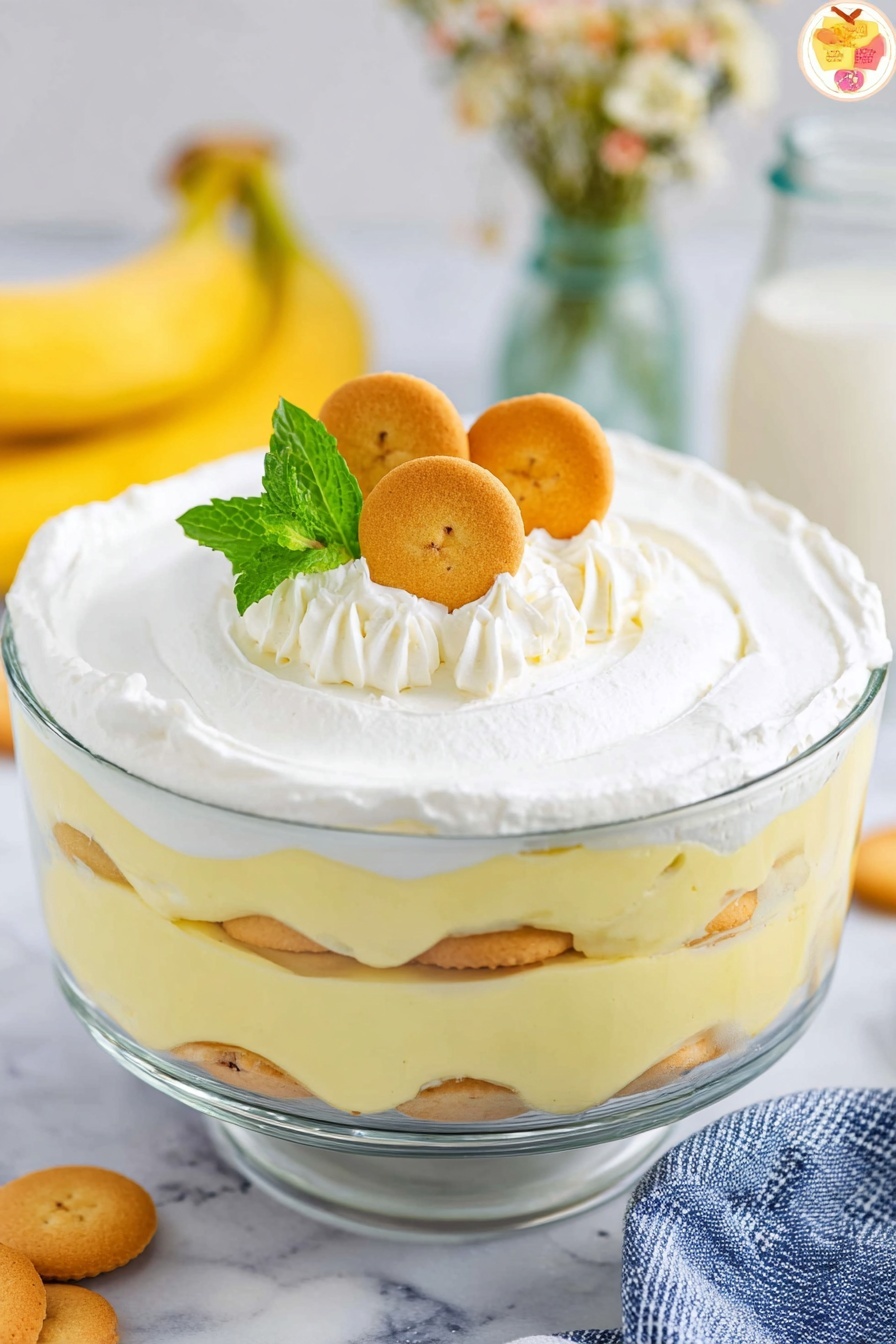
If you’re craving a dessert that feels like a warm hug and is ridiculously simple to whip up, you’re going to adore this Easy Banana Pudding Recipe. I absolutely love how this pudding combines creamy layers, fresh bananas, and buttery Nilla wafers into one luscious treat that’s perfect for any occasion. Whether you’re bringing it to a family gathering or just want a sweet fix at home, this recipe will quickly become your go-to because it’s fuss-free and fan-freaking-tastic.
Why You’ll Love This Recipe
- No-Cook Magic: This pudding comes together without any baking, making it super quick and easy.
- Creamy and Dreamy: The cream cheese and whipped topping blend creates the most luxuriously smooth texture.
- Perfect Banana Layers: Fresh bananas add brightness and natural sweetness, balancing every bite.
- Crowd-Pleaser: My family goes crazy for this — it’s always the first dessert to disappear!

Ingredients You’ll Need
You’ll find that these straightforward ingredients work in perfect harmony to give you that classic banana pudding flavor with a creamy, dreamy texture. I usually pick up the freshest bananas and make sure my cream cheese is at room temp for smoother mixing.
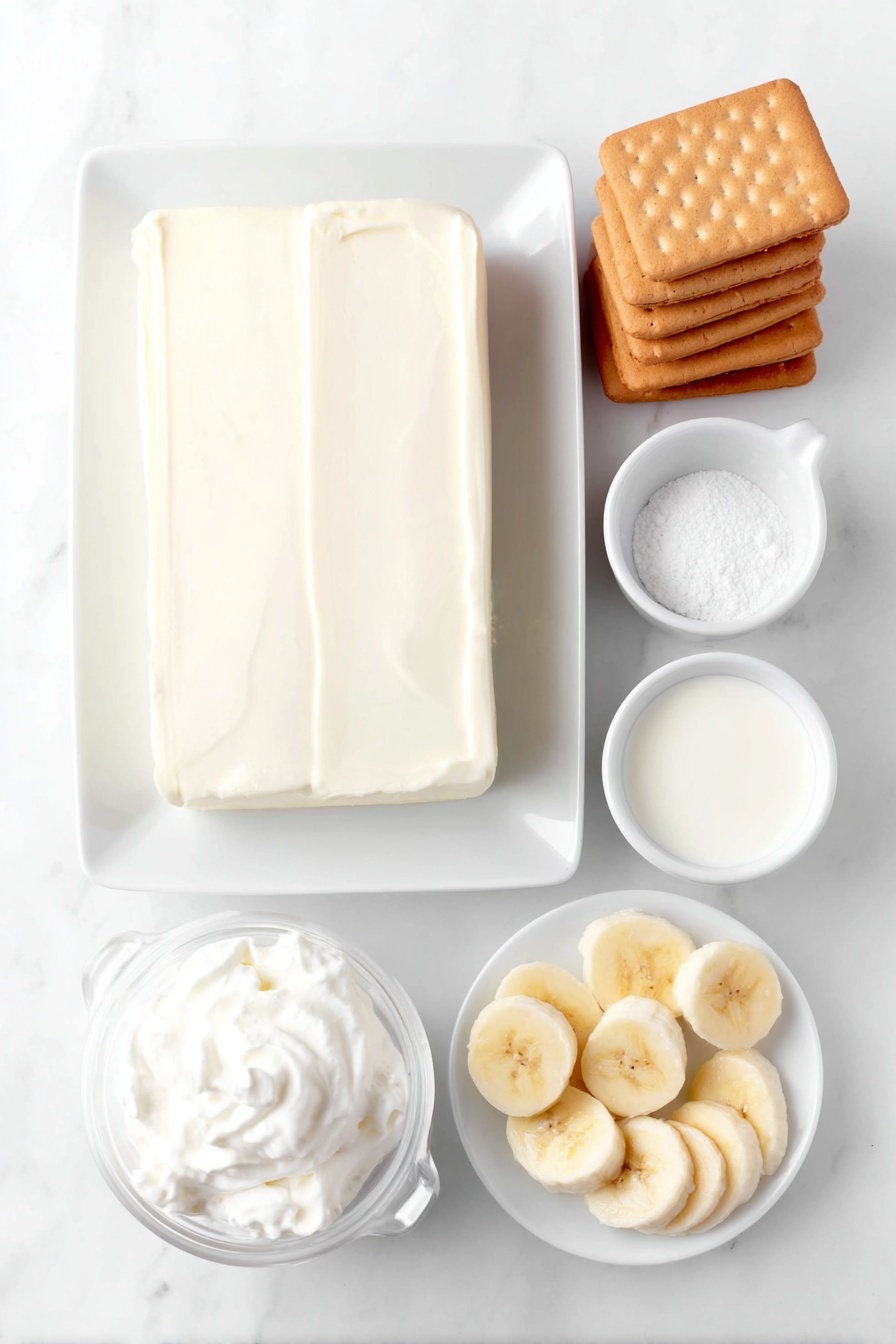
- Cream Cheese: Softened cream cheese is key to getting that rich, fluffy base without lumps.
- Sweetened Condensed Milk: This adds sweetness and creaminess without needing extra sugar.
- Instant Vanilla Pudding Mix: Using the larger package helps get just the right consistency and that classic vanilla flavor.
- Milk (2% or higher): Adds the necessary liquid to bring the pudding together; I find 2% milk gives the best balance of creaminess and lightness.
- Vanilla Extract: Enhances all the flavors – don’t skip it!
- Whipped Topping (Cool Whip): Thawed and divided, it lightens the pudding beautifully, giving each bite a cloud-like feel.
- Nilla Wafers: Classic and crunchy, they soften perfectly once layered and chilled.
- Bananas: Fresh, ripe bananas sliced evenly for that perfect sweet fruit layer.
Variations
While this Easy Banana Pudding Recipe is a classic for a reason, I love mixing things up to keep it fresh. You should definitely feel free to personalize yours depending on what you have around or dietary preferences.
- Chocolate Drizzle: Sometimes I add a drizzle of melted chocolate or sprinkle chocolate chips between layers – it’s a fun twist that my kids go nuts for.
- Fruit Mix-In: Substituting or adding sliced strawberries or blueberries makes it more colorful and adds a new flavor dimension.
- Dairy-Free Version: Swap out the whipped topping for coconut whipped cream and use a dairy-free pudding mix if you want to make it vegan-friendly.
- Extra Crunch: Toasting crushed Nilla wafers or adding chopped pecans gives an unexpected crunch that’s just divine.
How to Make Easy Banana Pudding Recipe
Step 1: Make Your Creamy Pudding Base
Start by beating the softened cream cheese with an electric mixer on medium speed until it feels smooth and fluffy – this is key for that lovely silky texture. Then, go ahead and add the sweetened condensed milk, instant vanilla pudding mix, milk, and vanilla extract. Mix everything until well combined. Finally, fold in half of the whipped topping gently to keep things light and airy.
Step 2: Layer Like a Pro
Grab a trifle dish, a large bowl, or a simple 9×13-inch baking dish to start your layering. Place about one-third of the Nilla wafers in an even layer at the bottom. Next, add a single layer of your sliced bananas—try to keep them uniform so they look as good as they taste! Then, pour one-third of your pudding mixture right over the bananas, making sure they’re nicely covered. Repeat this layering process two more times, finishing with the remaining whipped topping smoothed out across the top.
Step 3: Chill & Serve
Cover the pudding with plastic wrap and pop it into the fridge for at least one to two hours. This chill time lets the pudding thicken up beautifully and allows the wafers to soften just right—don’t skip this, or you’ll miss out on the perfect, melt-in-your-mouth texture!
Pro Tips for Making Easy Banana Pudding Recipe
- Soften Cream Cheese Properly: Let it sit at room temp for at least 30 minutes to avoid lumps in your pudding.
- Ripe but Firm Bananas: Choose bananas that are ripe but still firm—too ripe and they’ll turn mushy in the layers.
- Layer Evenly: Spread layers evenly so each bite has a perfect balance of wafers, pudding, and bananas.
- Chill Patience: Resist the urge to dig in immediately—letting it chill makes all the difference for ideal texture and flavor melding.
How to Serve Easy Banana Pudding Recipe

Garnishes
For garnishes, I love sprinkling a few crushed Nilla wafers or a light dusting of cinnamon on top just before serving. Sometimes, I add a few extra banana slices or a dollop of whipped cream on individual servings to make it extra special and Instagram-worthy.
Side Dishes
This pudding is a dessert all on its own, but if you’re serving it with a meal, it pairs wonderfully with light, summery dishes like grilled chicken or a fresh garden salad—keeps the meal feeling balanced and fresh without overdoing it on sweetness.
Creative Ways to Present
For a fun twist at parties, I’ve layered this Easy Banana Pudding Recipe in individual parfait glasses — guests love the personal touch. You can also use mason jars for grab-and-go convenience. Another trick I learned? Layer in clear dishes to show off those pretty layers; it almost looks too good to eat.
Make Ahead and Storage
Storing Leftovers
Leftovers keep well in the fridge if covered tightly with plastic wrap or stored in an airtight container. I usually enjoy mine within 2-3 days to ensure the bananas stay fresh and the wafers don’t get too soggy.
Freezing
I’ve tried freezing banana pudding, but honestly, the texture changes quite a bit—bananas tend to get mushy upon thawing. I’d recommend freezing just the pudding base without the bananas and wafers if you want to prep ahead, then assemble fresh when ready to serve.
Reheating
This dessert is best served cold, so reheating isn’t ideal. If you find yourself with leftovers, just give it a good stir after chilling and enjoy it straight from the fridge for the best flavor and texture.
FAQs
-
Can I use homemade pudding instead of instant vanilla pudding mix?
While homemade pudding is delicious, the instant pudding mix helps this Easy Banana Pudding Recipe set up quickly without cooking. Using homemade pudding might change the texture and require extra thickening or chilling time.
-
What’s the best way to keep bananas from browning in the pudding?
Using fresh bananas right before assembling is best. You can also toss the banana slices lightly in lemon juice to slow browning, but I find that assembling and chilling quickly works well enough.
-
Can I make this banana pudding gluten-free?
Absolutely! Swap the Nilla wafers for gluten-free cookies or crushed gluten-free cereal. Just make sure your pudding mix and other ingredients are gluten-free as well.
-
How long can I prepare the pudding ahead of time?
You can assemble it up to a day ahead and refrigerate. It actually tastes even better the next day as the flavors meld and wafers soften just right.
Final Thoughts
This Easy Banana Pudding Recipe holds a special place in my heart because it’s one of those desserts that everyone, from kids to grandparents, adores without fail. I love how the simple ingredients come together to create something so comforting and delicious with minimal effort. Seriously, I’m telling you—once you try making it, you’ll find yourself reaching for this recipe again and again. Give it a shot and share it with the ones you love. You won’t regret it!
Print
Easy Banana Pudding Recipe
- Prep Time: 25 minutes
- Cook Time: 0 minutes
- Total Time: 25 minutes
- Yield: 12 servings
- Category: Dessert
- Method: No-Cook
- Cuisine: American
Description
This Best Banana Pudding recipe is a creamy, no-cook dessert layering luscious vanilla pudding, sweetened condensed milk, cream cheese, fresh bananas, and crunchy Nilla wafers, topped with fluffy whipped topping. Perfectly chilled, it’s an easy, crowd-pleasing treat that combines smooth textures with delightful banana flavor in every bite.
Ingredients
Pudding Mixture
- 8 ounce block cream cheese, softened to room temperature
- 14 ounce can sweetened condensed milk
- 5 ounce package INSTANT vanilla pudding mix (larger box)
- 3 cups milk (2% or higher)
- 2 teaspoons vanilla extract
- 4 ounce whipped topping (COOL WHIP), thawed (half of the 8 ounce tub)
Assembly
- 8 ounce whipped topping (COOL WHIP), remaining half of 8 ounce tub
- 11 ounce box Nilla wafers, divided into thirds for layering
- 5-7 bananas, peeled and sliced, divided into thirds for layering
Instructions
- Prepare Cream Cheese Mixture: In a large bowl, beat the softened cream cheese using an electric mixer on medium speed until it becomes smooth and fluffy. This ensures a creamy base for the pudding.
- Add Liquid Ingredients: Add the sweetened condensed milk, instant vanilla pudding mix, milk, and vanilla extract to the bowl. Mix thoroughly until all ingredients are fully combined and the mixture starts to thicken slightly.
- Incorporate Whipped Topping: Gently fold in half of the thawed whipped topping to the pudding mixture. This adds lightness and creaminess to the filling.
- Layer the Pudding: In a trifle dish, large bowl, or 9×13-inch baking dish, place one-third of the Nilla wafers in an even layer at the bottom.
- Add Bananas: Arrange one-third of the sliced bananas over the wafer layer, ensuring an even distribution for consistent flavor in each bite.
- Add Pudding Mixture: Pour one-third of the prepared pudding mixture over the bananas, spreading gently to cover them completely.
- Repeat Layers: Continue layering wafers, bananas, and pudding mixture two more times, finishing with the pudding layer on top.
- Top with Whipped Topping: Spread the remaining whipped topping evenly over the final pudding layer for a smooth, creamy finish.
- Chill: Cover the dish tightly with plastic wrap and refrigerate for at least 1 to 2 hours. This chilling time thickens the pudding and softens the wafers to a perfect texture.
Notes
- This Banana Pudding is a no-cook recipe requiring no baking or stovetop cooking—easy and quick to assemble.
- Using instant vanilla pudding mix and sweetened condensed milk creates a creamy and rich pudding base.
- Allowing the pudding to chill helps thicken the filling and soften the wafers for ideal texture.
- You can adjust the number of bananas based on your preference, adding more or fewer slices in each layer.
- Use full-fat dairy products like 2% or higher milk and cream cheese for best flavor and texture.
Nutrition
- Serving Size: 1 serving
- Calories: 458 kcal
- Sugar: 54 g
- Sodium: 408 mg
- Fat: 14 g
- Saturated Fat: 8 g
- Unsaturated Fat: 6 g
- Trans Fat: 0 g
- Carbohydrates: 72 g
- Fiber: 1 g
- Protein: 10 g
- Cholesterol: 20 mg

