
If you’re craving a homemade treat that hits all the right notes of creamy peanut butter and rich chocolate, you’re absolutely going to adore this Easter Peanut Butter Chocolate Eggs Recipe. I love this because it’s simple to make yet feels so special and indulgent—the kind of candy that makes you smile with every bite. Trust me, once you try these peanut butter eggs, you’ll want to keep a stash handy for any season, not just Easter!
Why You’ll Love This Recipe
- Perfect Balance of Flavors: The creamy peanut butter center pairs flawlessly with the smooth chocolate coating.
- Easy to Make at Home: With just a few simple ingredients, you can craft these candies without any fancy equipment.
- Customizable Shapes and Sizes: You shape the eggs by hand, so you have total control over how big or small they are.
- Great for Gifting or Sharing: These candies look beautiful on a platter or wrapped up as a sweet homemade gift.

Ingredients You’ll Need
These ingredients come together to create a luscious peanut butter filling coated in silky chocolate. I like to use creamy peanut butter for that classic smooth texture, and good-quality chocolate really makes a difference for the coating.
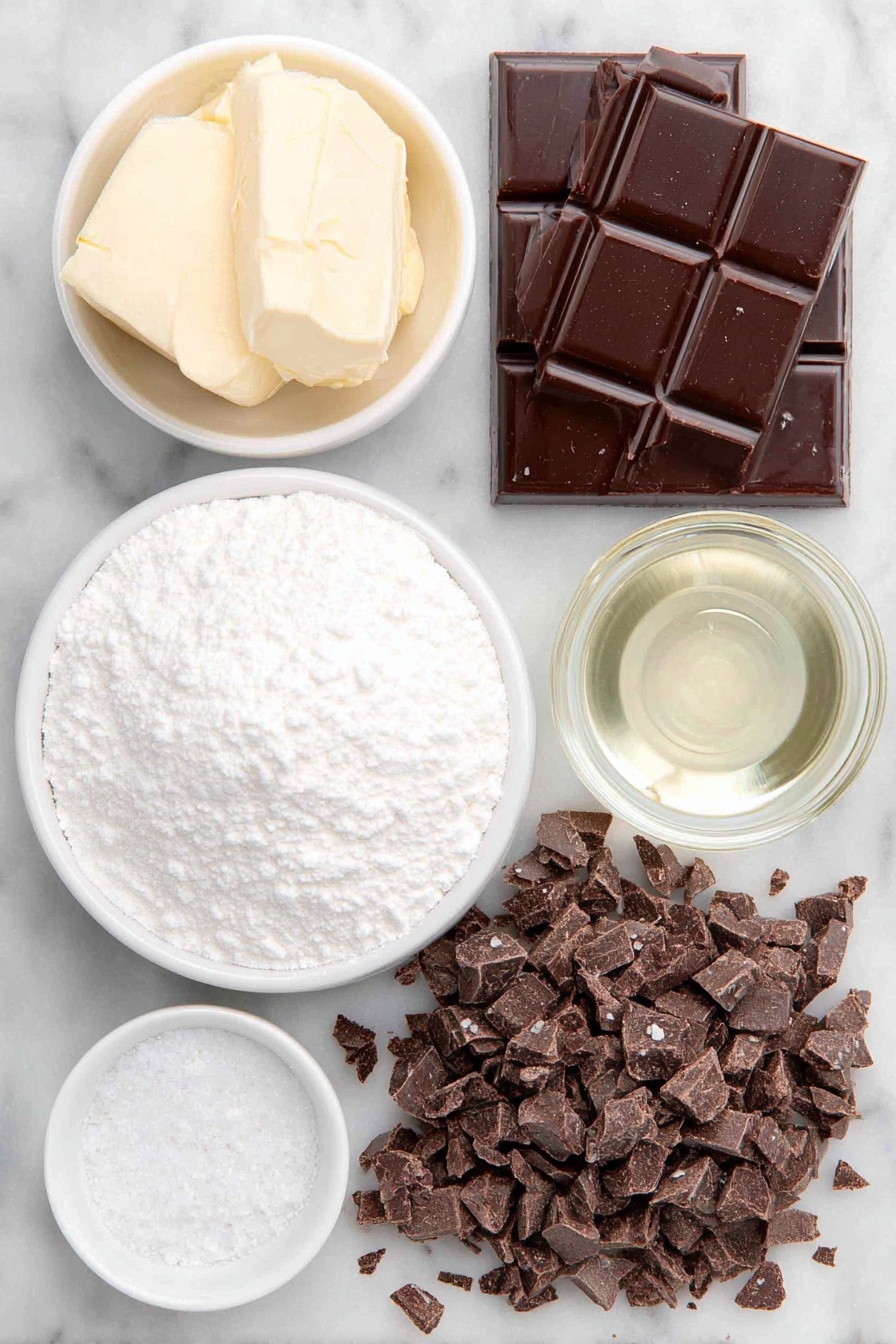
- Unsalted butter: Softened to room temperature for easy mixing and a creamy base in the filling.
- Creamy peanut butter (not natural style): This provides that smooth, classic peanut butter flavor and texture.
- Confectioners’ sugar: Helps sweeten and thicken the peanut butter mixture perfectly without any graininess.
- Pure vanilla extract: Adds a subtle depth of flavor to brighten up the filling.
- Salt: Just a touch to balance the sweetness and enhance flavors.
- Semi-sweet chocolate bars: Chopped for melting; choose a quality bar for smooth chocolate coating.
- Vegetable oil: A little helps the chocolate melt smoothly and coat evenly.
- Optional coarse sea salt or flaky sea salt: For a lovely finishing touch that contrasts with the sweetness.
Variations
I love how versatile this Easter Peanut Butter Chocolate Eggs Recipe is. Over time, I’ve experimented with slight tweaks to suit different tastes and dietary needs—you should definitely play around and find your favorite version!
- Use crunchy peanut butter: For a bit of texture inside the eggs, my family goes crazy for this crunchy twist.
- Dairy-free option: Swap the butter for coconut oil and use dairy-free chocolate for a vegan-friendly treat.
- Dark chocolate coating: If you like less sweetness, try using dark chocolate instead of semi-sweet—the rich bitterness pairs wonderfully with the peanut butter.
- Add festive sprinkles: Perfect for Easter or celebrations, topping your coated eggs with colorful sprinkles adds a fun pop of color.
How to Make Easter Peanut Butter Chocolate Eggs Recipe
Step 1: Prepare Your Peanut Butter Filling
Start by beating your softened butter on medium-high speed until creamy and smooth—about two minutes works great. Then add the peanut butter and continue mixing until everything’s blended together. Don’t worry if you see little butter chunks at first; they’ll smooth out as you mix. Next, add the confectioners’ sugar, vanilla extract, and salt, then beat on low speed for a couple of minutes until combined into a soft, slightly crumbly dough. I used to struggle with getting the filling too dry or crumbly, but mixing on low and not rushing this step really helps.
Step 2: Shape Your Peanut Butter Eggs
Now comes the fun part—you get to shape your eggs! Scoop about 1.5 tablespoons of the peanut butter mixture and roll it into a ball. Then flatten it gently and use your fingers to narrow one end, creating that classic egg shape. The mixture might feel crumbly, but your warm hands will bring it together nicely. If it gets too soft or sticky, pop it in the fridge for 15 minutes or dust your hands with confectioners’ sugar to keep things neat. I found chilling the mixture occasionally prevents it from becoming a gooey mess, which saved me a lot of frustration during my first attempts.
Step 3: Chill Before Coating
Place your shaped eggs on a baking sheet lined with parchment or a silicone mat. Refrigerate them for at least one hour or up to a whole day. This chilling step firms them up, making dipping easier. When they’re ready, you’ll start melting the chocolate while they rest in the fridge—the timing is key so the eggs don’t soften during dipping!
Step 4: Melt and Temper the Chocolate Coating
Gently melt your chopped chocolate and vegetable oil together in a double boiler or microwave. I like using a microwave, heating in 20-second bursts and stirring in between to avoid burning. Let the melted chocolate rest about 6 to 8 minutes to cool slightly—that ensures it won’t melt your eggs when you dip them. I discovered this trick after one too many peanut butter eggs turning into chocolate puddles, so it’s a must!
Step 5: Dip and Decorate Your Eggs
Take one peanut butter egg at a time and submerge it into the chocolate, then lift with a fork. Tap the fork on the side of the bowl to shake off excess chocolate, and carefully slide the coated egg onto your baking sheet. If the eggs soften too much while dipping, just pop them back into the fridge for 5–10 minutes to firm up again. If you have leftover chocolate, drizzle it artistically over the top or sprinkle with coarse sea salt or festive sprinkles while the coating is still wet. It’s such a nice touch that makes these candies feel extra special.
Step 6: Set and Chill One Last Time
After dipping, refrigerate the candies for about 30 minutes until the chocolate sets completely. Once firm, they’re ready to enjoy or package up for gifting. I usually stash a few in the freezer because they taste absolutely dreamy frozen!
Pro Tips for Making Easter Peanut Butter Chocolate Eggs Recipe
- Keep Your Filling Cool: If the peanut butter mixture feels too soft to handle, refrigerate it for a short time before shaping.
- Use a Liquid Measuring Cup for Dipping: The depth and shape make it easier to fully submerge eggs and reduce mess.
- Don’t Skip the Chocolate Cooling Time: Letting melted chocolate sit before dipping prevents losing the egg shapes.
- Work Quickly But Carefully: If eggs get too warm during dipping, chill them again to keep the coating crisp and neat.
How to Serve Easter Peanut Butter Chocolate Eggs Recipe

Garnishes
I usually keep it simple with a light dusting of flaky sea salt right after dipping, which adds a little crunch and brings out the chocolate flavor beautifully. During Easter, I love adding pastel-colored sprinkles or edible glitter to make these candies pop on the dessert table. It’s such a fun and festive touch that never fails to wow guests.
Side Dishes
These peanut butter eggs make a fantastic dessert or snack on their own, but I sometimes like to pair them with a simple fresh fruit salad or a cup of rich coffee. The fruit’s brightness balances the richness of the candies, and coffee complements the chocolate and peanut butter notes perfectly—trust me on this combo!
Creative Ways to Present
For Easter gatherings, I line a pretty box or basket with shredded pastel paper and nestle the eggs inside—it looks adorable and is great for gifting. Another fun presentation is to layer the peanut butter eggs between sheets of parchment on a decorative plate, with small sprigs of fresh mint or edible flowers for a spring vibe. These little touches elevate the homemade feel and make it clear you put love into the treat.
Make Ahead and Storage
Storing Leftovers
I store leftover peanut butter eggs in an airtight container in the refrigerator layered between parchment paper to prevent sticking. They stay fresh for up to two weeks this way. One thing I’ve learned is that these candies do soften a bit at room temperature, so they taste best when chilled or straight from the fridge.
Freezing
Freezing works wonderfully for these eggs! I place them in a single layer on a baking sheet to freeze initially, then transfer to a freezer-safe container. They last for months and are such a delightful frozen treat. Just pop one out whenever you need a quick sweet fix.
Reheating
Because these are candies, they don’t require reheating per se, but if your chocolate coating gets dull or soft, just let them come to room temperature for a bit or briefly set them back in the fridge to firm up. Avoid microwaving as it can melt the chocolate and mess with the texture.
FAQs
-
Can I use natural peanut butter for this recipe?
Natural peanut butter usually has more oils and a thinner consistency, which can make the filling too soft or greasy to shape properly. I recommend using creamy, regular peanut butter with added stabilizers for the best texture in this Easter Peanut Butter Chocolate Eggs Recipe.
-
How do I prevent the chocolate from melting the peanut butter eggs while dipping?
Let the melted chocolate sit for several minutes to cool slightly before dipping your peanut butter eggs. Also, make sure the eggs are well chilled before dipping. If your eggs start softening mid-dip, refrigerate them briefly and then continue. This keeps the shape intact and coating smooth.
-
What’s the best way to shape the eggs if the mixture is crumbly?
Warm your hands a bit and gently roll the mixture to bring it together. If it’s too soft or sticky, chill it in the fridge for 15 minutes, or dust your hands lightly with confectioners’ sugar to help prevent sticking and make shaping easier.
-
Can I add flavors to the peanut butter filling?
Absolutely! A splash of almond extract, cinnamon, or even a pinch of cayenne pepper can add an interesting twist. Just keep the additions subtle to maintain that classic peanut butter and chocolate balance in this Easter Peanut Butter Chocolate Eggs Recipe.
Final Thoughts
This Easter Peanut Butter Chocolate Eggs Recipe has become such a favorite in my kitchen because it’s both nostalgic and effortlessly impressive. Making these candies always reminds me of cozy family times in the kitchen, and the joy of sharing something homemade and delicious. I hope you enjoy making and eating these as much as I do—it’s a recipe you can feel good about, and one your friends and family will ask for again and again!
Print
Easter Peanut Butter Chocolate Eggs Recipe
- Prep Time: 1 hour 30 minutes
- Cook Time: 30 minutes
- Total Time: 2 hours
- Yield: 18 candies
- Category: Dessert
- Method: No-Cook
- Cuisine: American
Description
These Easter Egg Peanut Butter Candies feature a creamy peanut butter filling coated in smooth semi-sweet chocolate, perfect for a festive treat. The candies have a soft, sweet interior with a crisp chocolate shell, making them delightful for holiday celebrations or anytime you crave a homemade peanut butter chocolate confection.
Ingredients
Peanut Butter Filling
- 6 Tablespoons (85g) unsalted butter, softened to room temperature
- 1 cup (250g) creamy peanut butter (not natural style)
- 2 and 1/2 cups (300g) confectioners’ sugar
- 1/2 teaspoon pure vanilla extract
- 1/8 teaspoon salt
Chocolate Coating
- 12 ounces (3 4-ounce bars) semi-sweet chocolate bars (339g), coarsely chopped
- 1 teaspoon vegetable oil
- Optional: coarse sea salt or flaky sea salt, for topping
Instructions
- Prepare baking sheet: Line a large baking sheet with parchment paper or a silicone baking mat and set aside.
- Make the peanut butter mixture: Using a handheld or stand mixer fitted with a paddle attachment, beat the softened butter on medium-high speed until smooth and creamy, about 2 minutes. Add the creamy peanut butter and blend for 1 minute until fully combined, ignoring small butter chunks as they will smooth out. Add the confectioners’ sugar, vanilla extract, and salt, then beat on low speed for 2 minutes until the mixture is blended but slightly soft and crumbly.
- Shape the candies: Measure roughly 1.5 tablespoons (about 1 ounce or 29 grams) of the peanut butter mixture and roll into a ball. Flatten gently and shape into an egg about 3/4 inch thick by narrowing one end with your fingers. Place on the prepared baking sheet. Repeat with remaining mixture. If the mixture becomes too soft, chill for 15 minutes or powder hands with confectioners’ sugar.
- Chill peanut butter eggs: Refrigerate the shaped eggs for at least 1 hour and up to 1 day to firm up before dipping.
- Melt chocolate coating: Just before dipping, melt the chopped chocolate and vegetable oil together in a double boiler or microwave in 20-second increments, stirring after each, until smooth. Let the chocolate cool for 6–8 minutes to prevent melting the peanut butter eggs during dipping.
- Dip peanut butter eggs: Remove eggs from the fridge one at a time, submerge in chocolate, and lift out with a fork. Tap the fork on the bowl’s edge to remove excess chocolate. Use a toothpick or second fork to slide the candy off the fork onto the parchment-lined baking sheet. If eggs soften excessively while dipping, chill the tray for 5–10 minutes and continue.
- Optional decoration: Drizzle leftover melted chocolate over the candies, reheating if needed. While the chocolate is wet, sprinkle coarse or flaky sea salt or festive sprinkles on top.
- Set the coating: Refrigerate the coated candies for 30 minutes or until the chocolate is fully set.
- Store: Layer candies between parchment or wax paper and keep in an airtight container in the refrigerator for up to 2 weeks. These taste best chilled or frozen.
Notes
- Use creamy peanut butter (not natural style) for the best texture and flavor in the filling.
- Chilling the peanut butter eggs before dipping helps them hold their shape when coated with chocolate.
- Powdering your hands with confectioners’ sugar can prevent sticking while shaping the eggs.
- Leftover melted chocolate can be used for decorative drizzles over the candies.
- Store candies in the refrigerator and consume within two weeks for best quality.
- For easier dipping, use a liquid measuring cup for melting the chocolate as its depth helps with submerging the eggs.
Nutrition
- Serving Size: 1 candy (approx. 28g)
- Calories: 160
- Sugar: 14g
- Sodium: 90mg
- Fat: 11g
- Saturated Fat: 4g
- Unsaturated Fat: 6g
- Trans Fat: 0g
- Carbohydrates: 13g
- Fiber: 1g
- Protein: 4g
- Cholesterol: 15mg


