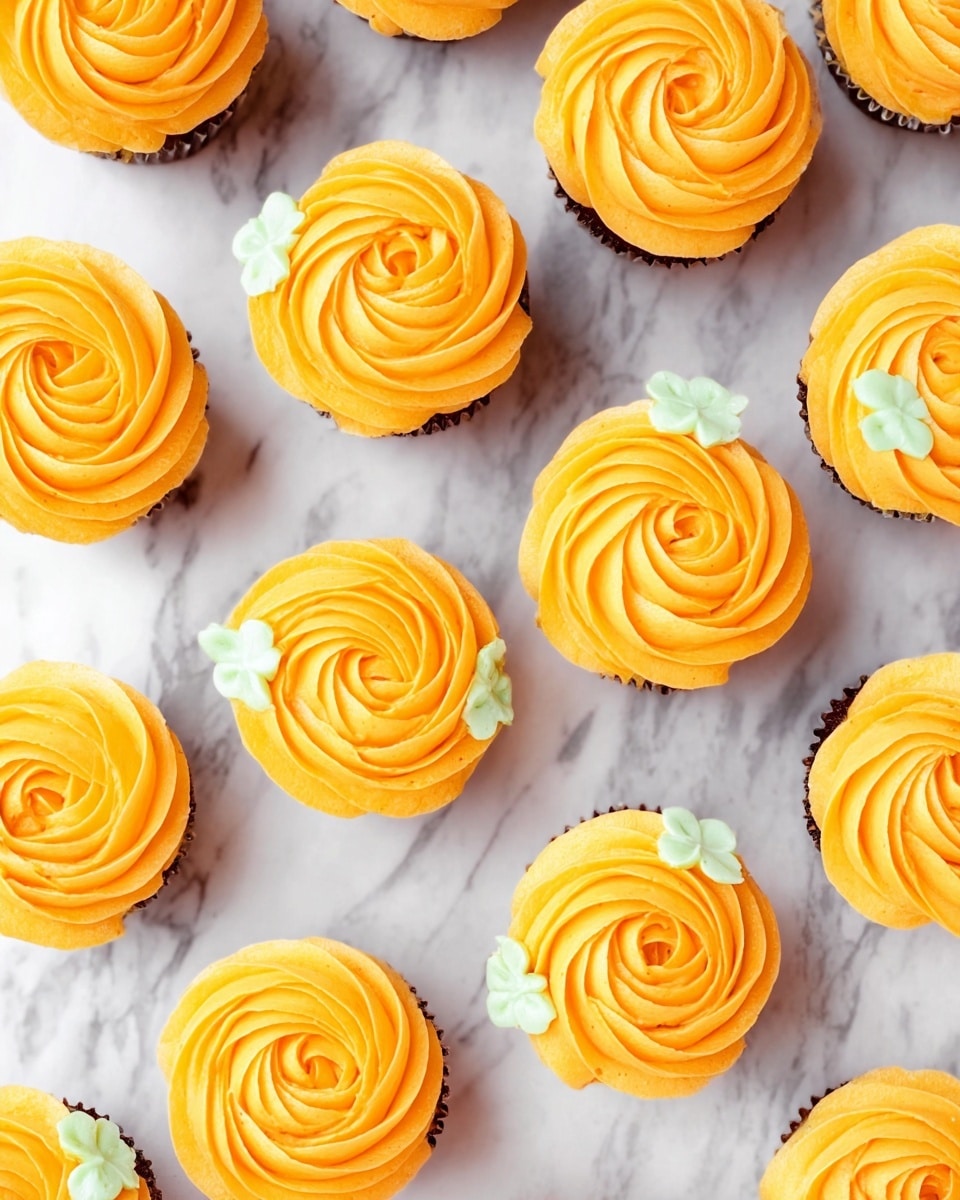
If you’re looking for a festive, fun treat that instantly brings the cozy vibes of fall right into your kitchen, this Decorated Pumpkin Cupcakes Recipe is exactly what you need. I absolutely love how these cupcakes transform with just a few simple decorating touches — they look like little pumpkins you could just pluck from a vine! Whether you’re whipping these up for a Halloween party, Thanksgiving, or just because pumpkin season calls for it, you’ll find that they’re as delightful to make as they are to eat.
Why You’ll Love This Recipe
- Simple Yet Stunning: With just a few decorating tricks, your cupcakes go from everyday to pumpkin patch perfect.
- Customizable: You can use your favorite cupcake recipe and frosting—this recipe is more about the fun decorating.
- Quick to Make: The decorating takes just minutes once your cupcakes are baked, perfect for last-minute celebrations.
- Family Favorite: My kids go crazy for these because they’re as pretty as they are tasty!

Ingredients You’ll Need
To make these adorable decorated pumpkin cupcakes, you’ll want to start with a cupcake base you love — it really makes a difference if the flavor complements pumpkin spice vibes. For the frosting, vanilla buttercream dyed with vibrant orange and green gel colors brings each cupcake to life. Here’s the rundown:
- Your favorite cupcake recipe: Whether it’s classic vanilla, spice, or even chocolate, pick the base that you and your crowd enjoy most.
- Vanilla buttercream: I recommend a smooth, creamy buttercream that holds shape well for piping those pretty swirls and leaves.
- Americolor Soft Gel Paste Electric Orange: This gel gives your pumpkin swirl that brilliant, rich orange color without watering down the frosting.
- Americolor Soft Gel Paste Avocado: For the pumpkin leaves, this green shade keeps things natural and fresh looking—plus it’s easy to build up color gradually.
Variations
I love encouraging folks to make this decorated pumpkin cupcakes recipe their own. Depending on your mood or pantry, there are so many ways to mix things up — from frosting flavor swaps to adding a little spice in the batter. Here are a few favorites I’ve tried that you might enjoy:
- Spiced Cupcakes: I once swapped my usual vanilla base for a pumpkin spice cupcake with cinnamon and nutmeg folded in — it was like autumn in a bite!
- Chocolate Pumpkin: Adding cocoa powder to the cupcake mix creates a delicious chocolate-pumpkin combo that’s unexpectedly amazing.
- Dietary Modifications: Using dairy-free buttercream or gluten-free cupcakes works just as well if you have allergies or preferences.
- Fun Toppings: Sometimes I sprinkle crushed graham crackers or toasted pumpkin seeds on top for a bit of crunch and extra flair.
How to Make Decorated Pumpkin Cupcakes Recipe
Step 1: Prepare Your Cupcakes
Start by baking your favorite cupcakes and letting them cool completely. I can’t stress this enough — frosting on warm cupcakes melts into a sad puddle. Give yourself plenty of time to cool or pop them in the fridge for a bit. Trust me, you’ll get those beautiful, distinct pumpkin swirls and leaves when your cupcakes are cool and ready.
Step 2: Color Your Buttercream
Divide your vanilla buttercream into two bowls. You’ll want about a cup for the green leaves and roughly five cups for the pumpkin-orange swirls, but adjust depending on how many cupcakes you’re decorating. Add the Americolor Avocado gel paste to the green portion, a few drops at a time, mixing until you get your ideal leaf shade. Repeat with the Orange gel paste for the pumpkin swirl, adding slowly until the color pops just right. I learned the hard way that you can always add more color, but it’s tricky to fix if you go overboard!
Step 3: Pipe the Pumpkin Swirls
Now for the fun part! Using a pastry bag fitted with a 1M open star tip, pipe an orange swirl shaped like a rose over the top of each cupcake. I found watching a quick video tutorial on how to frost a rose cupcake was a game-changer — it helped me get those layers looking just like a pumpkin’s ridges. Keep moving consistently and try not to over-pipe so your cupcakes don’t get too heavy.
Step 4: Add the Leaves
Switch to a smaller pastry bag fitted with a no.65 leaf tip for the leaves. Hold the tip close to the cupcake, apply even pressure while pushing outward, then slow the pressure to form the leaf’s tapering shape. I like piping two or three leaves per cupcake to balance that pumpkin swirl beautifully—adding just that touch of green that brings the whole design to life. Take your time here, and don’t be afraid to practice a few leaves on parchment first to get comfortable.
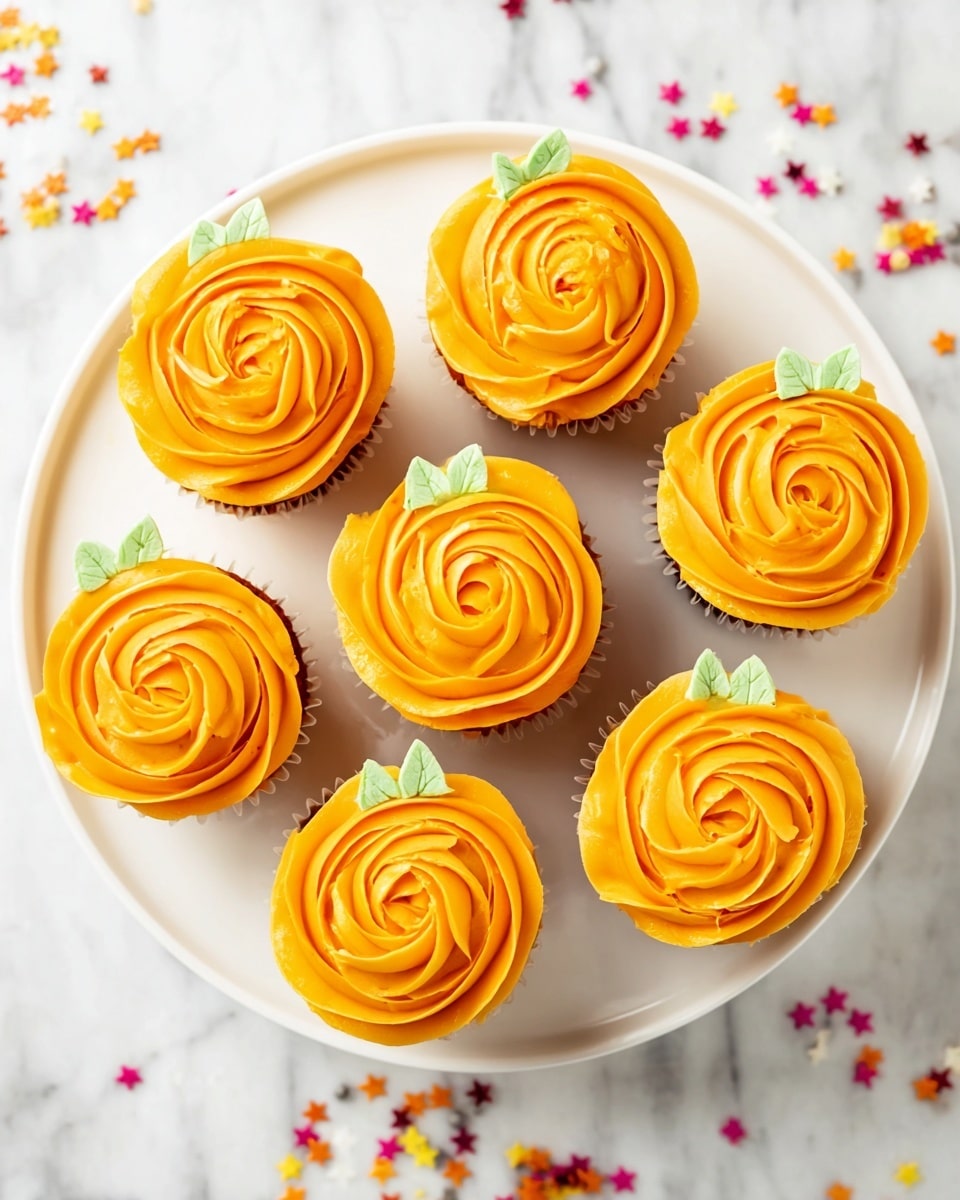
Step 5: Enjoy (or Share!)
Once all your cupcakes are dressed up and looking like the cutest pumpkins around, you can dig in or package them up for gifting. I love how these cupcakes immediately brighten any fall gathering—everyone’s eyes light up before they even take a bite!
Pro Tips for Making Decorated Pumpkin Cupcakes Recipe
- Cool Completely Before Frosting: I used to rush this step and ended up with melting frosting—cool cupcakes are key for crisp decoration.
- Build Color Slowly: Adding gel paste a few drops at a time means you won’t overdo it on color or waste frosting.
- Practice Leaf Piping: Making a few practice leaves on baking paper helped me feel confident before decorating the cupcakes.
- Use the Right Tips: The 1M star tip and #65 leaf tip create the perfect pumpkin swirl and leaf shape — nothing else quite matches!
How to Serve Decorated Pumpkin Cupcakes Recipe
Garnishes
For an extra little touch, I love dusting these cupcakes lightly with cinnamon or pumpkin pie spice — it adds a cozy aroma right before serving. Sometimes I tuck a tiny cinnamon stick or edible flower next to the leaves for that extra wow factor. Because the frosting is already vibrant, I keep the garnishes simple so nothing competes with the pumpkin design.
Side Dishes
These cupcakes are fantastic alongside a hot cup of chai tea, coffee, or warm apple cider. If serving at a party, I like pairing them with a light pumpkin or butternut squash soup for a true fall feast. They’re also great on a dessert table among nuts, caramel apples, or spiced cookies for a seasonal spread.
Creative Ways to Present
One year, I arranged them on a rustic wooden board surrounded by miniature pumpkins and autumn leaves for a centerpiece that guests kept asking about. Another time, I placed each cupcake in little burlap sacks tied with twine to give as party favors. You can also pipe a personalized message or add edible glitter for celebrations like Halloween or Thanksgiving dessert tables.
Make Ahead and Storage
Storing Leftovers
If you have leftovers, store the cupcakes in an airtight container in the fridge. That keeps the frosting fresh and the cupcakes moist. I usually let them come to room temperature before serving again so the buttercream softens up and tastes just like fresh.
Freezing
Freezing decorated cupcakes can be tricky, but I’ve had success freezing the cupcakes without frosting first. Simply freeze them wrapped tightly in plastic wrap and then store in a sealed bag. When you’re ready to enjoy, thaw completely and then pipe fresh buttercream and decorate. This way, your pumpkin swirls stay perfect and fluffy!
Reheating
I don’t recommend reheating decorated cupcakes in the microwave since the frosting might melt. Instead, bring refrigerated cupcakes to room temperature naturally, which takes about 20-30 minutes. This keeps frosting fluffy and the cupcake soft — perfect every time.
FAQs
-
Can I use store-bought cupcakes for the Decorated Pumpkin Cupcakes Recipe?
Absolutely! Using store-bought cupcakes works fine, especially if you’re short on time. Just make sure they’re fully cooled and fresh. The decorating steps still transform them into those adorable pumpkin cupcakes.
-
What if I don’t have Americolor gel paste for coloring?
You can certainly use other gel or paste food colorings that you trust, but I recommend gel over liquid coloring as it won’t thin out your buttercream. Just add color slowly to reach the perfect intensity.
-
How do I pipe the pumpkin swirl if I’m new to cake decorating?
Start by watching a simple tutorial on frosting a rose cupcake with a 1M star tip — this technique creates the rounded, swirled look you want. Practice on a plate or parchment first, and don’t worry if your first try isn’t perfect; it gets easier quickly!
-
Can I make the buttercream ahead of time?
Yes! Buttercream can be made a day or two ahead. Keep it covered and refrigerated, then bring it to room temperature and re-whip before coloring and piping for best texture.
Final Thoughts
This decorated pumpkin cupcakes recipe has become a favorite in my family for good reason: it’s easy, fun, and always results in smiles (and empty cupcake papers). I love how such a simple decorating trick turns everyday cupcakes into festive show-stoppers that everyone admires before devouring. Give it a try — you’ll enjoy the process, the colors, and, of course, the sweet pumpkin-y bites. Trust me, once you master these pumpkin cupcakes, they’ll be your go-to treat every fall!
Print
Decorated Pumpkin Cupcakes Recipe
- Prep Time: 10 min
- Cook Time: 0 min
- Total Time: 10 min
- Yield: 12 cupcakes
- Category: Dessert
- Method: No-Cook
- Cuisine: American
Description
Decorated Pumpkin Cupcakes are a festive fall treat featuring your favorite cupcake base adorned with vibrant orange and green buttercream. Using gel paste colors, the cupcakes are beautifully designed to resemble pumpkins with swirled orange frosting and piped green leaves, perfect for autumn celebrations or Halloween.
Ingredients
Cupcakes
- Your favorite cupcake recipe (quantity as desired)
Buttercream Frosting
- Vanilla buttercream (about 6 cups total)
- Americolor Soft Gel Paste Electric Orange (for orange frosting)
- Americolor Soft Gel Paste Avocado (for green leaves)
Instructions
- Divide and color buttercream: Separate your vanilla buttercream into two bowls—about one cup for the pumpkin leaves and approximately five cups for the pumpkin swirl. Add Americolor Soft Gel Paste Avocado to the smaller portion in drops, stirring continually until you achieve the desired green color for the leaves. To the larger portion, add Americolor Soft Gel Paste Electric Orange gradually, mixing well until a vibrant pumpkin orange hue is obtained.
- Pipe pumpkin swirls: Fit a pastry bag with a 1M open star decorating tip and fill it with the orange-colored buttercream. Pipe a rose swirl onto each cupcake by starting from the center and spiraling outwards, creating a raised, rounded pumpkin shape. Refer to the ‘How To Frost A Rose Cupcake’ video tutorial for detailed technique guidance. Continue until all cupcakes are frosted with the pumpkin swirl.
- Add pumpkin leaves: Fit another pastry bag with a #65 leaf decorating tip and fill it with the green buttercream. Apply even pressure while piping the leaves: begin at the base of the leaf, move the tip away gently while gradually releasing pressure to taper the leaf’s end. Pipe a couple of leaves onto each cupcake around the pumpkin swirl to finish the decoration. Repeat this for all cupcakes.
- Serve and enjoy: Once all cupcakes are decorated with the pumpkin swirls and leaves, serve immediately or store appropriately until ready to enjoy your festive fall treats.
Notes
- These decorated cupcakes bring the cozy, seasonal charm of a pumpkin patch right to your dessert table.
- Use gel paste colors gradually to avoid overly intense coloring and to get the perfect shade.
- The 1M star tip and #65 leaf tip are key to achieving professional-looking swirls and leaves.
- Video tutorials can significantly help beginners master the rose swirl technique.
Nutrition
- Serving Size: 1 cupcake
- Calories: 320
- Sugar: 30g
- Sodium: 150mg
- Fat: 18g
- Saturated Fat: 10g
- Unsaturated Fat: 6g
- Trans Fat: 0.2g
- Carbohydrates: 40g
- Fiber: 1g
- Protein: 3g
- Cholesterol: 50mg

