
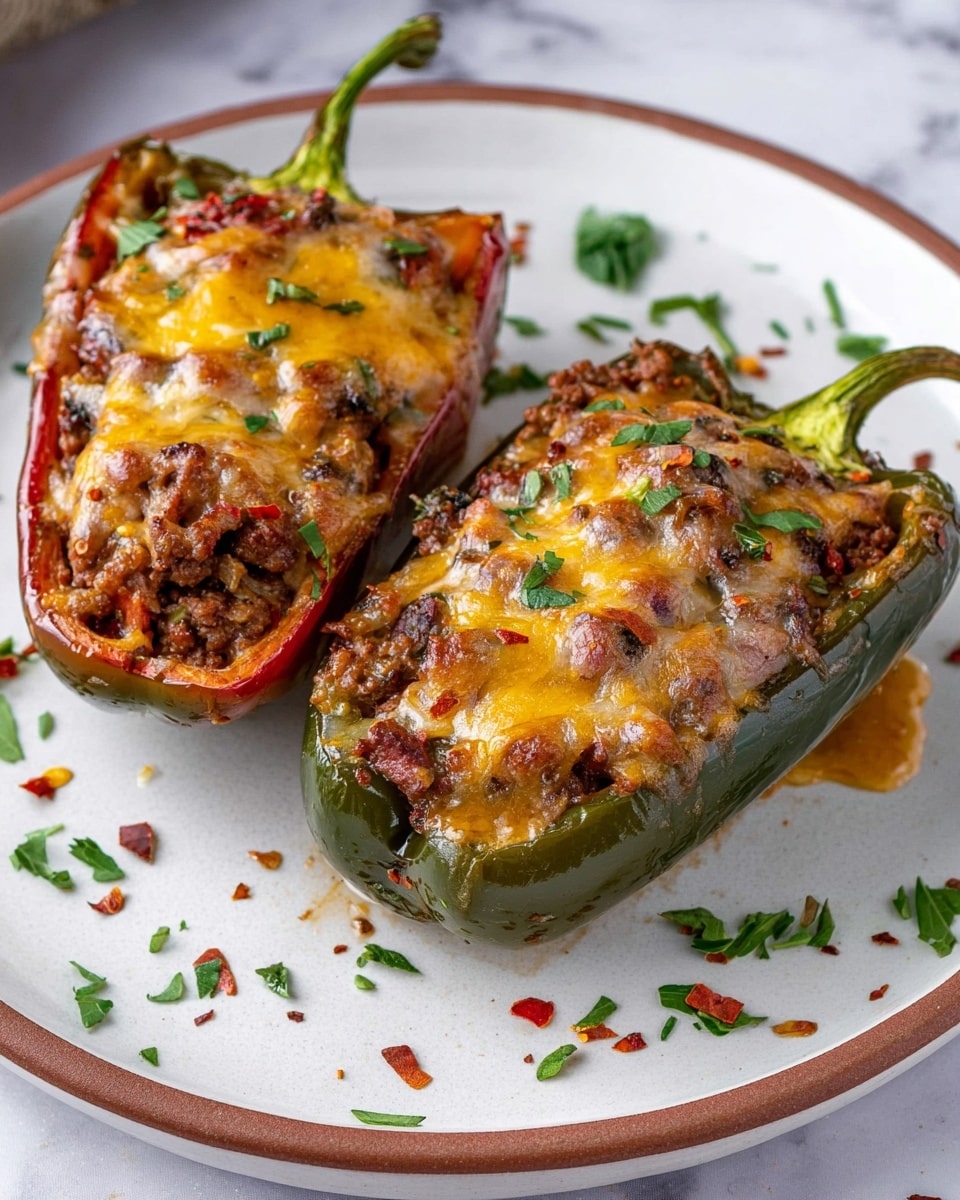
There’s something so comforting about a Classic Stuffed Bell Peppers Recipe that makes it a go-to family meal in my house. I love this recipe because it combines tender bell peppers with a savory, cheesy, well-seasoned meat and rice filling that’s just bursting with flavor. It’s a dish that feels both homey and special, great for cozy weeknights or even when you want to impress guests without too much fuss.
When I first tried this recipe, I was amazed at how versatile it is—you can tweak the filling with different proteins or add in whatever veggies you have on hand, and it still turns out fantastic. You’ll find that the balance of juicy roasted tomatoes and melty cheese makes the Classic Stuffed Bell Peppers Recipe a real winner that everyone will ask for again and again.
Why You’ll Love This Recipe
- Rich Flavor and Texture: The combination of seasoned meat, tender peppers, and melted cheese creates layers of deliciousness.
- Flexible Ingredients: Easily customizable with different proteins, cheeses, or spices to suit your taste and pantry.
- Family-Friendly Comfort: It’s a crowd-pleaser that works for kids and adults alike, perfect for weeknight dinners or batch cooking.
- Simple Prep and Bake: Minimal fuss with easy steps, plus you can prep ahead or freeze leftovers for convenience.

Ingredients You’ll Need
The ingredients for this Classic Stuffed Bell Peppers Recipe are simple but thoughtfully chosen to give you maximum flavor and texture. Each plays a key role, whether it’s the bright bell peppers creating a natural bowl or the blend of spices elevating the filling.
- Bell peppers: Use any color you like; they act as the perfect vessel and add a sweet crunch.
- Olive oil: Helps sauté the onions and garlic, adding a subtle richness.
- Ground beef: Classic choice for a hearty filling; you can swap for ground turkey or a plant-based alternative.
- Onion: Adds sweetness and depth when cooked down.
- Jalapeño pepper (optional): For a little zing; adjust based on your heat preference.
- Garlic: Brings aromatic warmth to the dish.
- Fire roasted tomatoes: Their smoky flavor really amps up the filling; you can substitute diced tomatoes too.
- Shredded cheese: I love pepper jack for a little kick, but cheddar or mozzarella works great too.
- Paprika, oregano, basil: These dried herbs and spices introduce cozy, familiar flavors.
- Salt and pepper: Essential to pull all the flavors together.
- Cooked rice: Helps bind the filling and adds satisfying texture.
Variations
I’ve played with this Classic Stuffed Bell Peppers Recipe in so many ways—trust me, you don’t need to stick rigidly to the original. Feel free to personalize it based on what you love or what’s in your fridge; that’s part of the fun.
- Vegetarian Option: Swap the ground beef for crumbled tofu or cooked lentils—I did this once and even my meat-loving husband was hooked!
- Spicy Kick: Add chopped chipotle peppers or use a smoky sausage to bring some extra heat and a smoky aroma.
- Grain Swap: Use quinoa or cauliflower rice instead of traditional rice for a lighter or gluten-free take.
- Cheese Variation: Try feta or goat cheese for a tangier flavor profile that adds a nice contrast to the sweet peppers.
How to Make Classic Stuffed Bell Peppers Recipe
Step 1: Prepare and soften your bell peppers
Start by washing your bell peppers and carefully cutting off the tops—save the tops because we’ll chop those up later for the filling. Scoop out all the seeds and membranes; this makes room for that delicious filling. I like to slice a tiny bit off the bottom if needed so the peppers stand up straight—this little trick really helps with even baking. Then, blanch the peppers in boiling water for about 5 minutes to soften them slightly without losing that perfect bite. You can also roast them for 20 minutes if you prefer a smokier taste.
Step 2: Make the flavorful filling
Heat olive oil in a large skillet over medium heat and toss in your chopped onions and the chopped pepper tops. If you’re using jalapeño, now’s the time to add it—for some mild heat that’ll wake up the dish. Cook these until they soften, about 5 minutes. Then stir in the garlic and cook just until fragrant, about 1 minute, being careful not to let it burn. Add the ground beef and break it up with your spatula, cooking until it’s no longer pink, about 5-6 minutes. Next, stir in the fire roasted tomatoes, paprika, oregano, basil, and don’t forget salt and pepper to taste. Finally, mix in the cooked rice and half of your shredded cheese until everything is combined beautifully.
Step 3: Stuff and bake
Place the softened peppers upright in a baking dish lightly coated with oil. I find using a baking dish with snug sides helps keep the peppers upright during baking. Stuff each pepper generously with the filling mixture, packing it gently. Top each one with the remaining shredded cheese—that golden layer will melt beautifully in the oven. Then bake at 425°F (220°C) for about 15-20 minutes. You’re looking for the peppers to be tender to your liking and the cheese to be bubbly and slightly browned around the edges.
Once done, let them cool for a few minutes so the filling settles and you don’t burn your mouth—always a crucial step I learned the hard way!
Pro Tips for Making Classic Stuffed Bell Peppers Recipe
- Don’t Skip Blanching: It softens the peppers just enough to cook evenly without becoming mushy.
- Use Fire Roasted Tomatoes: They add a smoky depth that makes the filling so much more interesting.
- Mix Cheese Into Filling: Stirring cheese into the meat mixture helps keep it moist and adds gooey goodness inside.
- Keep Peppers Upright While Baking: Use a snug baking dish or even a muffin tin for perfect shape retention.
How to Serve Classic Stuffed Bell Peppers Recipe
Garnishes
I always finish these stuffed peppers with a sprinkle of fresh chopped parsley for a pop of color and freshness. If you like a bit of heat, red pepper flakes are my go-to garnish—they add the right amount of kick without overpowering the dish. Sometimes I toss on a little extra shredded cheese right before serving for an extra melty surprise.
Side Dishes
This recipe pairs wonderfully with a simple green salad dressed with lemon vinaigrette or some garlicky sautéed greens like spinach or kale. For heartier meals, roasted potatoes or crusty bread work great to soak up all those juices. I’ve also served it alongside a light cucumber yogurt salad for a refreshing counterpoint.
Creative Ways to Present
For special occasions, I’ve carved out a small plate or shallow bowl and plated a stuffed pepper on a smear of tomato sauce, sprinkled with fresh herbs and a drizzle of good olive oil. Kids love when I cut the peppers into rings and serve them as “stuffed pepper bites” on a platter—fun and bite-sized! You can even make mini stuffed peppers for a party appetizer version.
Make Ahead and Storage
Storing Leftovers
I like to cool leftover stuffed peppers completely, then store them in airtight containers in the fridge. They keep well for up to 4 days, making great lunches or easy dinners throughout the week. Make sure to remove any excess moisture from peppers before storing to keep things from getting soggy.
Freezing
This recipe freezes beautifully! I usually freeze the stuffed peppers individually wrapped in foil or plastic wrap, placed inside a freezer bag. When I want a quick meal, I just thaw and reheat them—super convenient. You can also freeze the filling separately if you want to assemble fresh after thawing.
Reheating
To reheat, I preheat the oven to 350°F (175°C) and warm the stuffed peppers covered with foil for 15-20 minutes until heated through. If you’re pressed for time, the microwave works fine, but the oven keeps the peppers from getting too soggy and melts the cheese nicely again.
FAQs
-
Can I use other types of meat in the Classic Stuffed Bell Peppers Recipe?
Absolutely! Ground turkey, chicken, pork, sausage, and even plant-based proteins like tofu or lentils make excellent substitutes. Just adjust cooking times as needed and season accordingly to keep the same rich flavor.
-
How do I make the peppers more tender?
Blanching the peppers in boiling water for 5 minutes or roasting them before stuffing will soften them nicely. This step prevents the peppers from staying too firm or undercooked after baking.
-
Can I prepare Classic Stuffed Bell Peppers Recipe ahead of time?
Yes! You can prepare the filling and stuff the peppers a day in advance, then cover and refrigerate. When ready to serve, bake as usual, adding a few extra minutes to ensure they’re heated through.
-
What’s the best cheese to use?
For a classic flavor, cheddar or mozzarella works great. I personally love pepper jack for a little spicy kick. Feel free to mix cheeses or use whatever melts well at home.
Final Thoughts
This Classic Stuffed Bell Peppers Recipe has become a staple in my kitchen for so many reasons—it’s comforting, flexible, and always hits the spot. Whether you’re feeding your family a wholesome meal or making a batch to freeze for busy nights, this recipe delivers dependable deliciousness every time. I truly hope you give it a try and find as much joy in it as I do—sometimes the simplest recipes are the best kind of magic in the kitchen.
Print
Classic Stuffed Bell Peppers Recipe
- Prep Time: 15 minutes
- Cook Time: 35 minutes
- Total Time: 50 minutes
- Yield: 4 servings
- Category: Main Dish
- Method: Baking
- Cuisine: American
Description
This Classic Stuffed Peppers recipe features vibrant bell peppers filled with a savory mixture of ground beef, fire roasted tomatoes, rice, and cheese, baked to perfection. It’s a comforting and flavorful meal that can be customized with different proteins and cheese varieties, making it perfect for family dinners or meal prep.
Ingredients
Vegetables
- 4-6 bell peppers (any color – green, yellow, red, orange)
- 1 medium onion, chopped
- 1 jalapeno pepper, chopped (optional, for spicy)
- 5 cloves garlic, chopped
Meat and Dairy
- 1 lb (450g) ground beef (can substitute ground turkey, chicken, pork, sausage, tofu, or similar)
- 1 cup shredded cheese (cheddar, mozzarella, pepper jack, or blend)
Pantry Items
- 1 tablespoon olive oil
- 14.5 ounces fire roasted tomatoes (canned; or use diced tomatoes or tomato sauce)
- 1 cup cooked rice (white, brown, or wild rice)
- 1 tablespoon paprika
- 1 teaspoon dried oregano
- 1 teaspoon dried basil
- Salt and pepper to taste
For Garnish
- Fresh chopped parsley
- Red pepper flakes
Instructions
- Preheat Oven and Prepare Peppers: Preheat your oven to 425°F (220°C) and bring a pot of water large enough to cover the bell peppers to a boil.
- Clean and Cut Peppers: Wash the bell peppers, cut off the tops, and scoop out the seeds and membranes. To help them stand upright for baking, slice a small part off the bottom if needed. Chop the removed tops (excluding stems) to use later when cooking the filling.
- Blanch Peppers: Boil the prepared peppers in the water for 5 minutes to slightly soften. Alternatively, you may roast the peppers for 20 minutes if preferred. Then, place the softened peppers into a lightly oiled baking dish.
- Sauté Aromatics: Heat olive oil in a large pan over medium heat. Add the chopped onions, chopped bell pepper tops, and jalapeno if using. Cook for 5 minutes until softened.
- Add Garlic: Add the chopped garlic and cook for 1 minute until fragrant, stirring continuously to prevent burning.
- Cook Ground Beef: Add ground beef to the pan and cook for 5-6 minutes, breaking it apart with a spoon until cooked through and browned evenly.
- Combine Ingredients: Stir in the fire roasted tomatoes, paprika, dried oregano, dried basil, salt, pepper, and cooked rice. Mix well and remove from heat.
- Add Cheese to Filling: Stir in half of the shredded cheese until fully incorporated into the meat mixture.
- Stuff Peppers: Fill each softened pepper with the meat and rice mixture. Top each pepper with the remaining shredded cheese evenly.
- Bake: Roast the stuffed peppers in the preheated oven for 15-20 minutes, or until the peppers reach your desired tenderness and the cheese is melted and bubbly.
- Serve: Allow the peppers to cool slightly before garnishing with fresh chopped parsley and red pepper flakes. Serve warm and enjoy.
Notes
- Bell pepper sizes vary; you may need more or fewer peppers depending on size. Leftover filling freezes well for future meals.
- Worcestershire sauce adds a nice depth of flavor if you want to include it in the meat mixture.
- You can substitute the ground beef with ground turkey, chicken, pork, sausage, or even tofu for different dietary preferences.
- To soften the peppers without blanching, roasting for 20 minutes is an alternative method before stuffing.
Nutrition
- Serving Size: 1 stuffed pepper
- Calories: 534 kcal
- Sugar: 9 g
- Sodium: 419 mg
- Fat: 33 g
- Saturated Fat: 13 g
- Unsaturated Fat: 16 g
- Trans Fat: 1 g
- Carbohydrates: 29 g
- Fiber: 5 g
- Protein: 30 g
- Cholesterol: 103 mg


