
If you’re looking for a show-stopping dessert this holiday season, I can’t recommend this Christmas Tree Cake with Vanilla Buttercream Recipe enough. It’s festive, creamy, and just downright fun to make. When I first tried this, I was instantly hooked on how the fluffy vanilla buttercream pairs with the soft, buttery cake, all shaped into charming little Christmas trees. Trust me, whether you’re baking for family or a party, this cake brings that cozy holiday magic right to your table.
Why You’ll Love This Recipe
- Festive Presentation: Those adorable Christmas tree shapes instantly brighten up any holiday table.
- Classic Vanilla Flavor: The vanilla buttercream is rich and creamy but not overpowering, perfectly complementing the cake.
- Fun and Interactive: Assembling and decorating the trees is a delightful baking project you’ll enjoy from start to finish.
- Crowd-Pleaser: My family and friends go crazy for this cake every year—it’s a guaranteed holiday hit!

Ingredients You’ll Need
All the ingredients here come together to produce a moist, tender cake and a luscious vanilla buttercream frosting that holds its shape perfectly for decorating. I always make sure to use room temperature butter to get that dreamy, creamy texture in the buttercream.

- All Purpose Flour: Provides the perfect structure without being too dense or crumbly.
- Granulated Sugar: Sweetens the cake nicely without overpowering the vanilla notes.
- Baking Soda & Baking Powder: Helps the cake rise beautifully and stay soft.
- Salt: Just a pinch to balance sweetness and enhance flavor.
- Unsalted Butter: Use at room temperature for creaming and in buttercream for that rich texture.
- Egg Whites: They lighten the cake and help with that tender crumb.
- Sour Cream: Adds moisture and a slight tang that complements the sweetness.
- Vanilla Extract: The star flavor for both cake and buttercream.
- Whole Milk: Keeps the batter smooth and silky.
- Peppermint Extract (optional): Just a hint to give a festive twist if you like that cooling minty flavor.
- Confectioners Sugar: Essential for silky smooth buttercream.
- Heavy Whipping Cream: Added as needed to perfect buttercream consistency.
- Green Food Coloring: For the lovely Christmas tree green—you can also use natural color if you prefer!
- Ice Cream Cones: The base for building your Christmas tree cakes—they’re sturdy and add a whimsical touch.
Variations
I love customizing this Christmas Tree Cake with Vanilla Buttercream Recipe to suit different occasions or taste preferences. It’s such a flexible recipe—feel free to play around with extracts and decorations to make it your own.
- Chocolate Peppermint Cake: I swapped some flour for cocoa powder and added more peppermint extract once; the combination was a holiday miracle that my guests adored.
- Almond Buttercream: Adding a bit of almond extract to the vanilla buttercream gives a lovely nutty twist that’s subtle but delicious.
- Nut-Free Version: I keep the recipe nut-free by avoiding extracts with nuts and using allergy-friendly decorations—perfect for diverse crowds.
- Vegan Adaptation: I’ve experimented with plant-based butter and egg replacers to make a vegan version, which turned out surprisingly tasty and moist.
How to Make Christmas Tree Cake with Vanilla Buttercream Recipe
Step 1: Prepare Your Ingredients and Oven
First things first—preheat your oven to 350°F (175°C). Gather all your ingredients and make sure your butter is at room temperature for the creaming process. I always sift the dry ingredients together to keep the batter light and free of lumps, which really helps the cake texture.
Step 2: Mix the Cake Batter
Cream the unsalted butter with granulated sugar until the mixture is light and fluffy—a good 3-5 minutes with a stand mixer does the trick. Then, add your egg whites one at a time, beating well after each addition. Combine sour cream, vanilla, milk, and peppermint extract (if you’re using it), and slowly alternate adding your sifted dry ingredients with the wet mix to the butter mixture. Don’t overmix here; just combine until smooth and velvety.
Step 3: Bake the Cake Layers
Pour the batter evenly into greased and floured round pans or a pan of your choice for building the trees. Bake for about 30-35 minutes or until a toothpick comes out clean. I’ve found that rotating the pans halfway through baking helps ensure even cooking—especially if your oven has hot spots.
Step 4: Make the Vanilla Buttercream
While your cakes cool, whip up the vanilla buttercream. Beat the unsalted butter until smooth and creamy, then gradually add sifted confectioners sugar. Add vanilla extract and if your buttercream feels too thick to spread, beat in a tablespoon or two of heavy whipping cream to get that perfect fluffy, pipeable texture. Remember, patience here is key—beat it long enough for the icing to be silky.
Step 5: Assemble and Decorate Your Christmas Tree Cake
Now for the fun part! Use the ice cream cones as your tree trunks—coat each cone with a layer of green-tinted vanilla buttercream. I like to tint my buttercream with about five drops of green food coloring until it’s a vibrant tree green. Starting from the bottom of the cone, pipe ruffled layers going upward to mimic the look of pine branches. Use a piping bag fitted with a star tip for that texture. Sprinkle some edible glitter, colored sugar, or tiny sprinkles to mimic ornaments and snow. It really turns into a little winter forest on your plate.
Pro Tips for Making Christmas Tree Cake with Vanilla Buttercream Recipe
- Use Room Temperature Butter: It makes all the difference in getting a smooth, spreadable buttercream that pipes beautifully.
- Don’t Overmix the Batter: Overmixing can lead to a denser cake; mix just until ingredients are combined for tender results.
- Chill Cake Layers if Needed: If the cake is crumbly or warm, chilling before frosting helps keep crumbs at bay and makes assembly easier.
- Steady Hands for Piping: Take your time decorating the trees—steady, gentle pressure on the piping bag creates those lovely branches every time.
How to Serve Christmas Tree Cake with Vanilla Buttercream Recipe

Garnishes
I love finishing these cakes with a scattering of chopped nuts or crushed peppermint candies for a little crunch and extra festive flair. To give that snowy effect, a light dusting of powdered sugar or edible shimmer dust just before serving is perfect. Sometimes, I even add tiny star-shaped sprinkles on top—they look so adorable and really bring the trees to life.
Side Dishes
This cake pairs wonderfully with a hot cup of spiced hot chocolate or freshly brewed coffee. I’ve also served it alongside a bowl of cranberry sauce or warm mulled wine for that extra holiday cheer—you can’t go wrong!
Creative Ways to Present
One of my favorite presentation ideas is to arrange several Christmas tree cakes on a large, decorative platter placed on a layer of faux snow or cotton batting. Adding small string lights around the platter instantly makes your dessert table look magical. For a kid-friendly party, set up a decorating station where guests can personalize their own mini trees—kids love it!
Make Ahead and Storage
Storing Leftovers
I usually keep leftovers covered tightly in the fridge. The buttercream helps keep the cake moist overnight, but make sure to store the cake in an airtight container to prevent it from drying out or absorbing fridge odors.
Freezing
Freezing the cake layers before assembling works great if you want to prep ahead. Wrap each baked layer tightly in plastic wrap and foil, then thaw completely before frosting. I haven’t tried freezing fully decorated tree cakes—they look so pretty I usually gobble them up too quickly!
Reheating
Since it’s a butter-based cake, I don’t recommend reheating this Christmas Tree Cake. If the cake feels a bit firm after refrigeration, room temperature for 30 minutes is usually enough to bring back its softness and let the flavors shine.
FAQs
-
Can I make this Christmas Tree Cake with Vanilla Buttercream Recipe ahead of time?
Absolutely! You can bake the cake layers a day or two in advance and refrigerate them well wrapped. Prepare the buttercream and assemble the day you want to serve for the freshest look. You can even freeze the layers before assembly for longer storage.
-
What if I don’t have ice cream cones to build the trees?
No worries! You can form tree shapes by stacking and carving layers of cake or use sturdy waffle cones as an alternative. The key is to have a stable base to pipe your buttercream onto, so get creative!
-
How do I get the buttercream to a good piping consistency?
Use room temperature butter for easy whipping, and add confectioners sugar slowly. If it feels too thick or stiff, beat in a tablespoon of heavy cream at a time until it’s smooth and pipeable. Conversely, if too loose, add more powdered sugar.
-
Can I make this cake dairy-free?
Yes! Substitute dairy butter with a non-dairy butter alternative and use plant-based milk and cream. Egg whites can be replaced with aquafaba if you’re aiming for a vegan version. Just adjust baking times as needed.
Final Thoughts
This Christmas Tree Cake with Vanilla Buttercream Recipe really holds a special place in my holiday baking routine. It’s one of those desserts that’s both a treat and a centerpiece thanks to its charming design and delicious flavor. I love how approachable the recipe is, yet it delivers that festive wow-factor every time. If you want to impress your guests and get everyone into the holiday spirit, I encourage you to give this recipe a try—you might just find it becomes your family’s new favorite tradition, too!
Print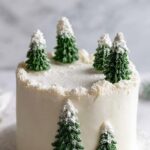
Christmas Tree Cake with Vanilla Buttercream Recipe
- Prep Time: 40 min
- Cook Time: 35 min
- Total Time: 75 min
- Yield: 8 servings (8 slices)
- Category: Dessert
- Method: Baking
- Cuisine: American
Description
This Christmas Tree Cake is a festive and delightful vanilla cake layered with creamy vanilla buttercream, decorated with charming Christmas tree-shaped cones to create a winter wonderland centerpiece for your holiday celebrations. The moist cake combined with the smooth, rich frosting and the peppermint hint makes it a perfect holiday treat.
Ingredients
Cake Ingredients
- 1 2/3 cups all purpose flour (213g)
- 1 cup granulated sugar (200g)
- 1/4 tsp baking soda (1g)
- 1 tsp baking powder (3g)
- 1/4 tsp salt (1g, heaping, optional)
- 3/4 cup unsalted butter (176g, room temperature)
- 3 egg whites
- 1/2 cup sour cream (120g)
- 1 tbsp vanilla extract (15mL)
- 1/2 cup whole milk (120mL)
- 1/2 tsp peppermint extract (optional, 2.5mL)
Buttercream Frosting Ingredients
- 1.5 lb confectioners sugar (680g)
- 1 lb unsalted butter (454g)
- 1-2 tbsp heavy whipping cream (if needed for consistency)
- 1 tsp vanilla extract (5mL)
- 5 drops green food coloring (for decorating the trees)
- 12 ice cream cones (for Christmas tree shapes)
Instructions
- Prepare the Cake Batter: In a large mixing bowl, sift together the all-purpose flour, baking soda, baking powder, and salt. In a separate bowl, cream the unsalted butter and granulated sugar until light and fluffy. Add the egg whites one at a time, mixing well after each addition. Combine the sour cream, vanilla extract, peppermint extract (if using), and milk; gradually add this mixture to the creamed butter and sugar, alternating with the dry ingredients until well incorporated.
- Bake the Cake: Preheat your oven to 350°F (175°C). Grease and flour your cake pans. Pour the batter evenly into the pans and bake for approximately 30-35 minutes or until a toothpick inserted in the center comes out clean. Remove from the oven and let cool completely on wire racks.
- Make the Vanilla Buttercream Frosting: In a large bowl, beat the unsalted butter until creamy. Gradually add the confectioners sugar, mixing on low speed until combined. Add the vanilla extract and continue to beat on medium-high speed until fluffy and smooth. If the consistency is too thick, add 1-2 tablespoons of heavy whipping cream to reach the desired consistency.
- Color the Frosting: Separate a small portion of the buttercream and mix in the green food coloring thoroughly to create the frosting for the Christmas tree decorations.
- Assemble the Cake: Level the cooled cake layers if needed. Spread a layer of vanilla buttercream on the bottom layer, then place the next cake layer on top and repeat until all layers are stacked. Cover the entire cake with a thin crumb coat of frosting and chill for 15-20 minutes. Then apply a smooth layer of vanilla buttercream all over the cake for the final finish.
- Decorate with Christmas Tree Cones: Frost the 12 ice cream cones with the green-colored buttercream, piping in a zigzag or leaf pattern to mimic the look of pine trees. Arrange the decorated cones around the cake or on top to form a beautiful display resembling a Christmas forest.
- Final Touches: Chill the cake in the refrigerator for at least 30 minutes before serving to allow the buttercream to set. Serve slices and enjoy your festive Christmas Tree Cake!
Notes
- A delicious vanilla Christmas tree cake with creamy, dreamy vanilla buttercream, covered with beautiful Christmas trees that turn this cake into a winter wonderland.
- You can adjust the peppermint extract to taste or omit it for a pure vanilla flavor.
- If frosting is too stiff, adjust with heavy cream one tablespoon at a time to get the perfect consistency for decorating.
- Make sure the cake layers are completely cool before frosting to prevent melting.
- Ice cream cones can be substituted with sugar cones if preferred.
Nutrition
- Serving Size: 1 slice
- Calories: 330 kcal
- Sugar: 31 g
- Sodium: 250 mg
- Fat: 17 g
- Saturated Fat: 5 g
- Unsaturated Fat: 10 g
- Trans Fat: 0 g
- Carbohydrates: 39 g
- Fiber: 0.5 g
- Protein: 3 g
- Cholesterol: 40 mg


