
If you’re anything like me and love a combo of rich chocolate and creamy peanut butter, then you’re in for a treat with this Chocolate Peanut Butter Cottage Cheese Ice Cream Bars Recipe. It’s one of those surprisingly simple yet seriously satisfying desserts that feels indulgent but sneaks in some extra protein thanks to the cottage cheese. Trust me, these bars are fan-freaking-tastic — creamy, chocolaty, and with just the right crunch on the outside. Keep reading and I’ll walk you through every step so you can make them perfectly at home.
Why You’ll Love This Recipe
- Creamy & Protein-Packed: The cottage cheese adds a smooth texture and a boost of protein without feeling heavy.
- No Ice Cream Maker Needed: You can whip these bars up using just a blender and molds—super simple!
- Perfect Chocolate-Peanut Butter Duo: The cocoa and peanut butter blend together beautifully for a classic flavor combo.
- Customizable Toppings: Get creative with nuts, sprinkles, or chocolate coatings for that extra wow factor.

Ingredients You’ll Need
Each ingredient in this Chocolate Peanut Butter Cottage Cheese Ice Cream Bars Recipe plays a delicious role, from the tangy cottage cheese balancing the sweetness to the cocoa powder giving it just the right chocolate punch. I always recommend using natural peanut butter—no added sugar or oil—so the flavors stay fresh and wholesome.

- Cottage Cheese: Choose your favorite variety, but I find whole-milk types make it creamier.
- Maple Syrup: Its natural sweetness blends smoothly; honey works well too if you prefer.
- Vanilla: Adds depth and rounds out the flavors beautifully.
- Salt: Just a dash enhances the chocolate and balances sweetness.
- Natural Peanut Butter: Stir it well before measuring to keep the oils mixed in.
- Cocoa Powder: Unsweetened cocoa gives that rich chocolate flavor without extra sugar.
- Peanuts: Chopped for crunch and that nutty hit.
- Chocolate Sprinkles: For a fun texture and visual appeal.
- Chocolate Chips: I love Hu No Added Sugar chocolate chips because they melt smoothly and taste great.
Variations
I love that this Chocolate Peanut Butter Cottage Cheese Ice Cream Bars Recipe is super flexible. You can tweak it based on what you have on hand or dietary preferences. Play around with flavors and toppings—you’ll discover your own signature version in no time.
- Nut-Free Version: Swap the peanut butter for almond or sunflower seed butter; my niece with allergies still loved it!
- Dairy-Free Alternative: Try using a plant-based cottage cheese substitute and coconut-based chocolate chips for a vegan-friendly treat.
- Extra Crunch: Add chopped pretzels or granola into the base before freezing for texture surprises.
- Flavor Boost: Add a pinch of cinnamon or a splash of espresso for a grown-up twist I discovered last winter.
How to Make Chocolate Peanut Butter Cottage Cheese Ice Cream Bars Recipe
Step 1: Blend the Creamy Chocolate-Peanut Butter Base
Start by combining the cottage cheese, cocoa powder, maple syrup, vanilla, and salt in a blender or food processor. I often use the cup from my Nutribullet—it’s quick and easy! Blend everything until it’s completely smooth; this is key because cottage cheese can be a little lumpy if not blended well. If you’re using an immersion blender, make sure to swirl thoroughly to get that velvety texture. This step always amazes me because it transforms simple ingredients into luscious, creamy goodness.
Step 2: Pour Into Popsicle Molds and Freeze
Next, pour the blended mixture into your popsicle molds. My favorite are silicone molds because they make it super easy to pop the bars out later without any battles. Insert the sticks, cover, and pop the molds into the freezer for about 3 to 4 hours, until fully set. Patience is key here—I’ve learned that rushing leads to icy bars, so let them freeze completely for the best creamy texture.
Step 3: Melt Chocolate and Prep Toppings
When the bars are set, it’s time to make that dreamy chocolate coating. Combine your chocolate chips with a little coconut oil in a microwave-safe bowl. Heat for 30 seconds, then stir gently. Pop it back in for another 30 seconds and stir again until smooth. This double heating method really helps avoid burning the chocolate—a little trick I discovered after trying to melt it all at once.
Step 4: Dip and Decorate Your Ice Cream Bars
Here comes the fun part! Remove a frozen bar from the mold and quickly dip it into the melted chocolate, letting the excess drip off. Immediately shake it over chopped peanuts and chocolate sprinkles — this step adds that irresistible crunch and visual flair. Then, set the finished bars on parchment paper to let the coating harden. You can enjoy them as soon as the chocolate firms up or keep them frozen for a later treat.
Pro Tips for Making Chocolate Peanut Butter Cottage Cheese Ice Cream Bars Recipe
- Smooth Blend Is Key: Take your time blending so there are no lumps in the cottage cheese for the creamiest bars.
- Freeze Completely Before Dipping: Dipping bars that aren’t fully frozen makes the chocolate coating messy and uneven.
- Use Coconut Oil in Chocolate: It thins the chocolate, helping it coat the bars in a nice, even layer and harden quickly.
- Quick Work After Dipping: Hurry to add nuts and sprinkles before the chocolate sets to get an even coating.
How to Serve Chocolate Peanut Butter Cottage Cheese Ice Cream Bars Recipe

Garnishes
I like topping these bars with extra crushed peanuts and chocolate sprinkles for texture and visual appeal, but sometimes I swap in toasted coconut flakes or a light dusting of sea salt for a salty-sweet pop. Honestly, these garnishes not only look pretty but add layers of flavor you’ll love.
Side Dishes
Since these bars are a sweet treat on their own, I usually serve them alongside fresh berries or a small fruit salad. Sometimes I pair them with a hot cup of coffee or herbal tea to balance the richness—which makes a great after-dinner combo in my book.
Creative Ways to Present
For special occasions, I’ve dipped these bars in different types of chocolate—white, dark, or even caramel-flavored. Wrapping each bar in colorful parchment paper and tying with a ribbon turns them into adorable edible gifts. It’s a simple trick that always impresses friends and family!
Make Ahead and Storage
Storing Leftovers
I store leftover bars in an airtight container lined with parchment paper to prevent sticking and keep them fresh. Because of the cottage cheese base, I try to eat them within a week for the best texture and flavor.
Freezing
Freezing these bars works wonderfully; just keep them well-covered to avoid freezer burn. I’ve found that silicone molds help with easy portioning, and you can pop them straight from freezer to chocolate dip without any issues.
Reheating
Because these bars are best served cold, reheating isn’t necessary, but if the bars have become icy, let them thaw at room temperature for 5-10 minutes to soften up before enjoying that creamy texture again.
FAQs
-
Can I use regular ice cream instead of cottage cheese in this recipe?
This recipe specifically leverages cottage cheese to achieve its creamy texture and boost protein content without heavy cream. Using regular ice cream would alter both the nutrition and texture quite a bit, so it’s best to stick with cottage cheese or a suitable dairy alternative for similar results.
-
What if I don’t have popsicle molds?
No worries! You can pour the mixture into a small baking dish and freeze, then scoop out portions like ice cream. Alternatively, you can use small paper cups with wooden sticks, but silicone molds really make the process easier and neater.
-
Why do my bars get icy sometimes?
Icy texture often happens if the bars are frozen too long or if the mixture wasn’t blended smooth enough. Try blending thoroughly and enjoy the bars within a few hours of freezing for the best creamy consistency. Letting them thaw for a few minutes before eating also helps soften them up perfectly.
-
Can I make these bars ahead for a party?
Absolutely! These bars can be made a day or two in advance and stored in the freezer. Just dip them in chocolate right before serving to keep the coating crisp and fresh.
Final Thoughts
I absolutely love how this Chocolate Peanut Butter Cottage Cheese Ice Cream Bars Recipe turns out every single time. It’s become a favorite treat in my house, perfect for those moments when you want something both delicious and a little nourishing. I love sharing it with friends because it always surprises them how creamy and indulgent it feels while being so simple and wholesome underneath. So go ahead, give it a try—you’ll thank yourself for making this at home!
Print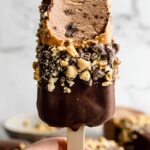
Chocolate Peanut Butter Cottage Cheese Ice Cream Bars Recipe
- Prep Time: 10 minutes
- Cook Time: 0 minutes
- Total Time: 4 hours 10 minutes
- Yield: 4 bars
- Category: Dessert
- Method: Freezing
- Cuisine: American
- Diet: Low Fat
Description
Delight in these creamy and nutritious Chocolate Peanut Butter Cottage Cheese Ice Cream Bars, blending the richness of peanut butter and cocoa with the smoothness of cottage cheese, sweetened naturally with maple syrup. Perfect for a refreshing, homemade frozen treat without the need for an ice cream maker.
Ingredients
Main Ingredients
- 1-1/4 cup cottage cheese (any variety)
- 2 tablespoons maple syrup (or honey)
- 1 teaspoon vanilla extract
- dash salt
- 1 tablespoon natural peanut butter
- 1 tablespoon cocoa powder
Toppings and Coating
- 2 tablespoons peanuts (chopped)
- 1 tablespoon chocolate sprinkles
- 1/2 cup chocolate chips (Hu No Added Sugar preferred)
- 1 tablespoon coconut oil (for chocolate coating)
Instructions
- Blend the Base: Combine the cottage cheese, cocoa powder, maple syrup, vanilla extract, natural peanut butter, and a dash of salt in a blender or Nutribullet cup. Blend until smooth and creamy, ensuring no lumps remain.
- Pour into Molds: Pour the blended mixture into silicone popsicle molds. Insert popsicle sticks and cover the molds with their silicone lids to prevent freezer odors.
- Freeze the Bars: Place the molds in the freezer for 3-4 hours or until the ice cream bars are completely set and firm.
- Prepare the Chocolate Coating: In a microwave-safe bowl, combine the chocolate chips and coconut oil. Heat for 30 seconds, stir gently, then heat for another 30 seconds. Stir thoroughly until smooth and melted.
- Dip and Decorate: Pour chopped peanuts and chocolate sprinkles each onto separate small plates. Remove a frozen bar from its mold, dip it into the melted chocolate coating, shake off excess chocolate, and quickly roll it in chopped peanuts and chocolate sprinkles before the chocolate hardens.
- Set the Coating: Place the coated popsicles on parchment paper to allow the chocolate to harden. You can enjoy them immediately or return them to the freezer for later.
- Serving Tip: For a softer, creamier texture, allow the ice cream bars to thaw for 5-10 minutes after freezing to reduce iciness before serving.
Notes
- Use silicone popsicle molds for easy pouring and removal of the ice cream bars.
- The cottage cheese base results in a protein-rich, creamy texture without the need for an ice cream maker.
- Allow thawing for a few minutes post-freezing for a softer, less icy consistency.
- Substitute honey for maple syrup if preferred.
- Hu No Sugar Added Chocolate Chips are recommended for healthier chocolate coating options.
- Store remaining bars in the freezer in an airtight container to preserve freshness.
Nutrition
- Serving Size: 1 bar
- Calories: 300 kcal
- Sugar: 18 g
- Sodium: 209 mg
- Fat: 16 g
- Saturated Fat: 8 g
- Unsaturated Fat: 3 g
- Trans Fat: 0 g
- Carbohydrates: 13 g
- Fiber: 5 g
- Protein: 11 g
- Cholesterol: 11 mg


