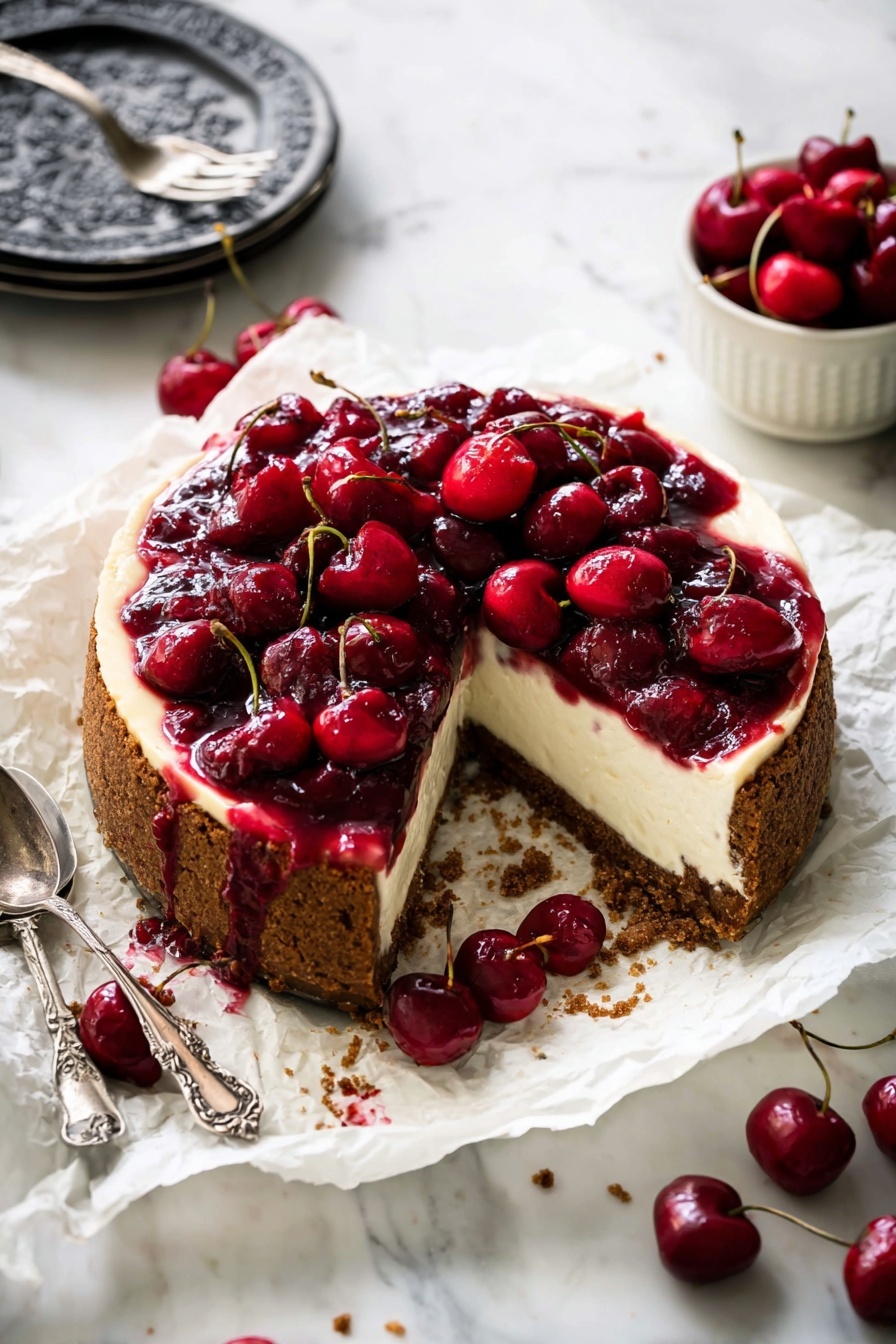
If you’re looking for a dessert that combines creamy decadence with a hint of warmth and a pop of fruity freshness, then you’re in for a treat with this Cheesy Cherry Biscoff Cheesecake Recipe. I absolutely love how the buttery Biscoff cookie crust pairs perfectly with the rich, velvety cream cheese filling, all topped with a luscious, homemade cherry topping that’ll have everyone asking for seconds. Stick with me, and I’ll walk you through every step so your cheesecake turns out perfectly smooth and packed with flavor every single time.
Why You’ll Love This Recipe
- Perfect Balance of Flavors: The spiced Biscoff crust adds depth while the fresh cherry topping cuts through the richness.
- Simple Homemade Cherry Topping: You won’t believe how easy it is to make your own sweet cherry sauce that tastes way better than store-bought.
- Creamy & Smooth Texture: Using room temperature ingredients and gentle mixing helps avoid cracks and ensures that silky finish we all crave in cheesecake.
- Showstopper Presentation: This cheesecake looks impressive enough for a special occasion but comes together with straightforward steps anyone can follow.

Ingredients You’ll Need
All of the ingredients in this Cheesy Cherry Biscoff Cheesecake Recipe come together harmoniously. I love using Biscoff cookies for that unique caramelized flavor, and the fresh cherries really elevate it. Be sure to use softened cream cheese and room temperature eggs to get a perfectly smooth batter.
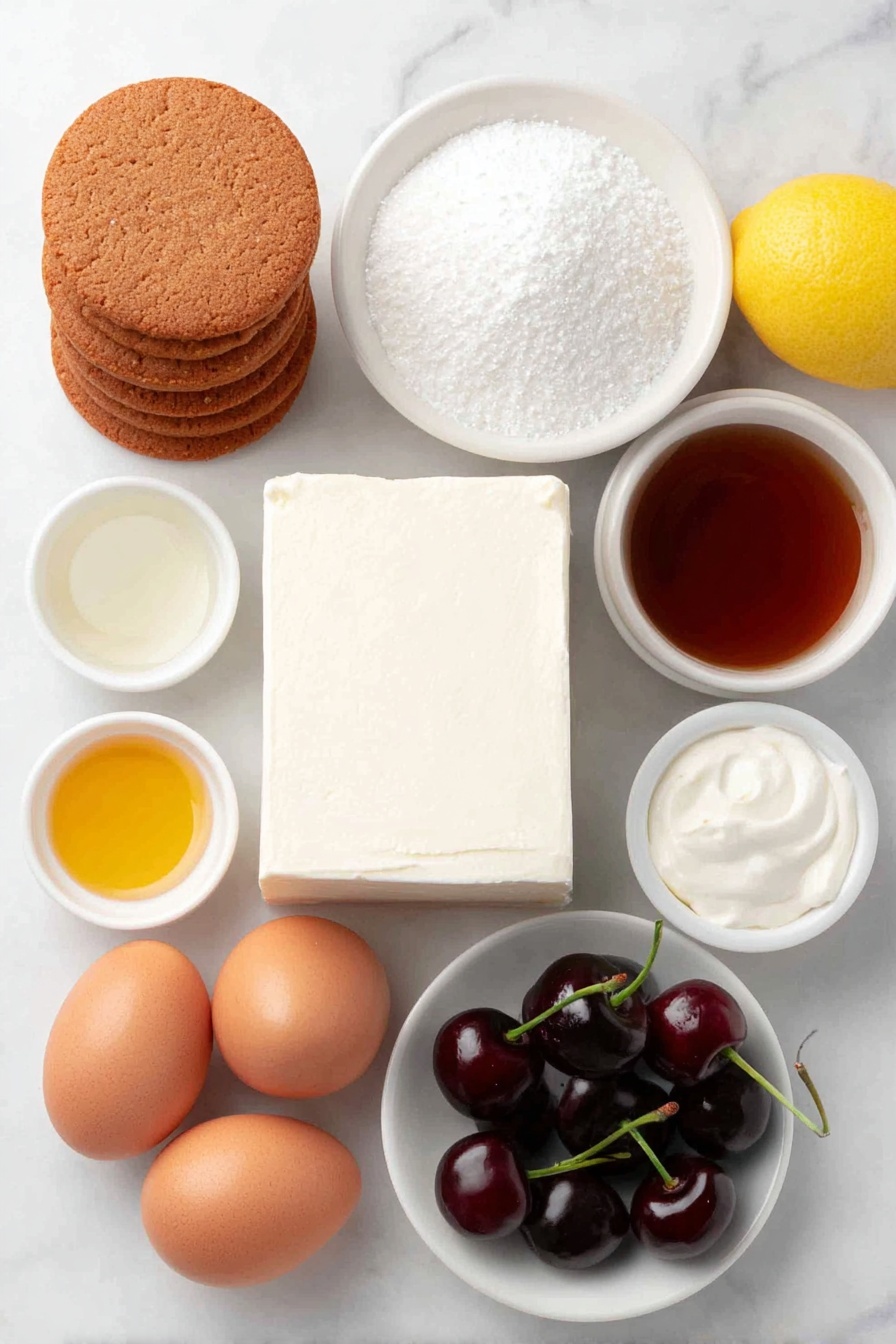
- Biscoff cookies: These spiced cookies create a buttery, flavorful crust that’s a crunchy base for this creamy cheesecake.
- Granulated sugar: Separate amounts are used—one for the crust and one for the filling—to balance sweetness throughout.
- Salted butter: Melted butter binds the crust together, and the salt enhances all the flavors.
- Cream cheese: The star of the show here—make sure it’s softened so it blends smoothly and avoids lumps.
- Sour cream: Adds creaminess with a slight tang that lightens the cheesecake texture.
- Pure vanilla extract: A splash goes a long way in deepening the flavor.
- Fine sea salt: Just a pinch to balance the sweetness and accentuate the other ingredients.
- Large eggs: Use room temperature eggs to ensure the batter emulsifies perfectly for a crack-free cheesecake.
- Fresh black cherries: You’ll want these for your homemade cherry topping—it’s incredibly fresh and vibrant.
- Lemon: Both juice and zest brighten up the cherry topping with a fresh zing.
- Cornstarch: This thickens the cherry topping to that perfect jammy consistency.
Variations
I love making this Cheesy Cherry Biscoff Cheesecake Recipe my own by swapping out the cherry topping or tweaking the crust. Feel free to personalize this recipe so it feels like your signature dessert.
- Mixed berry topping: When I want a change from cherries, I use a combination of blueberries, raspberries, and strawberries for a colorful twist that’s equally delicious.
- Crunchy nut crust: For a little extra texture, I sometimes fold crushed pecans or walnuts into the Biscoff crust before baking—it adds a lovely nutty flavor.
- Chocolate drizzle: Drizzle melted dark chocolate over the top to amp up decadence—my family goes crazy for this combo.
- Dairy-free version: Substitute cream cheese and sour cream with plant-based alternatives for a vegan-friendly cheesecake that’s surprisingly creamy.
How to Make Cheesy Cherry Biscoff Cheesecake Recipe
Step 1: Get the Biscoff Crust Ready
Start by pulsing Biscoff cookies in a food processor until finely ground—no big chunks here, or the crust won’t bind well. Mix the crumbs with melted butter and a bit of sugar until it resembles wet sand. Press this mixture evenly into the bottom of a springform pan, making sure to pack it tightly. I find using the bottom of a measuring cup works like a charm to get that smooth, even base. Pop it in the fridge while you prepare your filling—it helps the crust firm up nicely before baking.
Step 2: Whip Up the Cream Cheese Filling
Here’s the big secret to super creamy cheesecake: soften your cream cheese completely and beat it gently with sugar until no lumps remain. Don’t overmix or incorporate too much air, or you risk cracks later. Once smooth, blend in the sour cream, vanilla, and salt. Add the eggs one at a time, mixing just until combined after each addition. I like using room temperature eggs to keep everything silky and prevent curdling. Pour this luscious mixture over your chilled crust and smooth out the top with a spatula.
Step 3: Bake and Cool the Cheesecake
Bake the cheesecake at a moderate temperature—about 325°F (160°C)—for roughly an hour. You’ll notice the cheesecake jiggle slightly in the center when it’s done; that’s exactly what you want, as it will set further while cooling. To avoid cracks, I’ve learned to turn off the oven and leave the cheesecake inside with the door slightly ajar for about 30 minutes before removing it. Once it’s cooled to room temperature, pop it into the fridge for at least 4 hours, ideally overnight, so it can set up beautifully.
Step 4: Make the Cherry Topping
While the cheesecake cools, it’s time to make that magical cherry topping. Combine fresh pitted black cherries, sugar, lemon juice and zest, and cornstarch in a saucepan. Cook over medium heat, stirring frequently, until the mixture thickens and the cherries soften but still hold their shape. I love this step because the lemon brightens the natural sweetness of the cherries, keeping the topping fresh rather than cloyingly sweet. Let it cool completely before spooning it generously over your chilled cheesecake.
Pro Tips for Making Cheesy Cherry Biscoff Cheesecake Recipe
- Softening Ingredients: Always bring your cream cheese, eggs, and sour cream to room temperature before mixing to avoid lumps and cracking.
- Crust Pressing Trick: Use a measuring cup bottom or glass to firmly press down the crust evenly—it makes a big difference in texture and appearance.
- Gentle Mixing: Mix just until combined; overbeating traps air which can cause cracks during baking.
- Cooling Method: Leaving the cheesecake to cool slowly inside the oven with the door ajar stops abrupt temperature changes that crack the surface.
How to Serve Cheesy Cherry Biscoff Cheesecake Recipe
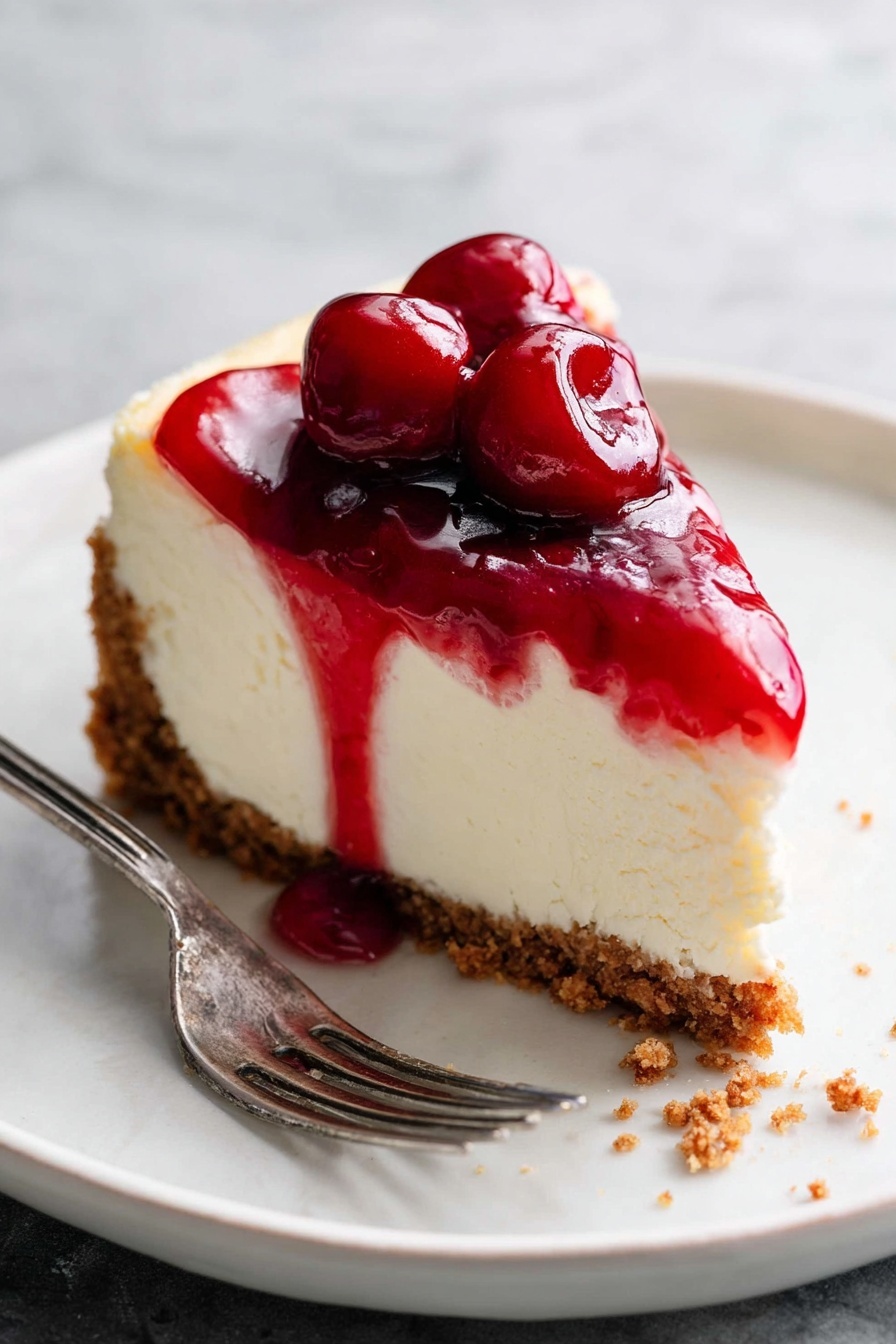
Garnishes
I like to finish this cheesecake with a few whole fresh cherries on top of the glossy cherry sauce for visual appeal and a burst of juicy contrast. A light dusting of powdered sugar or a dollop of whipped cream adds a delicate touch that complements the richness perfectly. Sometimes I sprinkle a few crushed Biscoff crumbs around the edges for an extra hint of crunch and spice.
Side Dishes
This cheesecake is pretty much a showstopper on its own, but I’ve found that pairing it with a simple espresso or a cup of vanilla bean tea really elevates the dessert experience. Fresh fruit salad or lightly toasted almonds on the side provide a nice contrast if you want additional texture and freshness.
Creative Ways to Present
For special occasions, I like to assemble individual cheesecake jars with layers of crust, filling, and cherry topping—perfect for parties or gift-giving. Another idea I tried was swirling some melted Biscoff spread through the cheesecake batter before baking for a marbled effect. It looks stunning and tastes deliciously spiced and creamy.
Make Ahead and Storage
Storing Leftovers
I usually keep leftover cheesecake tightly wrapped in plastic wrap and stored in an airtight container in the fridge. It holds up really well for about 4 to 5 days, maintaining its creamy texture and fresh cherry topping.
Freezing
Freezing cheesecake can be tricky, but I’ve had success with freezing the uncut whole cheesecake by wrapping it thoroughly in plastic wrap and then foil. When you’re ready to enjoy, thaw it overnight in the fridge. The texture remains smooth, and the cherry topping tastes fresh. If you prefer, individual slices freeze well too—just wrap each slice separately to prevent freezer burn.
Reheating
Cheesecake is best served chilled, but if you want to serve it at room temperature, take it out of the fridge about 30 minutes before serving. Avoid reheating in the microwave as it can make the texture grainy. If you want a warm cherry topping, gently heat it on the stove or in the microwave and spoon it over the cold cheesecake—it’s a lovely contrast!
FAQs
-
Can I use frozen cherries for the topping instead of fresh?
Absolutely! Frozen cherries work well too—just thaw and drain any excess water before cooking the topping to ensure it doesn’t get too watery. The flavor will still be delicious and juicy.
-
How do I prevent cracks in my cheesecake?
To avoid cracks, mix your batter gently, avoid overbeating, use room temperature ingredients, and bake the cheesecake at a lower temperature. Also, cooling it slowly inside the oven with the door ajar helps prevent sudden temperature changes that cause cracking.
-
Can I make this cheesecake gluten-free?
Yes! Simply swap the Biscoff cookies for a gluten-free cookie or graham cracker option. Just ensure they’re finely crushed and proceed with the recipe as usual.
-
Is it necessary to use a springform pan?
While not absolutely required, a springform pan makes it much easier to remove the cheesecake without damaging the crust. If you don’t have one, line a regular cake pan with parchment paper for easier removal.
Final Thoughts
When I first tried this Cheesy Cherry Biscoff Cheesecake Recipe, I was amazed at how the flavors just melded together beautifully—the spicy-sweet crust, the luscious vanilla cream cheese filling, and that fresh, tangy cherry topping make it an absolute crowd-pleaser. Whether it’s for a celebration or a cozy weekend treat, this cheesecake reliably impresses. Give it a try and watch your family and friends fall in love too—you’ll be the dessert hero in no time!
Print
Cheesy Cherry Biscoff Cheesecake Recipe
- Prep Time: 25 minutes
- Cook Time: 60 minutes
- Total Time: 445 minutes
- Yield: 16 servings
- Category: Dessert
- Method: Baking
- Cuisine: American
Description
A rich and creamy vanilla cheesecake baked on a crispy biscoff cookie crust and topped with a luscious homemade sweet cherry pie topping. This cherry cheesecake combines the comforting flavors of tangy cream cheese and fresh cherries with the warm, spiced notes of biscoff cookies, making it a perfect dessert for any occasion.
Ingredients
Crust
- 248 grams biscoff cookies (1 pack)
- 25 grams granulated sugar
- 113 grams salted butter (melted)
Cheesecake Filling
- 681 grams cream cheese (softened)
- 200 grams granulated sugar
- 170 grams sour cream (room temperature)
- 1 tablespoon pure vanilla extract
- 1/4 teaspoon fine sea salt
- 3 large eggs (room temperature)
Cherry Topping
- 1/2 lb fresh black cherries
- 25 grams granulated sugar
- 1 large lemon (zested and juiced)
- 5 grams cornstarch
Instructions
- Prepare the crust: Preheat your oven to 325°F (163°C). Crush the biscoff cookies into fine crumbs using a food processor or by placing them in a sealed bag and crushing with a rolling pin. Combine the cookie crumbs with 25 grams of granulated sugar and the melted salted butter until the mixture resembles wet sand. Press this mixture firmly and evenly into the bottom of a 9-inch (23 cm) springform pan to form the crust. Bake for 10 minutes, then remove and allow to cool.
- Make the cheesecake filling: In a large bowl, beat the softened cream cheese until smooth and creamy. Gradually add 200 grams of granulated sugar and continue beating until light and fluffy. Mix in the sour cream, pure vanilla extract, and fine sea salt until well combined. Add the eggs one at a time, beating gently after each addition just until incorporated to avoid overmixing.
- Bake the cheesecake: Pour the cream cheese filling over the cooled biscoff crust and spread evenly. Place the springform pan on a baking sheet to catch any drips and bake in the preheated oven for about 60 minutes, or until the edges are set and the center still jiggles slightly when shaken. Turn off the oven and leave the cheesecake inside with the door slightly open for 1 hour to cool gradually. Then transfer to the refrigerator and chill for at least 4 hours, preferably overnight, to fully set.
- Prepare the cherry topping: While the cheesecake chills, pit and halve the fresh black cherries. In a saucepan, combine the cherries, 25 grams of granulated sugar, lemon zest, and lemon juice over medium heat. Cook until the cherries release their juices and the mixture begins to simmer. In a small bowl, mix the cornstarch with a tablespoon of cold water to create a slurry. Slowly add the slurry to the simmering cherries, stirring constantly until the topping thickens, about 2-3 minutes. Remove from heat and allow to cool completely.
- Assemble and serve: Once the cheesecake is fully chilled, remove it from the springform pan and transfer to a serving plate. Spoon the cooled cherry topping evenly over the cheesecake. Slice and serve chilled for a decadent dessert experience.
Notes
- This vanilla cheesecake recipe is baked on a biscoff cookie crust, adding a deep caramelized flavor and crunch.
- The cherry topping is homemade for the freshest taste and can be adjusted in sweetness or tartness by varying the sugar and lemon.
- You can easily adjust the recipe for different pan sizes; just be mindful of adjusting baking times accordingly.
- Using room temperature ingredients ensures a smooth and creamy cheesecake batter without lumps.
- Allow the cheesecake to cool gradually in the oven after baking to prevent cracking on the surface.
Nutrition
- Serving Size: 1 slice (approx. 110 grams)
- Calories: 234 kcal
- Sugar: 16 g
- Sodium: 475 mg
- Fat: 11 g
- Saturated Fat: 6 g
- Unsaturated Fat: 4 g
- Trans Fat: 0.2 g
- Carbohydrates: 26 g
- Fiber: 1 g
- Protein: 9 g
- Cholesterol: 57 mg


