
If you’re searching for that perfect festive treat that combines classic flavors with a fun, eye-catching twist, then you’re going to absolutely love this Candy Cane Cookies Recipe. I remember the first time I made these—they’re not just pretty to look at but have that wonderful peppermint kick that reminds you of cozy holiday moments. Stick with me, and I’ll guide you through making these charming cookies that your family and friends will rave about all season long!
Why You’ll Love This Recipe
- Festive and Fun: These cookies transform classic sugar cookies into candy cane shapes that brighten up any holiday table.
- Perfect Peppermint Flavor: The peppermint extract gives you that authentic holiday taste without overpowering the cookie.
- Easy to Make: Despite their fancy look, the steps are straightforward—you’ll feel like a pro twisting dough in no time.
- Great for Gifting: These cookies keep well and look gorgeous in gift tins or cellophane bags.

Ingredients You’ll Need
The beauty of this Candy Cane Cookies Recipe is how accessible the ingredients are—simple pantry staples with a special twist of peppermint. When shopping, try using pure peppermint extract for the best flavor, and if you can get gel food coloring, it’ll give your cookies that vibrant red without changing the dough’s consistency.
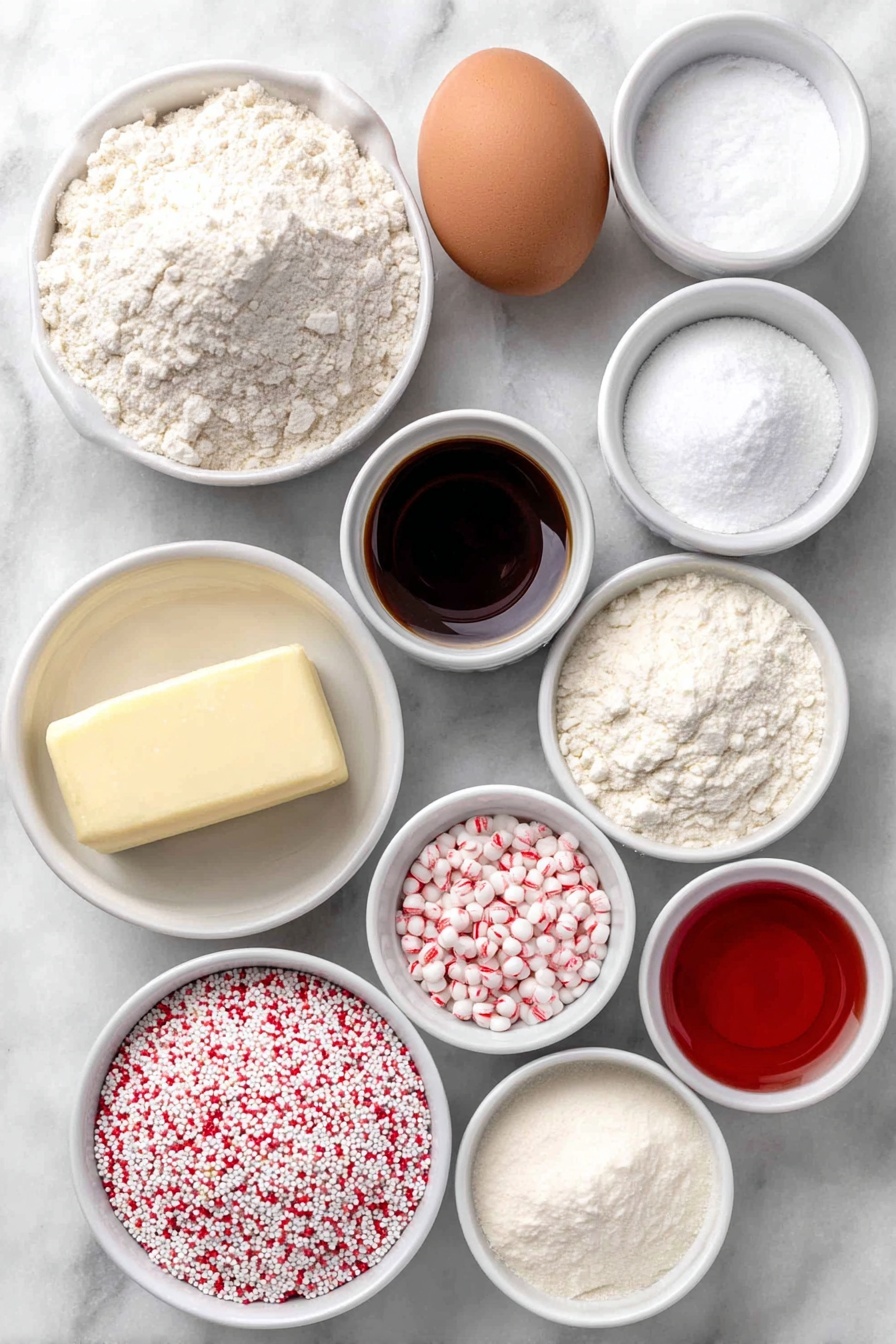
- All-purpose flour: Provides the perfect structure for tender but sturdy cookies.
- Cornstarch: Adds extra softness to the cookies, making them melt-in-your-mouth.
- Baking soda: Helps cookies rise a bit and creates that tender crumb.
- Baking powder: Works alongside baking soda for balanced leavening.
- Salt: Enhances all the sweet and minty flavors.
- Unsalted butter: Room temperature butter blends smoothly and adds richness.
- Granulated sugar: Sweetens without making the dough gritty.
- Egg: Binds everything together for perfect texture.
- Vanilla extract: Adds warmth and depth to the flavor.
- Peppermint extract: The star ingredient giving the classic candy cane scent and taste.
- Red gel icing color: For those iconic red stripes that make these cookies pop.
- Sprinkles or peppermint crunch (optional): Adds festive texture and visual appeal.
Variations
I love how versatile this Candy Cane Cookies Recipe can be depending on what you have on hand or how you want to customize it for guests. Don’t be afraid to get creative—after all, half the fun of baking is adding your own twist!
- Chocolate Peppermint: I’ve mixed in a tablespoon of unsweetened cocoa powder to the dough for a chocolatey version that pairs beautifully with the peppermint.
- Gluten-Free Option: I swapped the flour for a gluten-free blend once, and it worked well—just be sure to check your extracts and sprinkles for gluten.
- Sugar-Free Sweetener: When my friend needed to avoid sugar, I used a granulated erythritol substitute, and the results were surprisingly close!
- Decorative Drizzle: Adding melted white and dark chocolate drizzles on top takes these from cute to showstopper in seconds.
How to Make Candy Cane Cookies Recipe
Step 1: Mix the Dry Ingredients
This is the foundation of your cookies, so grab a medium bowl and whisk together the all-purpose flour, cornstarch, baking soda, baking powder, and salt. I always like to set this bowl aside while creaming the butter and sugar—that way, everything’s ready to go and you keep moving smoothly through the process.
Step 2: Cream Butter and Sugar Until Fluffy
I love this step because you can really see the transformation—using a mixer on medium speed, beat your room-temperature unsalted butter with granulated sugar until it’s light and airy. This fluffiness is what gives your cookies their tender texture and subtle rise. It usually takes about 3 to 5 minutes, and you’ll know it’s ready when the color lightens and the mixture looks creamy.
Step 3: Add Egg and Extracts
Mix in the egg followed by the vanilla and peppermint extracts. The peppermint is key here—it adds that unmistakable holiday zing. Blend just until everything is well combined; no need to overdo it.
Step 4: Combine Dry and Wet Ingredients Carefully
Gradually add your flour mixture to the wet ingredients, mixing just until the dough comes together. When I first made this recipe, I learned the hard way that over-mixing can make the cookies tough, so take it slow and gentle here.
Step 5: Divide and Dye the Dough
Split the dough in half, and knead red gel icing color into one portion until evenly colored. Don’t worry if it looks bright—that will mellow as you bake. The other half stays white for those classic candy cane stripes.
Step 6: Chill and Shape the Dough
Now, this is a trick I discovered that makes shaping so much easier: refrigerate both dough portions for 2-3 hours. If you want to prep in advance (which I highly recommend), scoop out teaspoon-sized balls before chilling—it makes the process a breeze when you’re ready to roll and twist.
Step 7: Roll, Twist, and Form Candy Canes
Preheat your oven to 350°F (180°C). On a lined baking sheet, roll each ball of dough into two ropes about 5 inches long—using a ruler helps keep them uniform. Pair one red and one white rope and gently twist them together. I found it easier to twist the top half and the bottom half separately—this prevents the ropes from tangling. Then, shape the twisted rope into a candy cane by curving one end.
Step 8: Add Sprinkles and Bake
If you want to add extra holiday flair, press sprinkles or crushed peppermint crunch onto the fronts of each candy cane before popping them into the oven. Bake for 5 to 7 minutes; watch carefully towards the end—they should be set but not browned.
Step 9: Cool and Store
Allow your pretty candy canes to cool on the baking sheet for about 10 minutes before transferring them to a wire rack to cool completely. This waiting step is crucial—these cookies are delicate when warm, and moving them too early can cause breakage. Once cooled, store in an airtight container to keep them fresh.
Pro Tips for Making Candy Cane Cookies Recipe
- Use Gel Food Coloring: I learned that gel colors keep the dough’s consistency perfect without making it sticky or runny.
- Chill the Dough Thoroughly: Chilling prevents the dough from spreading too much, helping your candy canes keep their shape while baking.
- Twist Gently: Light twisting keeps the ropes intact—over-twisting can cause cracking or breakage.
- Cool Before Moving: Always wait until cookies are firm before transferring them to a wire rack to avoid breaking these delicate shapes.
How to Serve Candy Cane Cookies Recipe

Garnishes
I like to keep it simple with a sprinkle of crushed peppermint candies or colorful holiday sprinkles pressed onto the dough before baking—it adds just the right festive crunch and sparkle without overpowering the peppermint flavor. Sometimes, a light dusting of powdered sugar after baking gives them a soft snowy look that’s just magical.
Side Dishes
These cookies are perfect paired with a warm cup of hot cocoa or peppermint-spiked mocha. For a holiday brunch, I like serving them alongside fluffy whipped cream-topped coffee or a creamy eggnog latte. They also make a wonderful sweet finish for Christmas dinners.
Creative Ways to Present
If you’re baking these for a party or gifting, try placing a small bundle of candy cane cookies tied with a festive ribbon inside a mason jar or cookie tin. I once created a candy cane cookie tree by stacking them on a cone-shaped foam base—everyone loved it! These little details make sharing your cookies extra special.
Make Ahead and Storage
Storing Leftovers
Your Candy Cane Cookies stay fresh for about 4 to 5 days stored in an airtight container at room temperature. I recommend layering parchment paper between them to prevent sticking or breakage. They keep their texture wonderfully, which is a big win when you’re baking ahead for holidays.
Freezing
I’ve frozen the dough itself and also the finished cookies. For the dough, wrap tightly in plastic wrap and freeze for up to a month—just thaw overnight in the fridge before shaping. Baked cookies freeze best in a single layer on a tray, then transferred to a freezer bag; thaw at room temperature for a few hours before serving.
Reheating
To refresh frozen cookies, I pop them in a 300°F oven for 5-7 minutes to bring back that fresh-baked warmth without drying them out. You can also microwave a cookie for 10 seconds if you’re in a hurry—just watch they don’t get chewy.
FAQs
-
Can I make these Candy Cane Cookies without peppermint extract?
Absolutely! While peppermint extract is what gives these cookies their signature flavor, you can substitute vanilla extract alone for a classic sugar cookie taste. Some people try almond or lemon extract as a fun twist, but peppermint really makes it special.
-
What if I don’t have gel food coloring?
You can use liquid food coloring, but be cautious as it can make the dough slightly softer. A tip I learned is to add the color slowly and knead it in thoroughly to avoid overhydrating the dough. If you want, you can also skip coloring and just twist white dough for a minimalist look.
-
How do I prevent my cookies from spreading too much?
Chilling the dough for at least 2 hours is key—it firms it up and stops the cookies from losing their shape in the oven. Also, be sure not to overmix the dough once you add the flour, as overworking can activate gluten and cause spreading.
-
Can I add sprinkles after baking?
I recommend pressing sprinkles or peppermint crunch onto the dough before baking so they stick well. Adding them after baking might cause them to fall off unless you use a royal icing or glaze to adhere them.
Final Thoughts
This Candy Cane Cookies Recipe holds a special place in my heart—it’s been a holiday tradition that fills my kitchen with the warm scent of peppermint and brings big smiles around the table. Whether you’re baking solo, with kids, or for a crowd, these cookies are cheerful, delicious, and surprisingly easy to make. Give them a try and watch how quickly they become a festive favorite in your home too!
Print
Candy Cane Cookies Recipe
- Prep Time: 3 hr
- Cook Time: 7 min per batch, total approx. 40 min depending on batch sizes
- Total Time: 3 hr 40 min
- Yield: About 60 cookies
- Category: Dessert
- Method: Baking
- Cuisine: American
Description
Candy Cane Cookies are a festive holiday treat featuring a soft and buttery cookie dough flavored with peppermint extract. These cookies are uniquely twisted in red and white ropes to resemble classic candy canes, making them perfect for Christmas celebrations. With a slight crisp on the edges and a tender center, they’re decorated optionally with sprinkles or peppermint crunch for an extra holiday touch.
Ingredients
Dry Ingredients
- 2 3/4 cups (358g) all-purpose flour
- 2 tbsp cornstarch
- 1 tsp baking soda
- 1/2 tsp baking powder
- 1/2 tsp salt
Wet Ingredients
- 1 cup (224g) unsalted butter, room temperature
- 1 cup (207g) granulated sugar
- 1 egg
- 1 tsp vanilla extract
- 1 tsp peppermint extract
Additional Ingredients
- Red gel icing color
- Sprinkles or peppermint crunch, optional
Instructions
- Mix Dry Ingredients: In a medium bowl, combine the all-purpose flour, cornstarch, baking soda, baking powder, and salt. Set this mixture aside for later use.
- Cream Butter and Sugar: Using a large mixer bowl, beat the unsalted butter and granulated sugar on medium speed until the mixture turns light in color and becomes fluffy. This usually indicates enough air has been incorporated.
- Add Egg and Extracts: Add the egg, vanilla extract, and peppermint extract to the butter and sugar mixture. Beat until all ingredients are well combined.
- Combine Wet and Dry Ingredients: Gradually add the dry ingredient mixture to the wet ingredients. Mix just until the dough forms and is well incorporated. Avoid overmixing to ensure tender cookies.
- Color the Dough: Divide the dough into two equal parts. Add red gel icing color to one half and mix until evenly colored. The other half remains white.
- Refrigerate Dough: Place both dough portions in the refrigerator for 2 to 3 hours to firm up, which makes shaping easier. For convenience, pre-form 1 teaspoon size balls while the dough is still soft.
- Preheat Oven and Prepare Baking Sheets: When ready, preheat your oven to 350°F (180°C). Line baking sheets with parchment paper or silicone baking mats to prevent sticking.
- Form Candy Cane Shapes: Roll each teaspoon-sized dough ball into a 5-inch long rope. Place one red rope and one white rope side by side and gently twist them together, twisting half at a time for control. Then shape the twisted rope into a candy cane by curving one end into a hook shape.
- Add Decorations: If desired, press sprinkles or peppermint crunch onto the front surfaces of the shaped cookies for added festive flair.
- Bake Cookies: Bake the cookies on the prepared baking sheets in the preheated oven for 5 to 7 minutes, until the edges start to set but centers remain slightly soft.
- Cool Cookies: Let the cookies cool on the baking sheets for about 10 minutes to firm up and prevent breakage. Then transfer them carefully to a wire rack to cool completely.
- Store Properly: Store the cookies in an airtight container at room temperature. They are best enjoyed within 4 to 5 days but can be frozen for up to a month for longer storage.
Notes
- This Candy Cane Cookies recipe is a classic Christmas treat, combining festive flavors and colors perfect for holiday celebrations.
- Chilling the dough is essential to make shaping easier and maintain the candy cane design during baking.
- Using gel coloring prevents the dough from becoming too wet, keeping texture ideal.
- Optional sprinkles or peppermint crunch add festive texture and flavor but can be omitted for a simpler look.
- Freezing the formed, twisted dough can help manage baking in batches during busy holiday preparations.
Nutrition
- Serving Size: 1 cookie
- Calories: 63
- Sugar: 3.4 g
- Sodium: 42.2 mg
- Fat: 3.2 g
- Saturated Fat: 1.9 g
- Unsaturated Fat: 1.3 g
- Trans Fat: 0 g
- Carbohydrates: 8 g
- Fiber: 0.2 g
- Protein: 0.7 g
- Cholesterol: 11.2 mg


