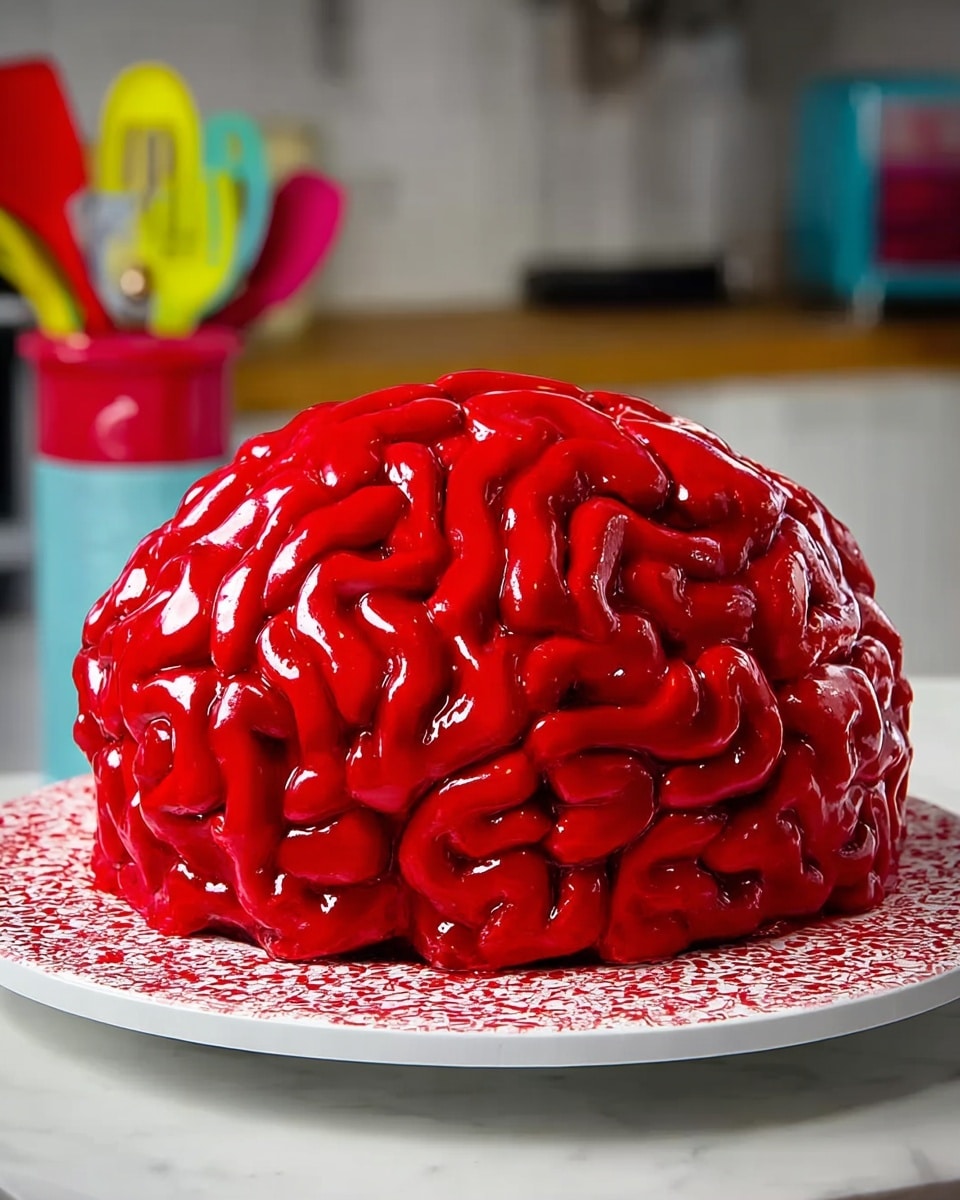
If you’re hunting for a show-stopping dessert that’s as spooky as it is scrumptious, I’ve got just the thing for you. This Brain Cake Recipe is a total crowd-pleaser, especially around Halloween, but honestly, I find any time is right to impress with this creepy-cool cake. It’s moist, richly flavored, and layered with the creamiest pink buttercream that looks like, well, a brain—plus oozing raspberry jam “blood” that gives it an extra thrill factor. Stick with me, and I’ll walk you through every step so you nail this delightfully eerie treat!
Why You’ll Love This Recipe
- Uniquely Stunning: The brain-shaped design is a guaranteed conversation starter at any party.
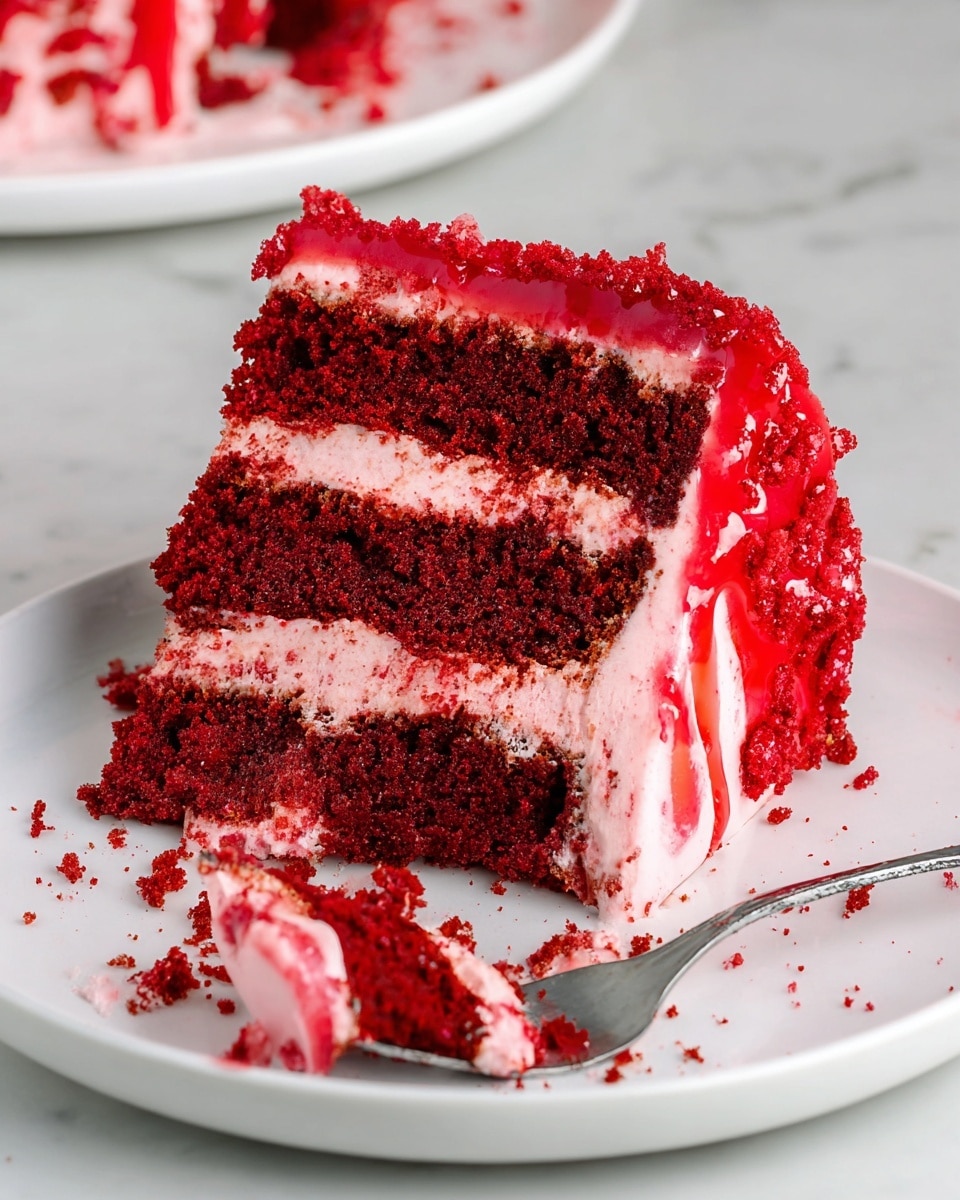
- Rich Flavor & Moist Texture: The red velvet layers are perfectly tender and balanced with tangy buttermilk and cocoa.
- Perfect Sweetness: The pink buttercream frosting hits the spot without being overly sweet.
- Fun & Festive: It’s a delightful way to celebrate Halloween or any spooky-themed occasion.

Ingredients You’ll Need
The ingredients for this Brain Cake Recipe come together beautifully to create that classic red velvet flavor with a fun twist. I always recommend using fresh, room-temperature ingredients—it helps everything mix up smoothly and gives you that tender crumb you’re aiming for.
- Cake Flour: Gives the cake a lighter, softer texture compared to regular flour.
- Unsweetened Cocoa Powder: Adds the subtle chocolate flavor that makes red velvet so distinctive.
- Baking Soda: The ideal leavening agent here to help your cake rise just right.
- Fine Salt: Enhances all the flavors, so don’t skip it!
- Unsalted Butter (for cake & frosting): Room temperature butter creams easily to give you a silky frosting and tender cake crumb.
- Granulated Sugar: Sweetens without weighing the cake down.
- Large Eggs: Bind everything perfectly; make sure they’re room temp to avoid curdling the batter.
- Buttermilk: Adds moisture and tanginess for that classic red velvet taste.
- Vegetable or Canola Oil: Keeps the cake super moist and soft.
- Vanilla Extract or Vanilla Bean Paste: For depth of flavor; the paste gives a lovely speckled look, too!
- White Vinegar: Reacts with baking soda to boost that fluffy rise and enhance the red color.
- Red Gel or Liquid Food Coloring: The magic behind the brain’s “bloody” red hue; gel tends to be more vibrant and less watery.
- Full-fat Cream Cheese: Gives the frosting that tangy richness that pairs flawlessly with red velvet.
- Powdered Sugar: Be sure to sift it for creamy, lump-free frosting.
- Heavy Whipping Cream: Helps achieve the perfect frosting consistency.
- Seedless Raspberry or Strawberry Jam: This is your “blood” filling—make sure it’s seedless for smooth spreading.
- Water: Used to thin the jam just a bit for easier drizzle.
Variations
One of the best things about this Brain Cake Recipe is how flexible it is. I like to switch things up depending on the occasion or what ingredients I have around. Feel free to put your own spin on it!
- Chocolate lovers unite: Swap out half the cake flour for cocoa powder for a richer chocolate taste—I did this once and everyone wanted seconds!
- Dairy-free option: Use dairy-free cream cheese and substitute buttermilk with a mix of almond milk and vinegar for a tasty vegan-friendly version.
- Fruit variations: Instead of raspberry jam, try cherry or blackberry for a different “blood” flavor and color pop.
- Natural colorings: Use beet juice powder or puree instead of red food coloring for a more natural hue and subtle earthy taste.
How to Make Brain Cake Recipe
Step 1: Prepare Your Pans and Preheat
Start by preheating your oven to 350°F (175°C). Grease and flour two 9-inch round cake pans, or line them with parchment paper circles — this helps with an easy release later. I always take the time for this step because nothing’s worse than a ruined cake when it won’t budge from the pan.
Step 2: Mix the Dry Ingredients
In a medium bowl, sift together cake flour, cocoa powder, baking soda, and fine salt. Sifting adds air and ensures there aren’t any lumps, which I promise makes your cake smoother and lighter.
Step 3: Cream Butter and Sugar
In a large bowl, beat the unsalted butter and granulated sugar until pale and fluffy—this usually takes about 3-5 minutes with an electric mixer on medium speed. This step creates the perfect base for a tender cake crumb.
Step 4: Add Eggs and Vanilla
Add the eggs one at a time, beating well after each addition to prevent curdling. Then mix in the vanilla extract or paste for that lovely aromatic note.
Step 5: Alternate Adding Dry Ingredients and Liquids
Now here’s the trick I love: add the dry ingredients in three parts, alternating with buttermilk and oil in two parts. Start and end with the flour mixture. Mix gently on low speed just until combined each time—you don’t want to overwork the batter or you’ll risk a denser cake.
Step 6: Add Vinegar and Food Coloring
In a small bowl, combine the white vinegar with red gel food coloring, then gently fold that into your batter. You’ll notice the color intensify and the batter lighten slightly—this is the color magic of red velvet!
Step 7: Bake and Cool
Divide the batter evenly between your prepared pans and bake for about 27 minutes or until a toothpick inserted comes out clean. Once baked, let the cakes cool for 10 minutes in the pans, then turn them out onto wire racks to cool completely before frosting.
Step 8: Make the Pink Buttercream
Beat together the butter and cream cheese until smooth and creamy. Add vanilla extract, salt, and a small squirt of red food coloring to get a soft pink hue. Gradually add sifted powdered sugar, then blend in heavy whipping cream until you reach a spreadable, luscious consistency.
Step 9: Layer and Fill
Place one cake layer on your serving plate, spread a generous amount of pink buttercream, then drizzle some raspberry jam mixed with water to mimic “blood.” Repeat with the second layer and cover the entire cake with the remaining frosting.
Step 10: Shape the Brain
Using a small spatula, sculpt the frosting with curvy ridges and bumps that resemble brain folds. I found that swirling the frosting back and forth in an “S” shape works wonders here. For the final “bloody” effect, drizzle extra raspberry jam over the cake’s crevices.
Pro Tips for Making Brain Cake Recipe
- Room Temperature Ingredients: Using eggs, butter, and buttermilk at room temp helps everything blend smoothly and prevents curdling.
- Don’t Overmix: Mixing the batter just enough keeps the crumb tender—not tough or dense.
- Use Gel Food Coloring: It intensifies the red color without thinning your batter or frosting.
- Jam “Blood” Tip: Thinning the raspberry jam with water makes it easier to drizzle while still keeping that vibrant “bloody” effect.
How to Serve Brain Cake Recipe
Garnishes
I love adding edible red glitter or a few fresh raspberries around the base to amp up the gore factor just a bit. A dusting of powdered sugar can create a cool contrast, like a foggy morning in a haunted forest. It really brings your brain to life (or death?).
Side Dishes
This cake pairs beautifully with a simple cup of black coffee or a tart lemon herbal tea to balance out the sweetness. If you want a full spread, I’ve served it alongside pumpkin-spiced cookies and candied nuts for a seasonal delight.
Creative Ways to Present
One year, I popped the brain cake on a platter draped with red berry coulis and scattered edible fake spiders around for that extra spooky wow. You can also put it inside a glass cloche or on a 3D-printed brain-shaped cake stand to crank up the theme at your party.
Make Ahead and Storage
Storing Leftovers
Once frosted, cover the brain cake loosely with plastic wrap or a large cake dome and store it in the refrigerator. It stays fresh for up to 3 days, and the flavors actually meld beautifully overnight.
Freezing
If you want to make it ahead of time, you can freeze the un-iced cake layers wrapped tightly in parchment and foil for up to 2 months. When you’re ready, thaw fully in the fridge before assembling and frosting.
Reheating
Since this is a frosted cake, reheating isn’t really needed. But if the cake is slightly chilled, let it sit at room temperature for 30 minutes before serving to bring out those flavors and soften the frosting.
FAQs
-
Can I make the Brain Cake Recipe without red food coloring?
Absolutely! You can substitute red gel food coloring with natural options like beet juice or beet powder. They give a beautiful red-pink hue, though the flavor will have a subtle earthiness. Adjust the amount depending on how vibrant you want the color.
-
What’s the best way to shape the brain frosting?
I found using a small offset spatula or butter knife to drag curved “S” shapes works best to mimic brain folds. It’s easier if your frosting is slightly firm but still spreadable. Don’t worry about perfection—the organic, bumpy look is what makes it look real!
-
Can I use a different cake flavor for this Brain Cake Recipe?
Of course! While red velvet is classic here, you could try chocolate, vanilla, or even strawberry cake layers to keep that pink theme. Just keep the texture moist and dense enough to hold up well when shaped and frosted.
-
How do I prevent the frosting from sliding off the cake?
Make sure your cake layers are completely cool before frosting. Also, chilling the cake for 20-30 minutes after a crumb coat helps set the foundation so the final layer won’t slide or melt, especially if your kitchen is warm.
Final Thoughts
This Brain Cake Recipe has become one of my absolute favorites to make not just because it’s delicious but because it’s so much fun to create and share. When I first made it, my family went crazy over how realistic it looked—and it’s always a hit at Halloween parties. I hope you’ll enjoy making it as much as I do; it’s the perfect blend of spooky and sweet that turns any gathering into a memorable celebration. Give it a try—you might surprise yourself and your friends with the baking skills you didn’t know you had!
Print
Brain Cake Recipe
- Prep Time: 20 min
- Cook Time: 27 min
- Total Time: 77 min
- Yield: 20 servings
- Category: Dessert
- Method: Baking
- Cuisine: American
Description
This Brain Cake is a spooky and delicious dessert, perfect for Halloween celebrations. Featuring moist red velvet cake layers tinted with vibrant red food coloring, it is layered and frosted with creamy pink buttercream and filled with seedless raspberry or strawberry jam to mimic realistic ‘brain’ blood. The combination of rich cake, tangy cream cheese frosting, and sweet jam creates a delightful flavor and striking visual effect.
Ingredients
Red Velvet Cake
- 2 1/2 cups cake flour (300g)
- 2 Tbsp unsweetened cocoa powder, sifted (10g)
- 1 tsp baking soda (6g)
- 1/2 tsp fine salt (3g)
- 1/2 cup (1 stick) unsalted butter, room temperature (113g)
- 1 3/4 cups granulated sugar (350g)
- 2 large eggs, room temperature (112g)
- 1 1/4 cups buttermilk, room temperature (300g)
- 1/2 cup vegetable or canola oil (120g)
- 2 tsp vanilla extract or vanilla bean paste (8g)
- 1 tsp white vinegar (4g)
- 1 tsp red gel food coloring (or 1 Tbsp liquid food coloring)
Pink Buttercream Frosting
- 1 1/2 cups (3 sticks) unsalted butter, room temperature (339g)
- 1 cup (8 oz) full-fat cream cheese, room temperature (226g)
- 1 Tbsp vanilla extract or vanilla bean paste (12g)
- 1 tsp fine salt (6g)
- 7 cups powdered sugar (904g or a 2lb. bag)
- 3 Tbsp heavy whipping cream, room temperature (45g)
- small squirt of red gel food coloring (or 1 tsp liquid food coloring)
Jam Filling
- 1/2 cup seedless raspberry or strawberry jam
- 3 Tbsp water (45g)
- [1/4 tsp red gel food coloring or 1 tsp liquid food coloring – optional]
Instructions
- Prepare the Cake Batter: Preheat your oven to 350°F (175°C). In a large bowl, sift together the cake flour, cocoa powder, baking soda, and fine salt. In a separate bowl, cream the butter and granulated sugar together until light and fluffy. Add eggs one at a time, beating well after each addition. Mix in the vanilla extract, white vinegar, and red food coloring until the batter turns bright red. Alternate adding the dry ingredients and buttermilk, beginning and ending with the dry ingredients. Stir in the vegetable oil last to create a smooth, moist batter.
- Bake the Cake Layers: Grease and flour your cake pans. Divide the batter evenly between the pans. Bake in the preheated oven for about 25-27 minutes, or until a toothpick inserted into the center comes out clean. Allow the cakes to cool completely in their pans before removing.
- Make the Pink Buttercream Frosting: In a large bowl, beat the unsalted butter and cream cheese together until smooth and creamy. Mix in vanilla extract and fine salt. Gradually add powdered sugar, mixing well after each addition. Add heavy whipping cream to adjust consistency to your preference. Add a small squirt of red food coloring to achieve a soft pink hue and mix thoroughly.
- Prepare the Jam Filling: In a small saucepan, combine the seedless raspberry or strawberry jam and water. Heat gently, stirring until well combined and smooth. Optionally, add the red food coloring to enhance the jam’s color to simulate ‘blood’. Allow it to cool slightly before use.
- Assemble the Brain Cake: Level the cooled cake layers if necessary. Place the first layer on a serving plate and spread a generous amount of the jam filling over it. Add a thick layer of pink buttercream frosting on top of the jam. Repeat layers as desired, finishing with a layer of buttercream frosting on top and around the sides of the cake.
- Decorate to Resemble a Brain: Using additional pink buttercream frosting, pipe ridges and patterns on the surface of the cake to mimic the shape and folds of a brain. Use a piping bag fitted with a round or star tip for best effect. Chill the cake briefly if needed to set the frosting.
Notes
- This brain cake is perfect for Halloween celebrations or any spooky-themed event.
- Ensure all dairy ingredients are at room temperature for a smoother batter and frosting.
- Use gel food coloring for vibrant color without altering the cake’s texture.
- Seedless jam prevents unwanted texture in the filling, giving a smoother ‘blood’ effect.
- For best results, assemble the cake on a sturdy base to support the weight and decoration.
Nutrition
- Serving Size: 1 piece (approximately 1/20th of cake)
- Calories: 596 kcal
- Sugar: 60 g
- Sodium: 333 mg
- Fat: 31 g
- Saturated Fat: 16 g
- Unsaturated Fat: 14 g
- Trans Fat: 0 g
- Carbohydrates: 77 g
- Fiber: 1 g
- Protein: 4 g
- Cholesterol: 89 mg

