
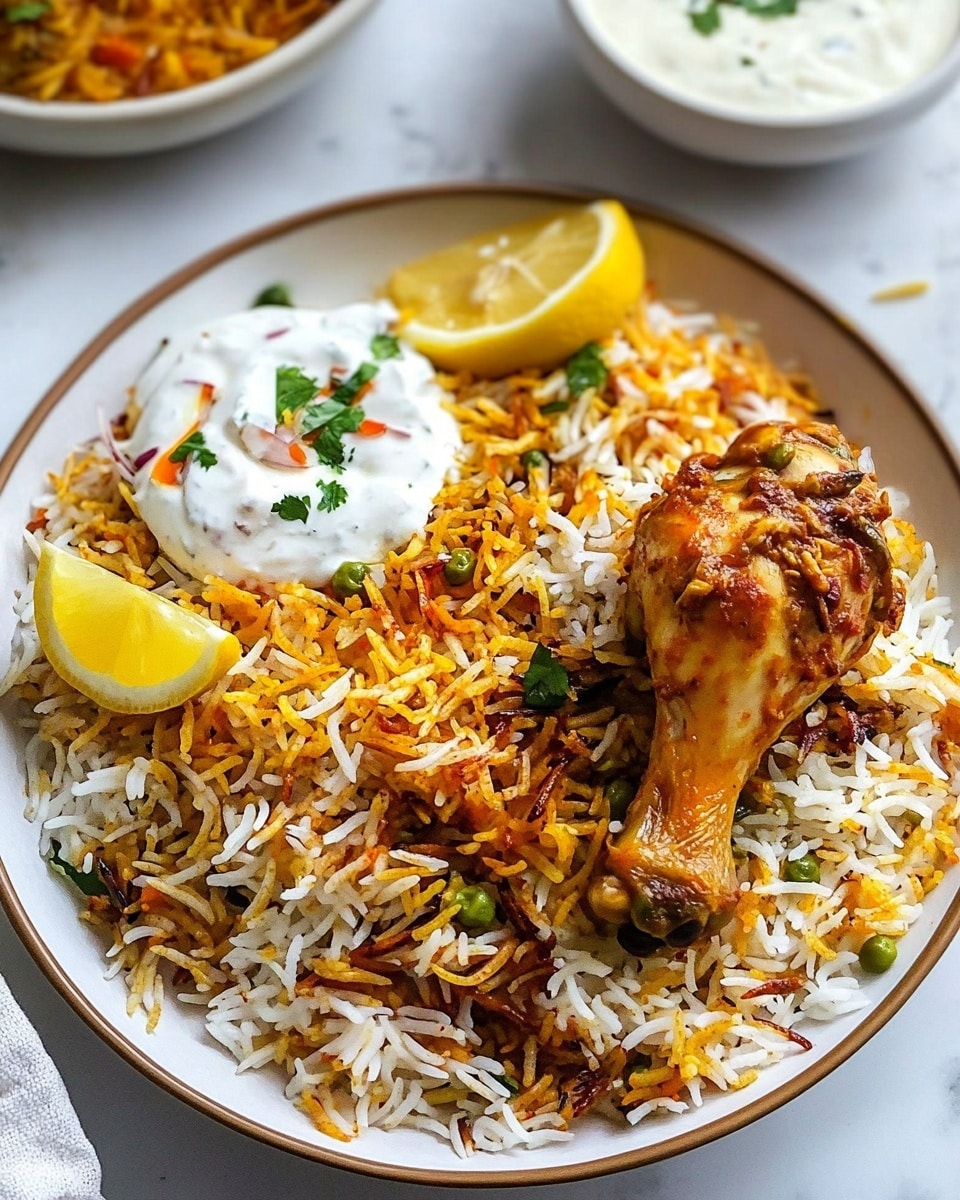
I absolutely love how this Better Than Restaurant Chicken Dum Biryani Recipe brings the magic of classic Indian flavors right to your kitchen. When I first tried making biryani at home, I struggled with getting that perfect balance between juicy chicken and fluffy, aromatic rice. This recipe changed all that-it s packed with layers of flavor and a cooking technique that locks in all the goodness, making every bite a celebration.
You ll find that this biryani works perfectly for special gatherings or even a weekend dinner when you want to impress without complicated cooking stress. It’s worth trying because it tastes rich and indulgent but uses simple ingredients that come together beautifully – plus, you get to make mouthwatering crispy fried onions yourself, which is the secret sauce here!
Why You’ll Love This Recipe
- Authentic Flavor: The marinade and spices create layers of deep, rich taste that rival your favorite restaurant biryani.
- Moist & Tender Chicken: Marinating the chicken thoroughly ensures it stays juicy and flavorful throughout the cooking process.
- Perfectly Layered Rice: Parboiling the rice and cooking it on dum seals in aroma and texture for a fluffy, non-sticky finish.
- Homemade Crispy Onions: These add a delicious crunch and sweetness that bring it all together beautifully.

Ingredients You’ll Need
The ingredients in this Better Than Restaurant Chicken Dum Biryani Recipe work harmoniously to get that perfect balance of spice, creaminess, and aroma. Picking fresh herbs and high-quality basmati rice will really elevate your biryani experience.
- Chicken drumsticks: Skin removed for better marinade absorption and tenderness.
- Boneless chicken thighs: Thighs stay juicy and flavorful even after long cooking.
- Biryani masala: Essential blend for authentic biryani spices.
- Ginger paste: Adds warmth and brightness without being overpowering.
- Garlic paste: Brings that lovely pungency and depth.
- Kosher salt: Ensures even seasoning throughout the dish.
- Kashmiri red chili powder: Gives a vibrant color and mild heat.
- Ground turmeric: Adds earthiness and a golden hue.
- Fresh mint leaves: For a refreshing herbal note.
- Lemon juice: Balances spice with tang.
- Plain yogurt: Tenderizes the chicken and adds creaminess.
- Ghee: Used for frying onions and cooking chicken, lends a rich nutty flavor.
- Yellow onion: Thinly sliced for frying to crispy perfection.
- Extra long grain Basmati rice: The heart of the biryani, best soaked before cooking.
- Black cumin seeds (shah jeera): Distinctive warm spice enhancing the rice.
- Bay leaves (tamal patra): Adds a subtle herbal aroma.
- Star anise: For a gentle licorice note in the rice.
- Green cardamom pods: Sweet and aromatic.
- Cloves: Adds warmth and complexity.
- Chopped cilantro: Fresh garnish to brighten each bite.
- Saffron: Soaked in warm milk to infuse luxurious color and flavor.
- Milk (warm): Helps soften saffron and distribute its flavor evenly.
Variations
I love making this Better Than Restaurant Chicken Dum Biryani Recipe my own by customizing it now and then – feel free to tweak the spices or add veggies to suit your taste and dietary needs.
- Vegetarian Version: Swap chicken for mixed vegetables like cauliflower, carrots, and peas-adjust cooking time accordingly.
- Spice Level: I sometimes adjust the Kashmiri chili powder for milder or hotter heat, depending on who I m cooking for.
- Lighter Biryani: Use less ghee and substitute yogurt with non-fat Greek yogurt for a lighter version.
- Protein Swap: You can replace chicken with lamb or beef, but keep marination time longer to tenderize the meat well.
How to Make Better Than Restaurant Chicken Dum Biryani Recipe
Step 1: Marinate the Chicken for Maximum Flavor
Start by mixing yogurt, ginger and garlic pastes, turmeric, Kashmiri red chili powder, biryani masala, kosher salt, fresh mint, and lemon juice in a bowl. Add the chicken drumsticks and thighs, coating them well with the marinade. I like to let this sit in the refrigerator for at least 30 minutes, but overnight gives you the best flavor and tenderness. Trust me, the longer the marination, the deeper the flavor – don t rush this step!
Step 2: Soak and Parboil the Rice for Perfect Texture
Rinse the basmati rice thoroughly 2-3 times until the water runs clear, then soak it in water for about 20 minutes. Meanwhile, bring a large pot of water to boil with the black cumin seeds, bay leaves, star anise, cardamom pods, cloves, and salt. After soaking, drain the rice and add it to the boiling spiced water. Boil uncovered on medium heat for 5-6 minutes until the rice is about 90% cooked-still firm but not soft. Drain promptly to avoid overcooking, keeping the rice fluffy for the layering.
Step 3: Fry the Onions for that Crispy, Sweet Punch
This is my favorite step because those golden crispy onions add so much flavor and texture. Heat ghee in a heavy-bottom pan over medium heat and add thinly sliced onions. Stir frequently for about 15-20 minutes until they turn light golden brown and start to crisp – don t rush them or they might burn. Remove the onions and leave the excess ghee in the pan; we ll use it for cooking the chicken.
Step 4: Cook the Chicken to Lock in Juices
Into the same pan with ghee, add the marinated chicken along with a quarter of your fried onions and cook on medium heat for 8-10 minutes. Turn the pieces halfway so that each side gets lightly brown and cooked through without drying out. You ll notice the kitchen fills with that comforting biryani aroma – that s when you know you re on the right track!
Step 5: Layer the Rice and Chicken, Then Cook Dum Style
Carefully layer the partially cooked rice over the chicken in the pan. Sprinkle the reserved fried onions on top, then drizzle the saffron-infused warm milk evenly over the rice. If you like, you can add a little extra ghee on top for richness. Cover the pot tightly with aluminum foil and place the lid on top, adding some weight if you can – this traps steam and cooks the biryani gently. Cook it on very low heat for 20 minutes, then turn off the stove and let it rest for another 10 minutes before opening. This slow dum cooking is what makes this biryani truly special.
Before serving, sprinkle chopped cilantro and let the biryani sit uncovered for 5 minutes. Gently fluff the rice with a fork or a silicone spatula to keep the grains separate, perfect for plating up that stunning biryani you ll be proud of.
Pro Tips for Making Better Than Restaurant Chicken Dum Biryani Recipe
- Marinate Overnight: Whenever possible, marinate the chicken overnight to deepen flavors and tenderness.
- Control the Heat: Watch your onions carefully while frying to avoid bitter burnt bits, stirring frequently.
- Cook Rice Just Right: Stop cooking the rice when it s still a bit firm so it finishes cooking in the dum without getting mushy.
- Seal Tightly for Dum: Use aluminum foil under the lid to trap steam-it s key to that fluffy, aromatic biryani texture.
How to Serve Better Than Restaurant Chicken Dum Biryani Recipe
Garnishes
I always top my biryani with fresh chopped cilantro and a handful of those homemade crispy fried onions for a perfect mix of color and crunch. Sometimes a drizzle of extra ghee warms it all wonderfully. It s the little touches like these that make the dish shine on the table.
Side Dishes
This biryani pairs beautifully with cooling cucumber raita, a simple lemon wedge, and sometimes a mixed vegetable salad. The refreshing sides balance the rich and spicy flavors, making the meal even more enjoyable.
Creative Ways to Present
For special occasions, I like to serve biryani in individual dhokli bowls or small clay pots to give an authentic, rustic feel. Garnishing with edible rose petals or a sprinkle of chopped nuts adds an elegant touch that s sure to wow your guests.
Make Ahead and Storage
Storing Leftovers
I cool leftover biryani to room temperature, then store it in an airtight container in the refrigerator. It holds well for up to 3 days and the flavors actually deepen, making it even tastier the next day.
Freezing
I ve frozen biryani portions successfully in freezer-safe containers for up to 2 months. Just be sure to thaw overnight in the fridge before reheating to preserve texture and flavor.
Reheating
Reheat biryani gently on the stovetop over low heat with a splash of water or ghee to keep it moist. You can also microwave covered, but stirring halfway helps avoid dry spots and keeps the rice fluffy.
FAQs
-
Can I use boneless chicken only for this biryani?
Absolutely! Using boneless chicken thighs will cook faster and remain juicy, but including drumsticks adds a nice variety of texture and flavor. Just adjust cooking time slightly if using only boneless.
-
Is it necessary to fry onions at home, or can I use store-bought crispy onions?
While store-bought crispy onions are convenient, frying your own onions in ghee provides a fresher, richer flavor and crunch that really elevates the biryani. You can prepare them ahead of time for ease.
-
What type of rice works best for this biryani?
Aged extra long grain basmati rice is best because it stays fluffy, aromas soak in nicely, and the grains separate well after cooking. Fresh or non-aged rice may become sticky.
-
Can I make this biryani in advance for a party?
Definitely! You can prepare all components a day ahead and do the final layering and dum cooking on the event day for fresh biryani. This helps reduce last-minute stress.
Final Thoughts
This Better Than Restaurant Chicken Dum Biryani Recipe is one I keep coming back to because it never fails to impress family and friends with its rich flavors and perfect textures. Cooking it feels like an experience, not just a meal, and it s so satisfying to recreate that restaurant magic at home. If you re looking to try one truly special biryani recipe, I highly encourage you to give this one a go – I promise you ll love the way it brings everyone together around the table.
Print
Better Than Restaurant Chicken Dum Biryani Recipe
- Prep Time: 30 minutes
- Cook Time: 30 minutes
- Total Time: 1 hour 30 minutes
- Yield: 6 servings
- Category: Main Course
- Method: Stovetop
- Cuisine: Indian
Description
This Better Than Restaurant Chicken Dum Biryani recipe features tender, marinated chicken cooked to perfection with aromatic basmati rice, fried onions, and fragrant spices. The dish is layered and slow-cooked on ‘dum’ for rich, flavorful biryani that rivals any restaurant quality biryani. Served with fresh cilantro and saffron-milk for an authentic touch, this biryani is a perfect blend of textures and spices for a delightful meal.
Ingredients
Marinade Ingredients
- 1 pound chicken drumsticks (4), skin removed
- 1 pound boneless skinless chicken thighs, cut in half
- 2 teaspoon biryani masala
- 1 tablespoon ginger paste
- 1 tablespoon garlic paste
- 2 teaspoons kosher salt
- 1 tablespoon kashmiri red chili powder
- 1/2 teaspoon ground turmeric
- 1/4 cup fresh mint leaves, chopped
- 2 tablespoon lemon juice
- 3/4 cup plain yogurt
Crispy Fried Onions
- 4 tablespoons ghee
- 1 large yellow onion, thinly sliced
Rice Ingredients
- 2 1/2 cups extra long grain basmati rice
- 1 teaspoon black cumin seeds (shah jeera)
- 2 bay leaves (tamal patra)
- 1 star anise
- 4 green cardamom pods
- 8 cloves
- 1 1/2 tablespoons kosher salt
Garnish
- 1/4 cup chopped cilantro
- 1/2 teaspoon saffron
- 2 tablespoons warm milk
- 2 tablespoons ghee (optional)
Instructions
- Marinate Chicken: In a bowl, combine yogurt, ginger paste, garlic paste, turmeric, Kashmiri red chili powder, biryani masala, kosher salt, chopped fresh mint leaves, and lemon juice to make the marinade. Add chicken drumsticks and thighs, coating them evenly with the marinade. Refrigerate for at least 30 minutes or up to overnight for deeper flavor.
- Soak Saffron: Soak saffron threads in warm milk and set aside to infuse.
- Rinse & Soak Rice: Rinse basmati rice 2 to 3 times until water runs clear. Drain and soak in 4 cups of water for 20 minutes.
- Fry Onions: Heat ghee in a heavy-bottomed pan over medium heat. Add thinly sliced onions and fry, stirring frequently for 15 to 20 minutes, until they turn light golden brown and crisp. Remove fried onions, reserving some for layering and leaving excess ghee in the pan.
- Add Onions to Chicken: Mix one-fourth of the fried onions into the marinated chicken for additional flavor.
- Parboil Rice: Bring 8 cups of water to a boil in a medium pot. Add black cumin seeds, bay leaves, star anise, green cardamom pods, cloves, and kosher salt. Drain soaked rice and add to boiling spiced water. Boil on high for a minute then reduce to medium heat and cook uncovered for 5 to 6 minutes until rice is about 90% cooked. Drain rice and set aside.
- Cook Chicken: Using the pan with leftover ghee, add marinated chicken and cook over medium heat for 8 to 10 minutes, turning halfway to brown evenly.
- Layer and Cook Biryani on Dum: Carefully layer the parboiled rice over the cooked chicken in the pan. Sprinkle the remaining fried onions on top. Drizzle the saffron-infused milk evenly across the rice. Optionally, add additional ghee on top. Cover the pot tightly with aluminum foil and place the lid on top, weighing it down with a heavy object if possible to seal. Cook over low heat for 20 minutes to steam (dum cooking). Turn off heat and let it rest sealed for 10 minutes.
- Garnish and Serve: Remove the lid and foil. Garnish biryani with chopped cilantro. Let the biryani sit uncovered for 5 minutes to allow flavors to settle. Gently fluff the rice with a fork or silicone spatula to prevent breaking grains. Serve hot with raita and lemon wedges.
Notes
- Chicken can be marinated up to 24 hours for enhanced flavors.
- Prepare fried onions a day ahead to save time; alternatively, air fryer crispy onions provide a healthier option with less ghee.
- Choose aged extra long-grain basmati rice for authentic texture and aroma.
- Allow biryani to rest uncovered for 5 minutes before fluffing to firm up delicate rice grains and prevent breaking.
Nutrition
- Serving Size: 1 serving
- Calories: 601
- Sugar: 3g
- Sodium: 2682mg
- Fat: 22g
- Saturated Fat: 11g
- Unsaturated Fat: 9g
- Trans Fat: 0.02g
- Carbohydrates: 69g
- Fiber: 3g
- Protein: 31g
- Cholesterol: 154mg
