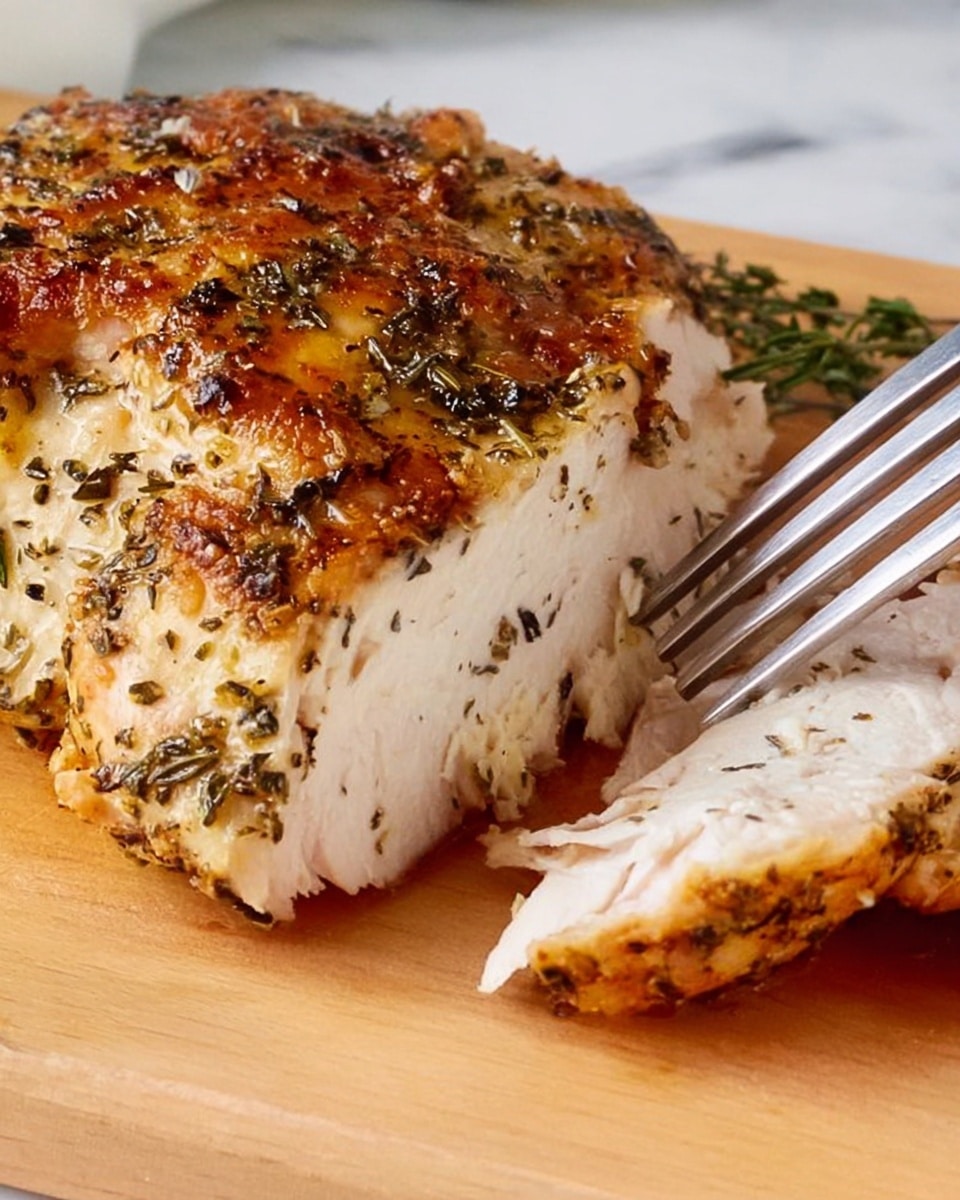
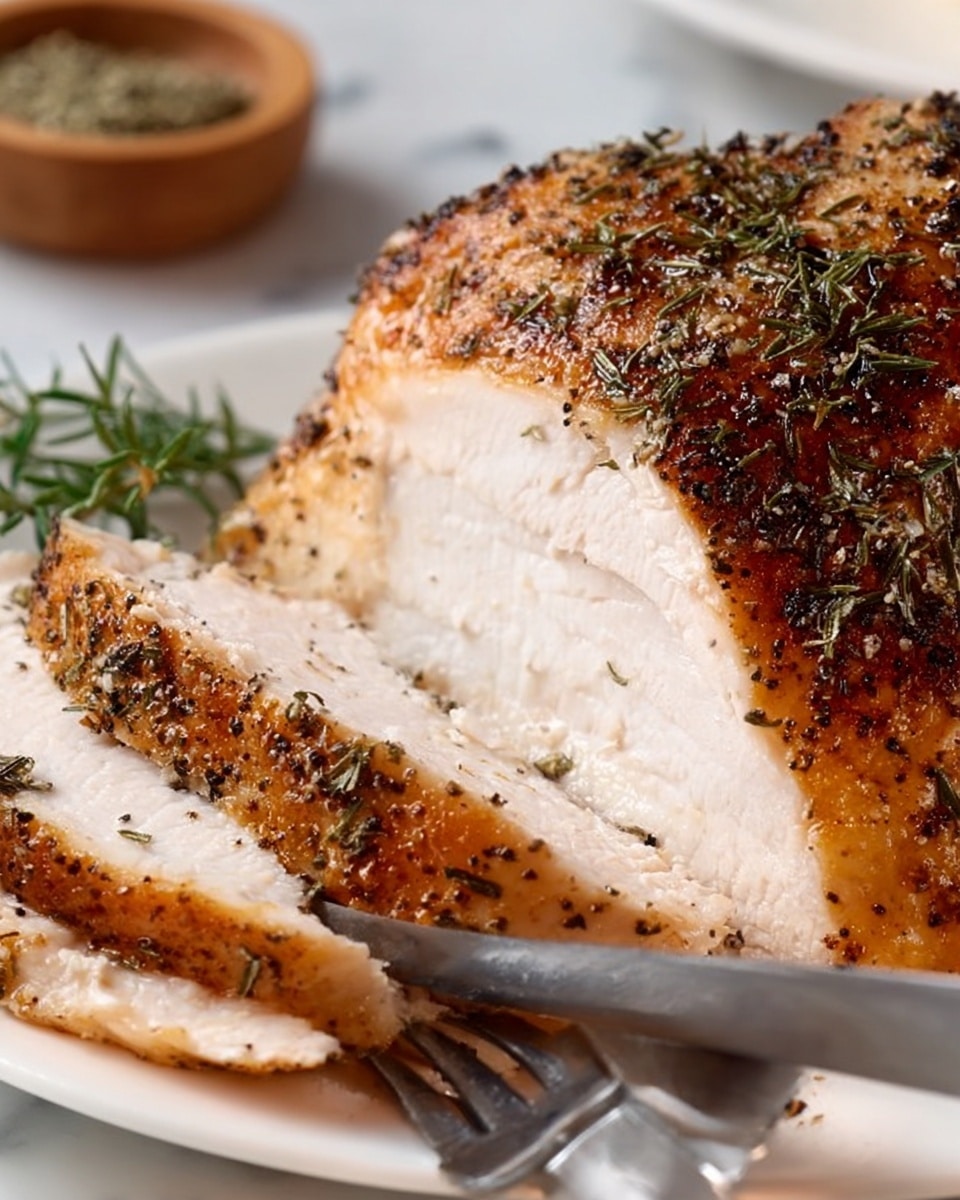
I absolutely love sharing this Air Fryer Turkey Breast Recipe because it’s a game changer for anyone who wants juicy, flavorful turkey without the fuss of a whole oven roast. Whenever I need a centerpiece that’s quick but still impressive, this recipe comes to the rescue. The air fryer gives the turkey a beautifully crisp skin while keeping the meat tender and moist inside – a perfect balance that’s hard to beat.
Whether it’s a weeknight dinner or a smaller holiday gathering, this recipe works like a charm. You’ll find that it’s straightforward to get right even if you’re new to air frying, and the minimal seasoning lets the natural turkey flavor shine. Plus, that crispy skin? Total crowd-pleaser every time.
Why You’ll Love This Recipe
- Speedy Cooking: This air fryer method cuts down turkey cooking time significantly compared to traditional roasting.
- Juicy Results: The turkey stays perfectly moist inside, avoiding dryness that often happens with turkey breast.
- Minimal Ingredients: Simple seasonings let the turkey’s natural flavor shine, making it easy for any palate.
- Consistent Success: Following this recipe, you’ll rarely have to guess cooking times or temperature.

Ingredients You’ll Need
The ingredients for this Air Fryer Turkey Breast Recipe are straightforward, and each one plays a role in creating that perfect blend of flavor and texture. The olive oil helps crisp the skin while the kosher salt and dry turkey seasoning bring out the best taste without overpowering.
- Turkey Breast (on the bone with skin): Choosing one on the bone keeps the meat tender and juicy; skin is essential for that crispy finish.
- Olive Oil: Helps evenly crisp the turkey skin and locks in moisture.
- Kosher Salt: Enhances the natural flavor and helps season the turkey evenly.
- Dry Turkey or Poultry Seasoning: Adds depth and savory notes; I like Bell’s seasoning which doesn’t include added salt.
Variations
I love playing around with this Air Fryer Turkey Breast Recipe based on what I have on hand or what flavors my family is craving. You can easily customize it, so don’t feel tied down to the exact seasonings I use.
- Herb Infusion: I sometimes swap the dry turkey seasoning for a mix of fresh herbs like rosemary, thyme, and sage for an aromatic twist that’s perfect in fall.
- Spicy Kick: Adding a pinch of smoked paprika or cayenne pepper can give this recipe a nice warm heat that my family loves.
- Lower Sodium: If you prefer less salt, just reduce the kosher salt and rely more on herbs and garlic powder.
- Skinless Option: You can make this without skin for a leaner option, but note that the crispy texture won’t be the same.
How to Make Air Fryer Turkey Breast Recipe
Step 1: Prep and Season Your Turkey Breast
Start by patting your turkey breast dry with paper towels to remove any extra moisture—this helps the skin crisp up better. Rub half a tablespoon of olive oil all over the turkey, then season both sides evenly with kosher salt and the dry turkey seasoning. Once the seasoning is in place, rub the remaining half tablespoon of oil over the skin side. This double rub gives the skin a beautiful golden color and locks in flavor.
Step 2: Air Frying Magic at 350°F
Preheat your air fryer to 350°F—preheating is crucial for even cooking. Place the turkey breast skin side down and air fry it for 20 minutes. This step helps render the fat under the skin and starts the crisping process. After 20 minutes, flip the turkey—skin side up now—and continue air frying for about 30 to 40 minutes more. The exact time depends on your turkey’s size, so always use an instant-read thermometer. When the internal temperature reaches 160°F, it’s ready. Let it rest for at least 10 minutes before carving; this lets juices redistribute and keeps the meat tender.
Pro Tips for Making Air Fryer Turkey Breast Recipe
- Use an Instant-Read Thermometer: This is my favorite tool to ensure the turkey is perfectly cooked without overdoing it.
- Don’t Skip the Resting Time: Even though it’s tempting, resting keeps the meat juicy and easy to slice.
- Preheat Your Air Fryer: I learned this trick after some uneven cooking; preheating sets the perfect stage for crispy skin.
- Avoid Overcrowding: Give your turkey breast enough room in the basket for air to circulate for even cooking.
How to Serve Air Fryer Turkey Breast Recipe
Garnishes
I like to serve this turkey with a sprinkle of fresh chopped parsley or thyme for a pop of color and fresh aroma. Sometimes a squeeze of lemon over the top adds a little brightness that cuts through the richness. Cranberry sauce also pairs beautifully, especially if you’re serving this around the holidays.
Side Dishes
My go-to sides with this Air Fryer Turkey Breast Recipe include roasted garlic mashed potatoes, green beans almondine, or a crisp fall salad. Sweet potatoes and maple-glazed carrots also bring a lovely seasonal touch. These all complement the simplicity of the turkey without stealing the spotlight.
Creative Ways to Present
For special occasions, I’ve arranged sliced turkey breast on a large platter lined with fresh rosemary sprigs, cranberries, and orange slices to create a festive centerpiece. You can also serve the turkey sliced thin on warm baguette slices with cranberry mayo for a casual but elegant appetizer. These ideas always impress guests without needing too much extra effort.
Make Ahead and Storage
Storing Leftovers
After the turkey cools, I wrap leftover slices tightly in foil or store them in an airtight container in the fridge. This keeps the meat juicy for 3 to 4 days. I’ve found slicing the turkey before storing makes reheating easier and quicker later on.
Freezing
I’ve frozen cooked turkey slices in vacuum-sealed bags or freezer-safe containers, which keeps them fresh for up to 3 months. Just make sure to separate layers with parchment paper so slices don’t stick together when frozen.
Reheating
The best way I’ve found to reheat turkey without drying it out is to warm it gently in the microwave covered with a damp paper towel or use a low oven setting wrapped in foil. If you have an air fryer still handy, a quick 3-5 minute reheat at 300°F restores some crispness to the skin that’s super satisfying.
FAQs
-
Can I cook a frozen turkey breast in the air fryer?
It’s best to thaw your turkey breast completely before air frying for even cooking. Cooking from frozen can result in an unevenly cooked center or dry edges. Plan ahead and thaw overnight in the fridge for best results.
-
How do I know when the turkey breast is fully cooked?
Use an instant-read thermometer inserted into the thickest part of the breast. When it hits 160°F, the turkey is safely cooked. Remember it will continue to cook slightly while resting, reaching the ideal 165°F holding temperature.
-
Can I use boneless turkey breast for this recipe?
You can, but the cooking time will be shorter and the texture can be a bit drier since there’s no bone to help retain moisture. I recommend adjusting time and checking internal temperature more frequently if you go boneless.
-
What do I do if my turkey skin isn’t crispy enough?
Try air frying a few extra minutes at a slightly higher temperature (around 375°F), keeping a close eye to avoid burning. Also, patting the skin dry before seasoning and ensuring the air fryer basket isn’t overcrowded helps crispness.
Final Thoughts
This Air Fryer Turkey Breast Recipe has become a favorite in my kitchen because it delivers succulent, crispy turkey without overshadowing your day. I recommend giving it a try next time you want a fuss-free, impressive meal. Once you see how easy it is to get juicy, flavorful turkey in under an hour, you’ll wonder why you didn’t try air frying turkey sooner — just like I did!
Print
Air Fryer Turkey Breast Recipe
- Prep Time: 5 minutes
- Cook Time: 55 minutes
- Total Time: 1 hour
- Yield: 10 servings
- Category: Main Course
- Method: Air Frying
- Cuisine: American
- Diet: Halal
Description
This Air Fryer Turkey Breast recipe offers a simple and flavorful way to cook a moist and tender turkey breast with crispy skin. Using an air fryer ensures even cooking and a perfect golden finish without the need for an oven. Seasoned with olive oil, kosher salt, and poultry seasoning, this dish is convenient for a quick yet delicious holiday or weeknight meal.
Ingredients
Turkey Breast
- 4 pound turkey breast (on the bone with skin, ribs removed)
Seasoning
- 1 tablespoon olive oil
- 2 teaspoons kosher salt
- 1/2 tablespoon dry turkey or poultry seasoning (such as Bell’s poultry seasoning, no salt)
Instructions
- Prepare the Turkey: Rub half a tablespoon of olive oil evenly all over the turkey breast. Then, season both sides of the turkey with the kosher salt and dry poultry seasoning. Finally, rub the remaining half tablespoon of olive oil over the skin side to help with browning and crispiness.
- Preheat the Air Fryer: Set your air fryer to 350°F (175°C) and allow it to preheat fully, ensuring optimal cooking temperature for the turkey breast.
- Cook Skin Side Down: Place the seasoned turkey breast skin side down into the air fryer basket. Cook for 20 minutes, allowing the skin to start crisping and the inside to begin cooking evenly.
- Flip and Continue Cooking: Carefully turn the turkey breast over so the skin side is up. Continue air frying for an additional 30 to 40 minutes, depending on the size of the breast. Use an instant-read thermometer to check that the internal temperature reaches 160°F (71°C) to ensure proper doneness.
- Rest and Serve: Remove the turkey breast from the air fryer and let it rest for 10 minutes before carving. Resting allows the juices to redistribute, resulting in juicy, tender slices.
Notes
- Removing the skin will reduce the smart points to zero for those tracking points-based diets.
- Cooking time may vary slightly depending on the air fryer model and size of the turkey breast.
- Always use a meat thermometer to ensure the turkey is safely cooked to the recommended internal temperature.
Nutrition
- Serving Size: 4 ounces
- Calories: 226 kcal
- Sugar: 0 g
- Sodium: 296 mg
- Fat: 10 g
- Saturated Fat: 2.5 g
- Unsaturated Fat: 7.5 g
- Trans Fat: 0 g
- Carbohydrates: 0 g
- Fiber: 0 g
- Protein: 32.5 g
- Cholesterol: 84 mg


