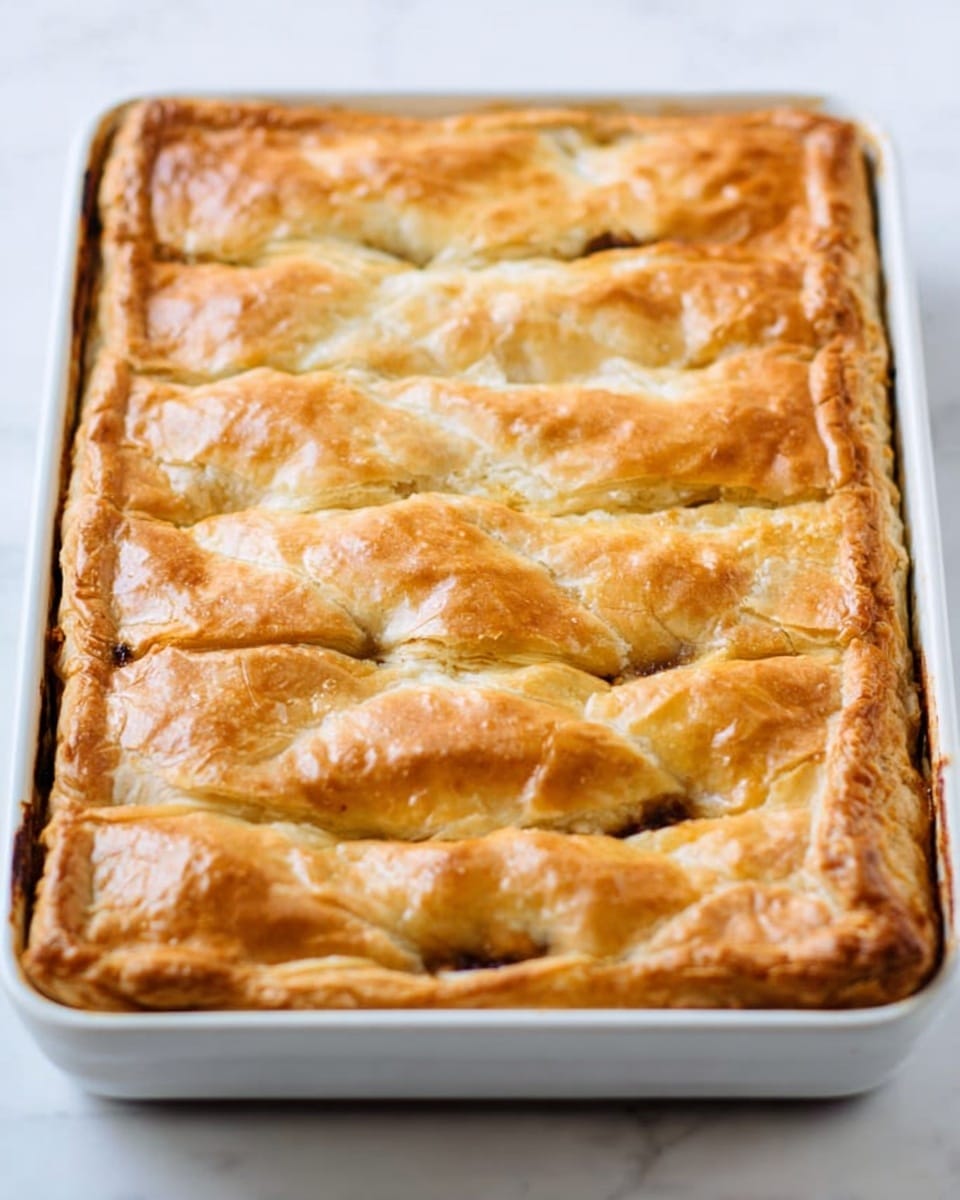
If you’re craving a cozy, satisfying dessert that feeds a crowd with ease, this Apple Slab Pie Recipe is just what you need. I absolutely love how this pie comes together: it’s rustic, hearty, and packed with tender, cinnamon-spiced apples all wrapped in a flaky, buttery crust. You’ll find that it’s perfect for family gatherings, potlucks, or any time you want to impress without fussing over individual pies.
When I first tried this recipe, I was amazed at how the slab format makes slicing and serving a breeze—no fighting over crust edges or tiny portions! Plus, the filling has a lovely balance of sweet and tart with just the right touch of warming spices. Honestly, once you make this Apple Slab Pie Recipe, you’ll keep coming back because it’s the kind of dessert that feels like a big warm hug on a plate.
Why You’ll Love This Recipe
- Feeds a Crowd Effortlessly: This Apple Slab Pie Recipe makes a big pie that serves many, so it’s perfect for parties and family dinners.
- Perfectly Balanced Filling: The mix of tart apples with cinnamon and nutmeg creates a classic flavor that isn’t too sweet or bland.
- Flaky, Buttery Crust: Combining shortening and cold butter helps you get that ideal texture and richness in the crust every time.
- Simple Yet Impressive: Even if you’re not an expert baker, this recipe’s straightforward steps lead to a stunning pie that impresses.

Ingredients You’ll Need
Each ingredient in this Apple Slab Pie Recipe plays a crucial role, from building a tender yet sturdy crust to creating a luscious apple filling. I’ll share some shopping tips to help you choose the best components.
- All-purpose flour: This is your base for both crust and filling thickening; make sure it’s fresh for best dough texture.
- Salt: Just a pinch to enhance all those flavors without overpowering.
- Shortening: Adds flakiness—choose a quality vegetable shortening for best results.
- Cold butter: Keeps your crust tender and flavorful; don’t skip chilling it well.
- Vegetable oil: Helps to balance the fat content in the dough for a soft but manageable crust.
- Milk: Mixed with lemon juice to create a homemade buttermilk substitute for tenderness.
- Lemon juice: A little acidity to help activate the milk and brighten the flavor of the apples.
- Apples: Choose crisp and tart varieties like Granny Smith or Honeycrisp—they hold up beautifully when baked.
- Sugar: Just enough to sweeten the apples and sprinkle on top for a gentle crunch.
- Ground cinnamon and nutmeg: Classic warming spices that bring the apple filling to life.
- Egg: For egg wash to give your crust that beautiful golden sheen.
Variations
I love how versatile this Apple Slab Pie Recipe is—sometimes I stick with the classic, but other times I like to mix things up. Feel free to adapt it to your personal taste or dietary needs.
- Adding nuts: I’ve sprinkled chopped walnuts or pecans over the filling before baking for a lovely crunch that my family goes crazy for.
- Using different fruits: Pears, cranberries, or even a mix with apples add lovely seasonal twists I like to try around holidays.
- Gluten-free crust: I once experimented with a gluten-free all-purpose flour blend—the key was keeping the dough chilled and not overworking it.
- Vegan version: Swap out butter for dairy-free margarine and the egg wash for almond milk with a touch of maple syrup for a beautiful glossy finish.
How to Make Apple Slab Pie Recipe
Step 1: Craft the Perfect Dough
Start by mixing your flour and salt in a large bowl. This base is super important because it sets the stage for a sturdy yet flaky crust. Next, cut in the shortening and cold butter—my trick is to freeze the butter cubes and work quickly so they stay cold, which means flakier layers later. When the pieces look like small peas, you’re ready for the next step.
Step 2: Add Liquids and Bring Dough Together
Combine the milk and lemon juice to create a quick homemade buttermilk—this tenderizes the crust and adds subtle tang. Pour in the vegetable oil along with the milk mixture, stirring gently until the dough just comes together. I usually switch to my hands here, which feels messy but helps know exactly when you have the right texture. Divide into two discs, wrap in plastic, and pop them in the fridge for about 30 minutes while you prep the filling.
Step 3: Prepare the Apple Filling
Peeling and chopping about four pounds of apples can feel like a big task, but trust me, it’s worth every minute. Pick apples that hold their shape when cooked like Granny Smith or Honeycrisp. Toss the pieces with sugar, flour, cinnamon, and nutmeg to coat evenly—that’s where the magic flavor balance happens.
Step 4: Roll Out and Assemble Your Slab Pie
Roll your first dough disc on a lightly floured surface until it’s roughly a 13×18-inch rectangle—don’t stress if it looks a bit rustic, that’s part of the charm. Place it into your 10×15-inch jelly roll pan with the edges hanging over. Sprinkle a mix of sugar and flour (the crust dust) over the bottom crust to create a barrier that helps keep everything crisp. Pour your apple filling evenly, then roll out the second disc and place it on top, folding and crimping the edges to seal.
Step 5: Final Touches and Baking
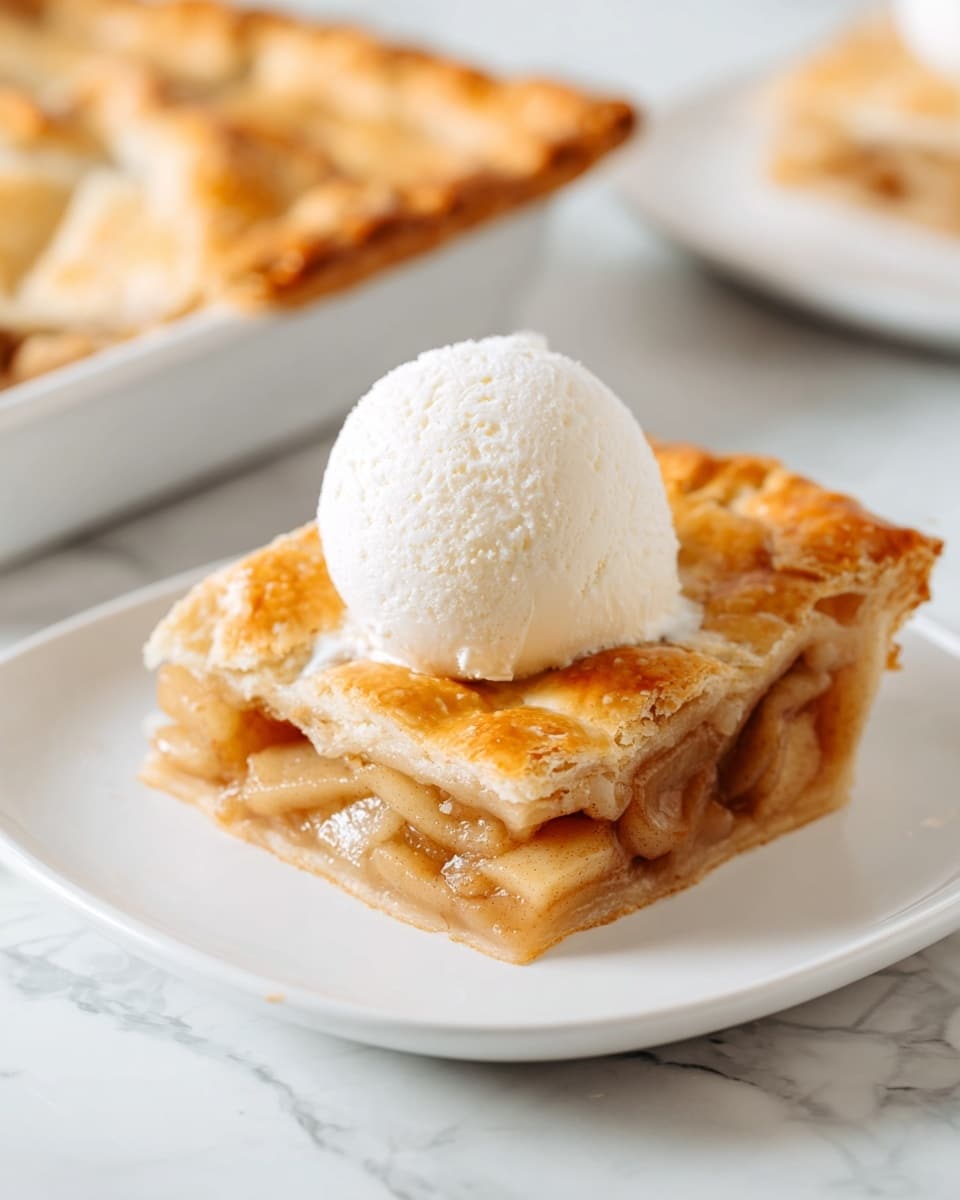
Cut a few slits into the top crust to let steam escape so your pie bakes evenly. Brush it with a simple egg wash and sprinkle a little sugar for that irresistible golden sparkle. Bake at 400°F for 30 minutes, then tent loosely with foil and bake for another 20-25 minutes until the crust is golden and the filling bubbles temptingly. The hardest part? Waiting at least two hours for it to cool before you dive in!
Pro Tips for Making Apple Slab Pie Recipe
- Keep Butter Cold: I learned that using frozen butter cubes and minimal handling yields the flakiest crust.
- Don’t Skip the Crust Dust: That sprinkle of sugar and flour under the apples helps prevent soggy crust—game changer for me!
- Use a Pizza Stone: Preheating a pizza stone inside your oven gives the pie bottom extra crispness, which I love.
- Let It Rest: It’s tempting to slice hot pie, but cooling for two hours ensures clean slices and allows flavors to meld.
How to Serve Apple Slab Pie Recipe
Garnishes
I usually top my slices with a generous scoop of vanilla ice cream—classic for a reason! A drizzle of caramel sauce or a sprinkle of chopped toasted pecans adds extra indulgence. When I’m serving a crowd, a dusting of powdered sugar makes everything look pretty without much fuss.
Side Dishes
This Apple Slab Pie pairs wonderfully with a brisk cup of coffee or a warm mug of spiced cider. For dinner parties, I sometimes serve it alongside creamy whipped cream or a mild sharp cheddar cheese on the side—trust me, it sounds odd but it really works!
Creative Ways to Present
For special occasions, I like cutting the slab pie into neat rectangles and arranging them on a rustic wooden board with seasonal decorations like cinnamon sticks and fresh apples. Wrapping individual slices in parchment for guests is a sweet touch for potlucks or picnics.
Make Ahead and Storage
Storing Leftovers
After the grand feast, I cover the remaining pie tightly with plastic wrap and keep it in the refrigerator. It stays fresh for up to three days that way, and I always feel good about not wasting a crumb.
Freezing
If I’m prepping ahead, I freeze the unbaked slab pie after assembling it in the pan, wrapped securely with foil and plastic wrap. When it’s time to bake, I let it thaw overnight in the fridge and then bake as usual. It’s a total time-saver without sacrificing flavor or texture.
Reheating
To revive leftover pie, I gently warm slices in a 350°F oven for about 10-15 minutes. This brings back the crisp crust and melty filling without drying it out—a far better option than the microwave in my experience.
FAQs
-
Can I use a store-bought pie crust for this Apple Slab Pie Recipe?
Absolutely! While I love making the crust from scratch for the flavor and texture, using store-bought crust is a time-saving option that still delivers a delicious slab pie. Just make sure to roll out enough to cover the large pan format, and follow the same assembly and baking instructions.
-
What’s the best apple variety for this slab pie?
I recommend tart and firm apples like Granny Smith, Honeycrisp, or Braeburn. They hold their shape well during baking and provide the perfect balance to the sweet spices. Mixing a couple of varieties can also add a complex flavor if you like.
-
How do I avoid a soggy bottom crust?
The secret is the crust dust: sprinkling a mixture of sugar and flour over the bottom crust before adding the apples helps absorb excess moisture. Using a preheated pizza stone under your baking pan also helps create a crisp bottom.
-
Can I make this Apple Slab Pie Recipe ahead of time?
Yes! You can assemble the pie a day in advance and keep it refrigerated, covered tightly with plastic wrap. Alternatively, freeze it unbaked and bake fresh when ready—a great stress-free strategy for holidays or busy weekends.
Final Thoughts
This Apple Slab Pie Recipe holds a special place in my heart because it combines the best parts of home baking—warmth, sharing, and simple ingredients—with an easy format that works for any gathering. I encourage you to try making it your own, whether sticking to the classic or experimenting with fun twists. Trust me, once you take that first bite, you’ll understand why it’s become one of my family’s favorite ways to enjoy apple pie.
Print
Apple Slab Pie Recipe
- Prep Time: 45 minutes
- Cook Time: 55 minutes
- Total Time: 3 hours 40 minutes
- Yield: 24 slices
- Category: Dessert
- Method: Baking
- Cuisine: American
Description
This Apple Slab Pie recipe features a flaky, homemade crust filled with a spiced apple mixture, baked to golden perfection in a large rectangular pan. Perfect for serving a crowd, this rustic pie combines sweet and tart flavors with warm cinnamon and nutmeg, wrapped in a tender, buttery dough that crisps beautifully in the oven.
Ingredients
Pie Crust
- 4 cups all-purpose flour
- 2 teaspoons salt
- 1 ¼ cup shortening
- ½ cup cold butter, cut into small cubes
- 1 Tbsp. vegetable oil
- ¾ cup milk
- 1 Tbsp. lemon juice
Apple Pie Filling
- 10-12 cups apples (about 4 pounds), peeled and chopped
- ⅔ cups sugar
- ¼ cup all-purpose flour
- 1 ½ teaspoons ground cinnamon
- ½ teaspoon ground nutmeg
Crust Dust
- 2 Tbsp. all-purpose flour
- 2 Tbsp. sugar
Egg Wash
- 1 egg, beaten
- 1 Tbsp. water
Instructions
- Prepare the Dough: In a large bowl, mix 4 cups flour and 2 teaspoons salt. Cut in 1 ¼ cups shortening and ½ cup cold cubed butter until the mixture resembles small pea-sized particles.
- Add Wet Ingredients: In a small bowl, combine ¾ cup milk and 1 Tbsp. lemon juice. Add 1 Tbsp. vegetable oil to this mixture, then stir it into the flour mixture until a soft dough forms. Use your hands if necessary to bring the dough together.
- Chill Dough: Divide the dough into two equal portions, form each into a disc, and wrap in plastic wrap. Refrigerate for about 30 minutes while you prepare the filling.
- Prepare the Apple Filling: Peel and chop 10-12 cups (approximately 4 pounds) of apples into small pieces. In a bowl, combine chopped apples with ⅔ cup sugar, ¼ cup flour, 1 ½ teaspoons cinnamon, and ½ teaspoon nutmeg. Stir to coat evenly.
- Preheat Oven: Preheat your oven to 400°F (204°C). If you have a pizza stone, place it on the oven rack now to preheat.
- Roll Out Bottom Crust: On a lightly floured surface, roll out one disc of dough into a rustic 13×18-inch rectangle about ⅛ inch thick. Transfer this to a 10×15-inch jelly roll pan, letting the edges hang over.
- Add Crust Dust: Sprinkle a mixture of 2 Tbsp flour and 2 Tbsp sugar evenly over the bottom crust.
- Fill the Pie: Pour the apple filling over the crust, spreading it out evenly.
- Roll Out Top Crust: Roll out the second dough disc into a 13×18-inch rectangle, and place it over the apple filling.
- Seal Edges: Fold the overhanging edges of both crusts back and tuck them into the pan. Pinch or crimp edges firmly to seal, using your fingers or a fork.
- Vent and Egg Wash: Cut slits in the top crust to allow steam to escape during baking. Brush the top crust lightly with the egg wash (1 beaten egg mixed with 1 Tbsp water) and sprinkle with sugar.
- Bake: Bake the slab pie for 30 minutes, then loosely cover with foil and continue baking for an additional 20-25 minutes until the top is golden and the filling is bubbling.
- Cool and Serve: Allow the pie to cool for at least 2 hours before slicing into 24 pieces for serving.
Notes
- Storage: Store leftover pie in the pan covered tightly with plastic wrap to keep it fresh for up to 3 days.
- Baking Sheets: It is best to bake on light-colored baking sheets. Dark sheets may require adjustment of baking time as they absorb more heat.
Nutrition
- Serving Size: 1 slice (1/24 of pie)
- Calories: 220 kcal
- Sugar: 15 g
- Sodium: 150 mg
- Fat: 11 g
- Saturated Fat: 5 g
- Unsaturated Fat: 5 g
- Trans Fat: 0 g
- Carbohydrates: 29 g
- Fiber: 3 g
- Protein: 2 g
- Cholesterol: 30 mg


