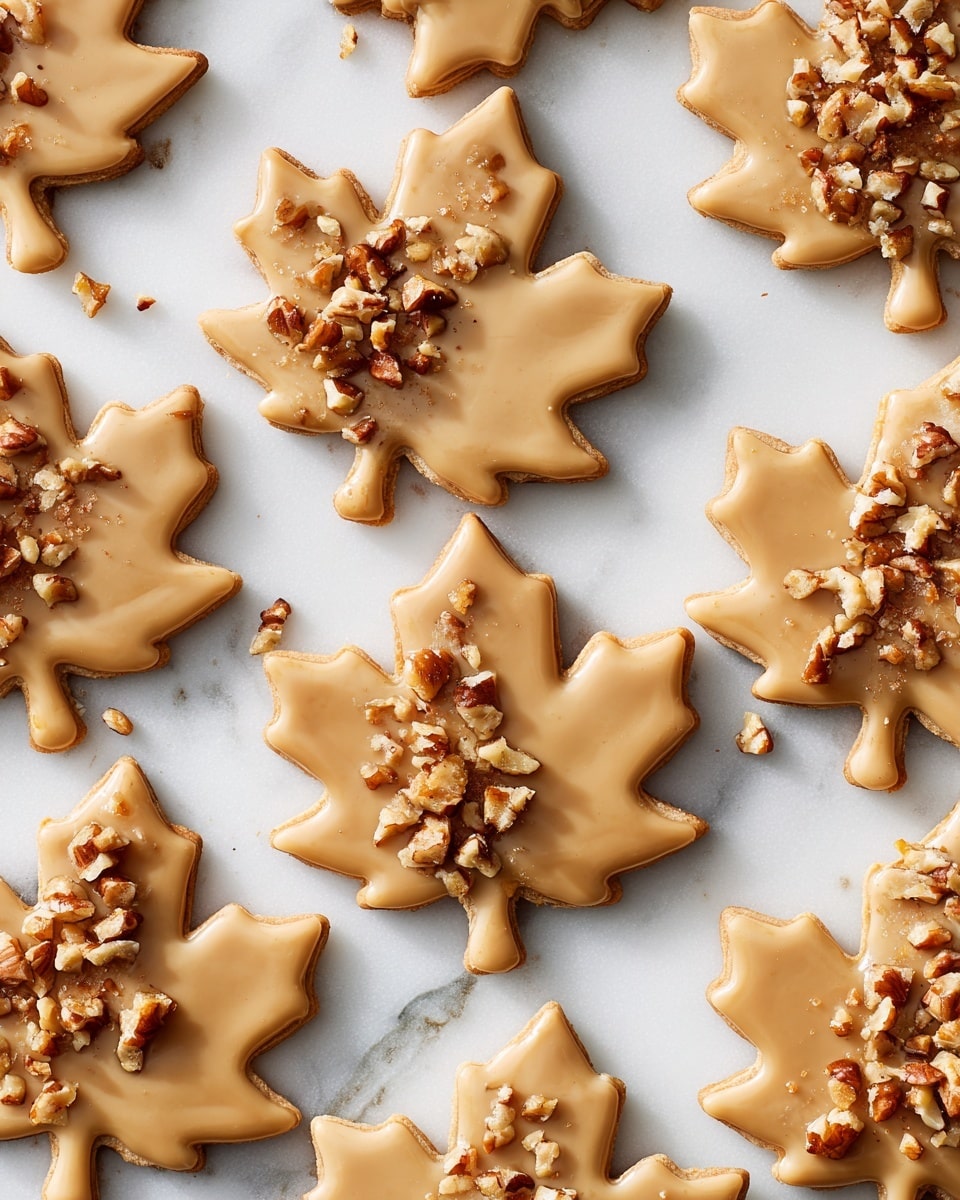
I’m so excited to share this Glazed Maple Leaf Cookies Recipe with you—it’s one of those special bakes that feels like a warm hug in cookie form. The blend of buttery cookie dough with finely ground walnuts and the cozy hint of cinnamon makes these cookies irresistible, but what really sets them apart is that beautiful maple glaze that gives them a lovely shine and just the right touch of sweetness.
This recipe is perfect for when you want to impress at a gathering or just treat yourself with a cozy, maple-kissed snack. I remember the first time I made these—I couldn’t stop sneaking cookie after cookie! You’ll find that these cookies hold their shape beautifully thanks to the chilled dough and the maple leaf cutter, making them perfect for autumn or any occasion you want to add a bit of charm to.
Why You’ll Love This Recipe
- Delightfully Nutty: The walnuts are ground into the dough, giving each bite a tender texture and subtle nutty flavor that’s just irresistible.
- Beautiful Maple Glaze: That shiny glaze isn’t just for looks—it’s a perfect balance of sweetness and maple flavor that makes these cookies stand out.
- Perfect for Seasonal Celebrations: These cookies are nostalgic and festive, especially around fall or holidays when maple flavors feel just right.
- Easy to Make and Customize: With straightforward ingredients and simple steps, you can easily tweak this recipe to your taste or dietary preferences.

Ingredients You’ll Need
Each ingredient here plays a crucial role in bringing the cookies and their glaze to life. Using raw walnuts adds a fresh nutty taste, and a touch of pure maple syrup elevates the glaze beautifully. Make sure to choose good-quality butter and real maple extract or syrup to get that authentic flavor.
- All-purpose flour: The base of the dough, makes for a tender but sturdy cookie.
- Raw walnuts: Ground finely, they add texture and a natural nuttiness throughout the cookie.
- Baking powder: Helps the cookies rise just enough for a soft bite without puffiness.
- Ground cinnamon: Adds warmth and depth to the flavor, perfect for maple pairing.
- Kosher salt: Enhances the sweetness and balances flavors.
- Unsalted butter: Softened for the dough, and melted for the glaze, butter is essential for richness.
- Granulated sugar: Sweetens the cookie dough and contributes to that classic cookie texture.
- Large egg: Binds the dough and adds moisture.
- Whole milk: Keeps the dough tender and also thins the glaze to the perfect consistency.
- Pure maple syrup: A defining maple flavor that’s subtle but unmistakably delightful.
- Light brown sugar: Sweetens the glaze with a little molasses flavor that deepens the maple notes.
- Maple extract or pure vanilla extract: Boosts the maple flavor in the glaze or adds a lovely aromatic contrast if you prefer vanilla.
- Confectioners’ sugar: Gives the glaze its smooth, glossy finish.
- Ground nutmeg: Just a pinch for warmth and complexity in the glaze.
- Crushed raw walnuts and maple sugar (optional): Great for decorating for that extra crunch and sweetness.
Variations
One of my favorite things about this Glazed Maple Leaf Cookies Recipe is how easy it is to customize. Whether you want to add a different spice, swap the nuts, or try a dairy-free version, it’s super flexible, and that means you can make it yours!
- Nut Variations: I’ve swapped out walnuts for pecans before, and it gave the cookies a lovely buttery crunch that my family adored.
- Spice It Up: Adding a pinch of ground cloves or ginger to the dough gives a wonderful holiday twist.
- Maple-Maple Boost: For an extra maple hit, drizzle additional pure maple syrup over the glazed cookies just before serving—it’s a crowd-pleaser.
- Dairy-Free Version: Substitute the butter with your favorite plant-based spread and use a non-dairy milk; the cookies still come out fantastic!
How to Make Glazed Maple Leaf Cookies Recipe
Step 1: Process the Dry Ingredients
Start by pulsing the flour and raw walnuts in your food processor until the walnuts are finely ground—that’s the secret to that lovely texture. Then add in the baking powder, ground cinnamon, and salt, and pulse a few more times until everything’s evenly combined. This step ensures the walnuts are perfectly dispersed, so every cookie has that nutty goodness.
Step 2: Cream Your Butter and Sugar
In a large bowl, beat the softened butter and granulated sugar until the mixture is fluffy and pale—this usually takes about 2 minutes with a handheld mixer. It’s an important step because it helps your cookies be tender and soft. Then add your egg, milk, and maple syrup, beating everything together until smooth and combined.
Step 3: Combine the Wet and Dry Ingredients
Gradually add the flour and walnut mixture to the wet ingredients, beating on medium-low until just combined with no dry streaks left. Be careful not to overmix here—that would make the cookies tough. Once combined, turn the dough out onto a clean surface, shape it into a disk, wrap it tightly in plastic wrap, and pop it in the fridge for at least an hour. This chilling step is key for rolling out the dough easily and getting clean cookie shapes.
Step 4: Roll and Cut the Cookies
Once chilled, roll the dough on a lightly floured surface to about 1/8-inch thickness. Use your maple leaf-shaped cookie cutter to cut out shapes, re-rolling scraps to maximize yield—you should get around 48 cookies. Transfer them carefully onto parchment-lined baking sheets, then pop the trays in the freezer for about 10 minutes—this extra chill helps the cookies keep their shape when baking!
Step 5: Bake to Golden Perfection
Preheat your oven to 350°F and position racks in the upper and lower thirds. Bake the cookies for 10 to 12 minutes, rotating the baking sheets halfway through to ensure even coloring. You’ll know they’re ready when the edges show a delicate golden hue. Let them cool completely on wire racks before glazing.
Step 6: Make the Maple Glaze
For the glaze, gently cook the brown sugar and butter over low heat, stirring constantly so it doesn’t burn, until the sugar dissolves—this takes about 2-3 minutes. Let it cool slightly, then whisk in your maple extract and pure maple syrup. Slowly blend in the confectioners’ sugar until smooth, then stir in salt, nutmeg, and milk. The glaze will have a lovely light brown color and pour easily—perfect for dipping!
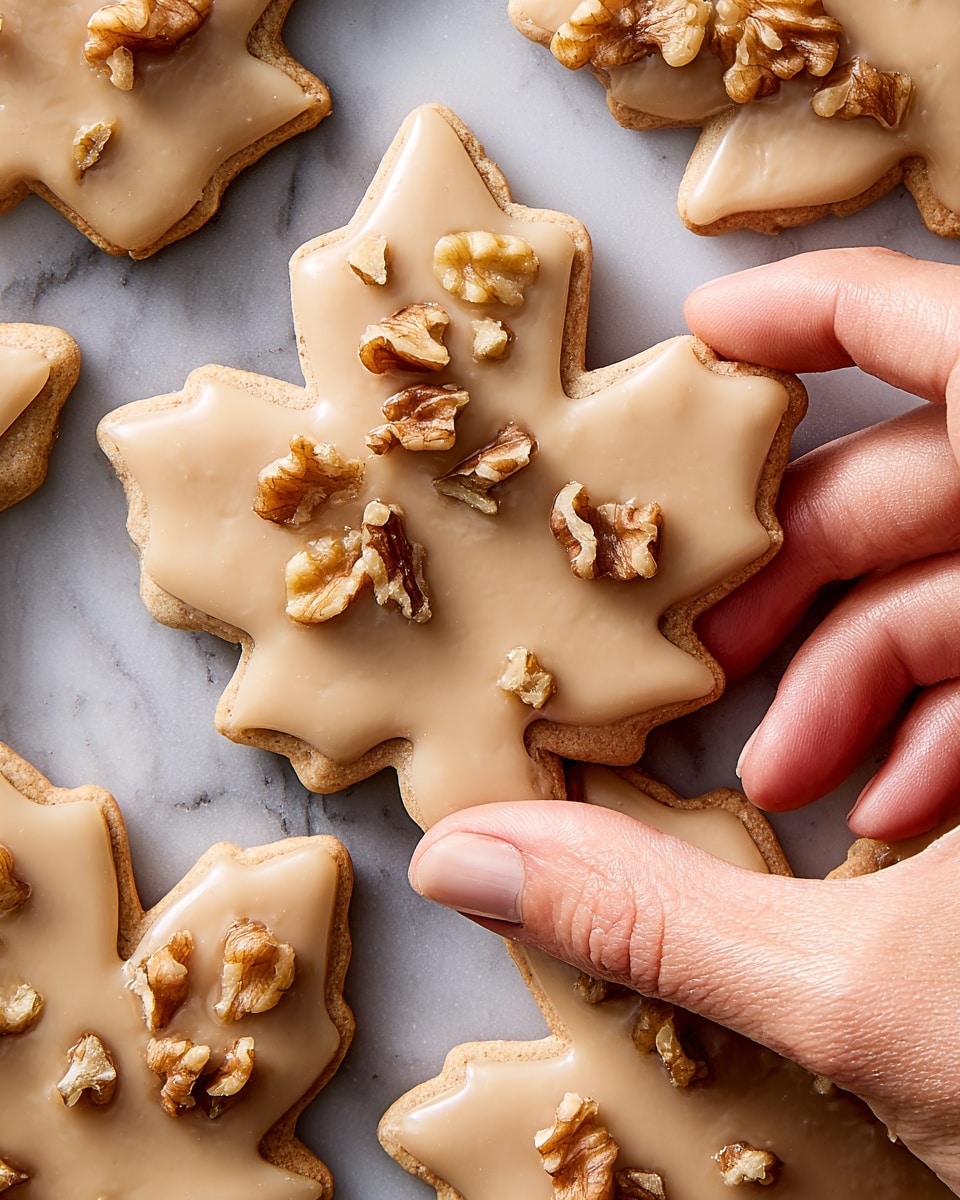
Step 7: Dip and Decorate
Dip one side of each cooled cookie into the glaze, allowing the excess to drip off. If you love a bit of extra texture and sweetness like me, sprinkle crushed walnuts or maple sugar on top while the glaze is still wet. Then set them aside to let the glaze set fully—this only takes about 20-30 minutes.
Pro Tips for Making Glazed Maple Leaf Cookies Recipe
- Chill Twice: I always chill the dough for at least an hour and then the cut cookies before baking to help them hold their shape beautifully.
- Don’t Overmix Dough: Mixing just until combined avoids tough cookies—I’ve learned this the hard way!
- Use a Light Hand with Glaze: Dipping the cookie lightly prevents dripping and sticky messes while ensuring perfect coverage.
- Freeze Cookies Before Baking: This quick freeze step gives you sharper edges and a prettier cookie shape every time.
How to Serve Glazed Maple Leaf Cookies Recipe
Garnishes
I love sprinkling crushed raw walnuts and a bit of maple sugar on top of the glaze—this adds crunch and an extra layer of maple sweetness that’s just magical. If I’m feeling fancy, a few tiny edible gold flakes can turn these cookies into a showstopper for special parties.
Side Dishes
These cookies pair wonderfully with a hot cup of coffee or chai tea for a cozy afternoon snack. I also often serve them alongside a simple cream cheese spread or maple whipped cream at brunch for a fun maple-themed treat.
Creative Ways to Present
For fall parties, I love arranging the maple leaf cookies on a wooden serving board with scattered fresh maple leaves and rustic twine accents. Making a cookie garland with string and clipped cookies is a fun idea to decorate for Thanksgiving or Halloween dessert tables—I tried it once, and it was a huge hit!
Make Ahead and Storage
Storing Leftovers
Once glazed and fully set, store your Glazed Maple Leaf Cookies in an airtight container at room temperature. I’ve kept them fresh for up to a week like this, and they taste just as delicious on day five as they do fresh-baked.
Freezing
If you want to freeze, the best way is to freeze the unglazed cookies after cutting and chilling, then bake fresh directly from frozen. I’ve found that freezing already glazed cookies can cause the glaze to dull or crack. Fresh glaze after baking makes all the difference.
Reheating
Since these are cookies, reheating isn’t always necessary, but if you want that just-baked warmth, pop them in a 300°F oven for a few minutes—just enough to warm through without melting the glaze completely.
FAQs
-
Can I make the Glazed Maple Leaf Cookies Recipe without a food processor?
Yes, you can! If you don’t have a food processor, finely chop the walnuts with a knife and sift the flour, baking powder, and spices together to ensure even mixing. It’ll take a bit more elbow grease, but your cookies will still turn out great.
-
What’s the best way to keep the maple glaze from becoming too runny?
The key is to whisk in the confectioners’ sugar slowly until you achieve the right consistency—it should be pourable but not watery. Also, make sure not to add too much milk at once; add it tablespoon by tablespoon to control thickness easily.
-
How do I store these cookies to keep the glaze shiny and fresh?
Store the glazed cookies in a single layer in an airtight container at room temperature. Avoid stacking them until the glaze is fully set to prevent smudging, and keep them away from moisture to preserve that lovely shine.
-
Can I substitute other nuts if I have allergies?
Absolutely. If you’re allergic to walnuts, try pecans or almonds. For nut-free options, finely crushed seeds like pumpkin or sunflower can work, but the flavor and texture will be a bit different.
Final Thoughts
Honestly, this Glazed Maple Leaf Cookies Recipe has become a staple in my kitchen, especially as the seasons change and the craving for cozy flavors kicks in. I love how they look festive yet are surprisingly simple to make, and I know once you try them, you’ll love sharing them just as much as I do. So grab your maple leaf cutter, dive into this recipe, and enjoy every sweet, buttery, maple-glazed bite with friends and family—you won’t regret it!
Print
Glazed Maple Leaf Cookies Recipe
- Prep Time: 20 mins
- Cook Time: 12 mins
- Total Time: 1 hr 50 mins
- Yield: 48 cookies
- Category: Dessert
- Method: Baking
- Cuisine: American
Description
These Glazed Maple Leaf Cookies combine a delicate walnut-infused cookie base with a rich, sweet maple-flavored icing. Perfectly shaped with a maple leaf cutter, these cookies offer a delightful cinnamon spice with a buttery texture and a glossy glaze, ideal for festive occasions or cozy gatherings.
Ingredients
Cookies
- 3 cups (360 g) all-purpose flour, plus more for dusting
- 1 cup raw walnuts
- 1 tsp baking powder
- 1 tsp ground cinnamon
- 1/2 tsp kosher salt
- 1 cup (2 sticks) unsalted butter, softened
- 1 cup (200 g) granulated sugar
- 1 large egg
- 1 Tbsp whole milk
- 1 tsp pure maple syrup
Icing
- 3/4 cup (160 g) light brown sugar
- 6 Tbsp unsalted butter
- 1/2 tsp maple extract or pure vanilla extract
- 1/2 tsp pure maple syrup
- 1 1/2 cups (175 g) confectioners’ sugar
- Pinch of kosher salt
- Pinch of ground nutmeg
- 3 Tbsp whole milk
- Crushed raw walnuts and maple sugar, for serving (optional)
Instructions
- Prepare dry ingredients: In a food processor, pulse the flour and raw walnuts until the walnuts are finely ground. Add baking powder, ground cinnamon, and kosher salt; pulse again until well combined.
- Make the dough: In a large bowl, use a handheld mixer on medium-high speed to beat the softened butter and granulated sugar until fluffy and pale, about 2 minutes. Add the egg, whole milk, and pure maple syrup; beat until combined. Gradually add the dry ingredients and beat on medium-low speed until no dry streaks remain. Transfer the dough to a clean surface, wrap with plastic wrap, and refrigerate for at least 1 hour or up to 2 days.
- Shape the cookies: On a lightly floured surface, roll the dough to 1/8-inch thickness. Use a maple leaf-shaped cookie cutter to cut out about 48 cookies, re-rolling scraps as needed. Place the cut cookies onto two parchment-lined baking sheets. Freeze the cookies until cold, about 10 minutes.
- Bake the cookies: Position oven racks in the upper and lower thirds and preheat the oven to 350°F (175°C). Bake the cookies, switching the baking sheets between racks halfway through, until the edges are lightly golden, approximately 10 to 12 minutes. Remove from oven and cool completely on racks.
- Prepare the icing: In a small saucepan over low heat, cook the light brown sugar and unsalted butter, stirring constantly for 2 to 3 minutes until sugar dissolves. Pour into a heatproof bowl and let cool slightly. Whisk in maple extract and pure maple syrup. Gradually add confectioners’ sugar until combined, then mix in kosher salt and ground nutmeg. Stir in whole milk carefully; the icing will take on a light brown color.
- Glaze and decorate: Dip one side of each cooled cookie into the maple icing, allowing excess to drip off. Optionally, garnish with crushed raw walnuts or sprinkle with maple sugar. Let the icing set before serving.
Notes
- Refrigerating the dough helps to firm it up, which makes it easier to roll and cut the shapes.
- Freezing the cut cookies before baking helps maintain their shape and prevents spreading in the oven.
- If you prefer a stronger maple flavor in the icing, you can use pure maple syrup instead of maple extract.
- Store cookies in an airtight container at room temperature for up to 5 days or freeze for longer storage.
- For a dairy-free option, substitute butter and milk with plant-based alternatives.
Nutrition
- Serving Size: 1 cookie
- Calories: 150
- Sugar: 10g
- Sodium: 80mg
- Fat: 9g
- Saturated Fat: 5g
- Unsaturated Fat: 3g
- Trans Fat: 0g
- Carbohydrates: 18g
- Fiber: 1g
- Protein: 2g
- Cholesterol: 25mg


