If you’re a fan of rich, peanut buttery desserts, you’re going to fall head over heels for this Nutter Butter Cookie Bars Recipe. I absolutely love how these bars blend the creamy punch of peanut butter with the nostalgic crunch and flavor of Nutter Butter cookies—you get that buttery, peanut-y goodness in every bite. They make an easy yet impressive treat when you want to whip up something comforting but a little different from your classic cookies or brownies.
When I first tried this recipe, I was amazed at how quickly it came together and how irresistibly good it turned out. Whether it’s for a weekend get-together, a bake sale, or a cozy night in with family, these cookie bars always hit the spot. They’re soft, chewy, and loaded with peanut butter chips and cookie pieces—just the kind of dessert that makes everyone ask for seconds. I’m excited to walk you through making them yourself, so you can enjoy that same warm, homemade feeling right in your own kitchen.
Why You’ll Love This Recipe
- Irresistible Peanut Butter Flavor: The chunky peanut butter and peanut butter chips create a rich, nutty taste that’s truly crave-worthy.
- Texture That Impresses: The mix of soft blondie bars with crunchy Nutter Butter cookie pieces gives the perfect combination of chewy and crisp.
- Super Easy to Make: You don’t need fancy equipment or complicated steps—just mix, bake, and enjoy.
- Perfect for Any Occasion: From casual snacking to parties, these cookie bars bring joy every time.

Ingredients You’ll Need
These ingredients combine to create a beautifully balanced peanut butter blondie with bursts of cookie crunch that are utterly satisfying. I always recommend grabbing natural chunky peanut butter for that authentic texture and flavor—it really makes a difference!
- Cooking spray: Essential for greasing the pan to keep the bars from sticking, plus an extra parchment layer makes removal effortless.
- Light brown sugar: Adds moisture and a subtle caramel note that complements the peanut butter perfectly.
- Unsalted butter: Melted butter helps to create a tender base without overwhelming the peanut flavor.
- Chunky peanut butter: Using an all-natural, chunky version gives you nice peanut bits and real, nutty flavor.
- Pure vanilla extract: Just a teaspoon amps up the depth of flavors without stealing the spotlight.
- Kosher salt: A pinch balances sweetness and enhances the peanuty notes beautifully.
- Large eggs: At room temperature, they bind everything tenderly and help the bars rise just right.
- Baking powder: Gives a slight lift so the bars are dense yet soft.
- All-purpose flour: The foundation of the batter, providing structure while keeping things chewy.
- Nutter Butter cookies: Both chopped and whole cookies add that classic peanut butter cookie taste and delightful crunch on top.
- Peanut butter chips: Divided into the batter and topping, they melt slightly and provide little pockets of creamy peanut butter joy.
Variations
I love how flexible the Nutter Butter Cookie Bars Recipe is—there’s room to make it your own with small changes that keep it fresh. Feel free to experiment with different add-ins or adjust for dietary preferences. Making it yours is part of the fun!
- Peanut Butter Swap: If you don’t have chunky, creamy peanut butter works too, just expect a smoother texture.
- Nut-Free Version: Substitute sunflower seed butter and seed butter chips to keep it allergy-friendly—I’ve done this for friends, and it’s a crowd-pleaser!
- Chocolate Lover’s Upgrade: Stir in mini chocolate chips or drizzle melted dark chocolate on top for an extra indulgence.
- Salty-Sweet Twist: Sprinkle flaky sea salt lightly on top before baking to heighten the flavors.
How to Make Nutter Butter Cookie Bars Recipe
Step 1: Prep Your Pan and Oven
Start by preheating your oven to 350°F. I always use a 13″ x 9″ metal baking pan because it gives the bars perfect thickness and bake time. Spray the pan lightly with cooking spray, then line it with parchment paper, leaving a couple of inches hanging over two long sides—that way, you’ll be able to lift the whole batch out easily when it’s cooled. Don’t forget to spray the parchment again for easy release.
Step 2: Beat the Sugar, Butter & Peanut Butter
In a large mixing bowl, grab your handheld mixer and beat the packed brown sugar, melted butter, chunky peanut butter, vanilla extract, and kosher salt on medium-high speed until smooth and combined. This mix is where all the peanut butter magic begins, and getting it nice and creamy at this stage helps set the stage for tender bars.
Step 3: Add the Eggs and Baking Powder
Now, add in the eggs one at a time, mixing on low speed after each addition to keep the batter silky and cohesive. After your eggs are fully incorporated, sprinkle in the baking powder and give it one last beat until everything is well mixed. This keeps the bars from getting too dense while still making them rich and moist.
Step 4: Fold in Flour, Chopped Cookies & Chips
Switch to a flexible rubber spatula and gently fold the flour into your wet batter—stir just until you see a few streaks of flour remain. Overmixing here can make the bars tough, so I always remind myself that a little streakiness is fine. Next, gently fold in the chopped Nutter Butter cookies and two-thirds of the peanut butter chips to disperse those delightful pockets of flavor.
Step 5: Spread Batter and Top with Whole Cookies and Chips
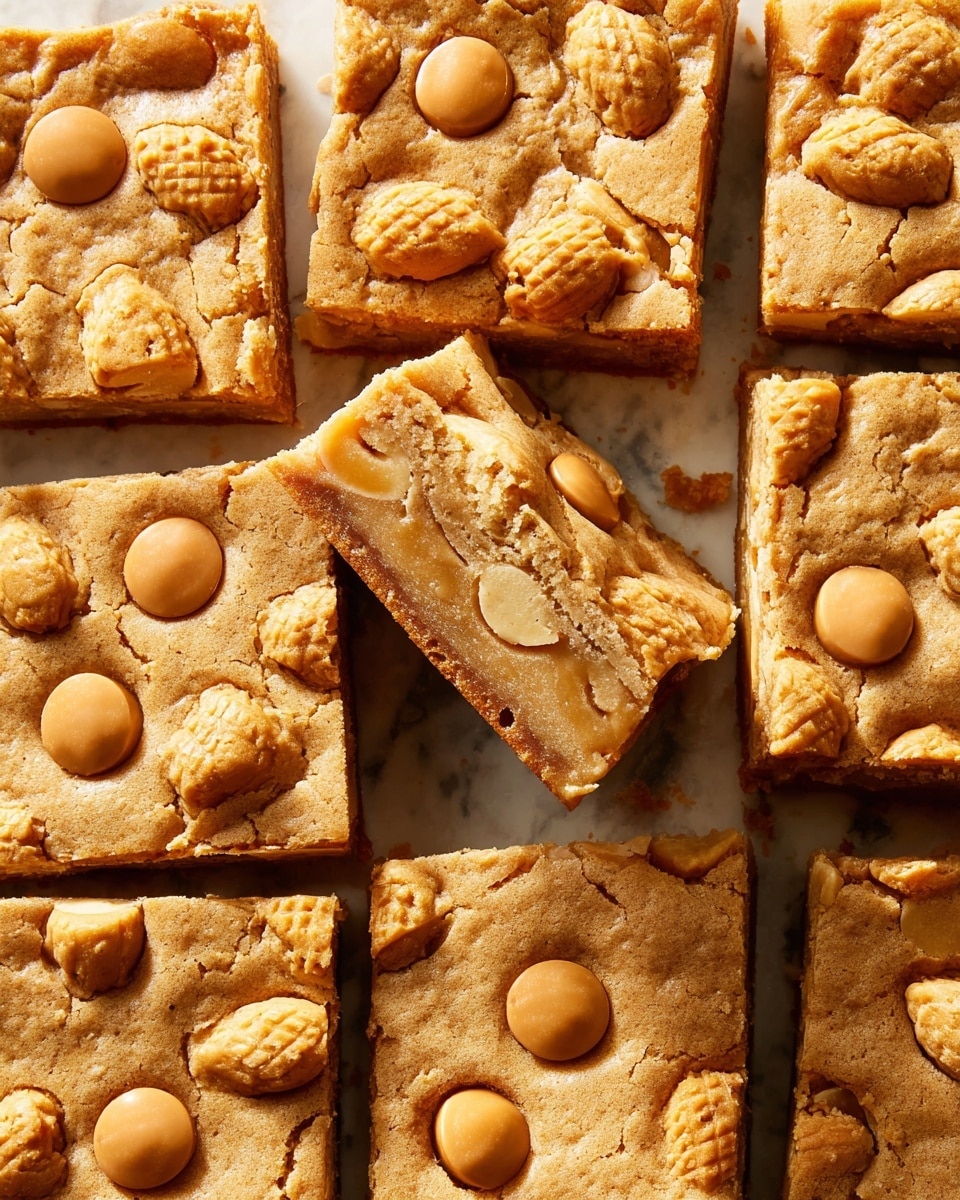
Scrape your batter into the prepared pan and use an offset spatula or the back of a spoon to spread it evenly. Here’s a fun part: take the remaining whole Nutter Butter cookies and twist them apart, then press the peanut-butter-side-up halves gently into the top of the batter. This adds amazing texture and visual appeal. Finish by sprinkling the rest of the peanut butter chips over the surface.
Step 6: Bake, Cool, and Cut
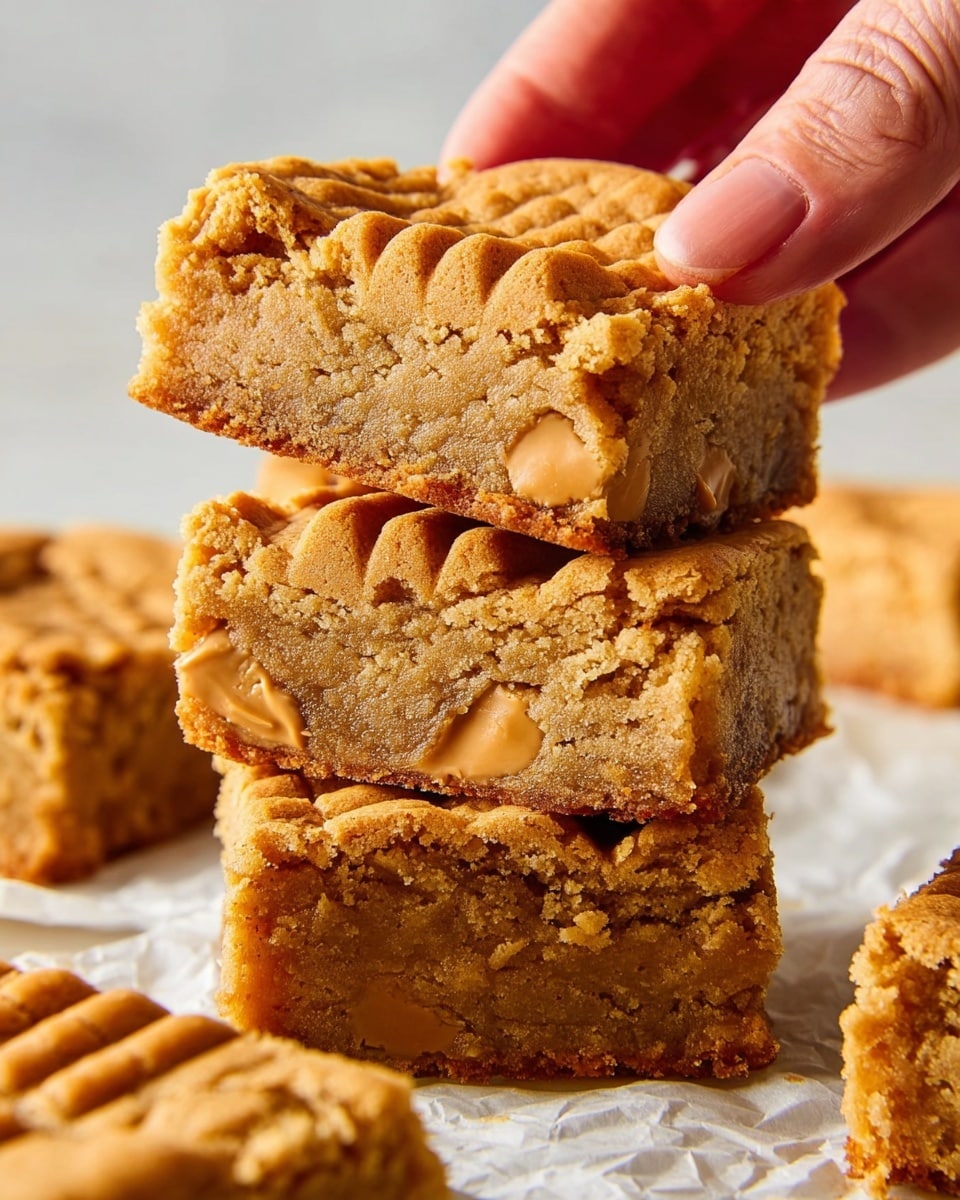
Bake your blondies for 23 to 27 minutes until they’re a lovely light golden brown and a toothpick inserted in the center comes out clean. The timing can vary based on your oven, so start checking at 23 minutes to avoid overbaking. When done, let the bars cool in the pan completely. Then use the parchment overhang to lift them out onto a cutting board and slice into squares—about 15 pieces is perfect for sharing (or savoring all to yourself!).
Pro Tips for Making Nutter Butter Cookie Bars Recipe
- Use Room Temperature Eggs: This helps create a smooth batter with better rise and texture.
- Don’t Overmix the Flour: Fold just until combined to keep your bars tender, not dense.
- Press the Cookies Gently: When topping with the separated cookies, don’t push down too hard—you want them to stay distinct for crunch.
- Watch the Bake Time Closely: These bars can go from perfectly moist to dry fast, so start checking at 23 minutes.
How to Serve Nutter Butter Cookie Bars Recipe
Garnishes
I like to keep it simple with these bars because they’re already so rich. A light dusting of powdered sugar or a drizzle of melted peanut butter or chocolate on top can really elevate them if you’re serving guests. Sometimes, I add a sprinkle of chopped roasted peanuts for an extra crunch and color contrast—always a hit!
Side Dishes
These bars pair perfectly with a classic glass of cold milk or creamy vanilla ice cream if you want to turn them into an indulgent dessert. For a slightly lighter treat, I sometimes serve them alongside fresh fruit like sliced apples or berries, which refresh the palate.
Creative Ways to Present
For birthdays or holiday gatherings, I’ve arranged these bars on a pretty platter, alternating whole cookie halves on top with dollops of whipped cream around the edges. They also look adorable cut into bite-sized squares, served on decorative sticks for easy party munching. You could even layer them with chocolate ganache and whipped peanut butter frosting for an irresistible peanut butter bar cake.
Make Ahead and Storage
Storing Leftovers
I keep leftover bars stored in an airtight container at room temperature for up to 3 days, and that usually works well for me since they disappear quickly! They stay moist and flavorful, and you’ll notice the cookie crunch soften slightly, which some say makes them even more enjoyable.
Freezing
If you want to make them ahead, you can freeze uncut bars tightly wrapped in plastic wrap and then foil for up to 2 months. When you’re ready, just thaw them overnight in the fridge and then bring to room temperature before slicing—freezing doesn’t impact their taste or texture much.
Reheating
If you love bars warm and gooey like I do, pop a piece in the microwave for 10-15 seconds. If you want to refresh a whole batch, warming them in a 300°F oven for about 5-7 minutes does the trick without drying them out. You’ll find that gentle reheating awakens the peanut butter chips and softens the cookie pieces just perfectly.
FAQs
-
Can I use creamy peanut butter instead of chunky in this Nutter Butter Cookie Bars Recipe?
Absolutely! Using creamy peanut butter will give you a smoother texture without the bits of peanuts, but the flavor will still be deliciously peanutty. I prefer chunky because it adds that extra texture, but creamy is a great substitute if that’s what you have on hand.
-
What pan size should I use for these bars?
The recipe calls for a 13″ x 9″ metal baking pan, which gives the bars the ideal thickness and even baking. Using a smaller pan will make thicker bars that may need longer baking, while a larger pan will thin them out and potentially dry them faster.
-
How do I know when these Nutter Butter Cookie Bars are done baking?
Look for a light golden brown color on top and edges, and carefully test the center with a toothpick. It should come out clean or with just a few moist crumbs, but no raw batter. Since ovens vary, start checking at 23 minutes to avoid overbaking.
-
Can I make this recipe gluten-free?
You can try swapping the all-purpose flour for a 1-to-1 gluten-free baking flour blend, but keep in mind the texture might be slightly different. Also, make sure any cookies or peanut butter chips you use are certified gluten-free.
-
What’s the best way to store leftover Nutter Butter Cookie Bars?
Store them in an airtight container at room temperature for up to three days to keep them soft and fresh. For longer storage, freezing is an excellent option—just thaw and enjoy anytime.
Final Thoughts
This Nutter Butter Cookie Bars Recipe has truly become one of my go-to desserts because it’s such a crowd-pleaser and so forgiving to make. Whether you’re baking for your family’s after-dinner treat or bringing something to share, these bars feel special without being complicated. I hope you enjoy making (and eating!) them as much as I do—trust me, once you try this combination of peanut butter bliss and cookie crunch, it’ll be a favorite fast.
Print
Nutter Butter Cookie Bars Recipe
- Prep Time: 10 mins
- Cook Time: 25 mins
- Total Time: 35 mins
- Yield: 15 bars
- Category: Dessert
- Method: Baking
- Cuisine: American
- Diet: Vegetarian
Description
Delight in these rich and chewy Nutter Butter Cookie Bars, combining the classic flavors of peanut butter and Nutter Butter cookies into a decadent blondie-style treat. Perfectly soft with a slight crunch from chopped cookies and peanut butter chips, these bars are an irresistible dessert for peanut butter lovers.
Ingredients
Base Ingredients
- Cooking spray
- 1 3/4 cups (350 g) packed light brown sugar
- 3/4 cup (1 1/2 sticks) unsalted butter, melted
- 3/4 cup (180 g) all-natural chunky peanut butter
- 1 tsp pure vanilla extract
- 3/4 tsp kosher salt
- 3 large eggs, room temperature
- 1 tsp baking powder
- 2 cups (240 g) all-purpose flour
Mix-ins and Toppings
- 8 Nutter Butter cookies (about 4 oz), coarsely chopped
- 5 whole Nutter Butter cookies, divided
- 1 cup peanut butter chips (about 6 oz), divided (2/3 cup plus 1/3 cup)
Instructions
- Preheat and Prepare Pan: Preheat your oven to 350°F (175°C). Grease a 13″ x 9″ metal baking pan with cooking spray. Line the pan with parchment paper, leaving an overhang on two long opposite sides, then grease the parchment with cooking spray to ensure easy removal.
- Mix Wet Ingredients: In a large bowl, use a handheld mixer on medium-high speed to beat together the light brown sugar, melted butter, chunky peanut butter, vanilla extract, and kosher salt until well combined and smooth.
- Add Eggs and Leavening: Add the eggs one at a time, beating on low speed after each addition to incorporate fully. Then add the baking powder and beat until the mixture is well combined.
- Incorporate Flour and Cookies: Using a flexible rubber spatula, gently fold the all-purpose flour into the batter until just a few streaks remain visible. Fold in the coarsely chopped Nutter Butter cookies and 2/3 cup of the peanut butter chips evenly throughout the batter.
- Assemble in Pan: Transfer and spread the batter evenly into the prepared baking pan using an offset spatula or the back of a spoon. Twist apart the remaining five whole Nutter Butter cookies and press the separated cookie halves, peanut side facing up, into the top of the batter. Sprinkle the remaining 1/3 cup peanut butter chips over the top for added texture and flavor.
- Bake: Place the pan in the preheated oven and bake for 23 to 27 minutes, or until the top is light golden brown and a toothpick or tester inserted into the center comes out clean.
- Cool and Cut: Allow the bars to cool completely in the pan. Once cooled, use the parchment paper overhang to lift the bars out of the pan and transfer them to a cutting board. Cut into 15 squares for serving.
Notes
- For best flavor, use natural chunky peanut butter rather than creamy or processed versions.
- Allow eggs to come to room temperature before mixing to ensure even incorporation.
- The parchment paper with overhang ensures easy removal of bars without breaking.
- Do not overbake; bars should remain slightly soft in the center for the best texture.
- Store bars in an airtight container at room temperature for up to 3 days or refrigerate for up to a week.
- Peanut allergy substitute: You can swap peanut butter and peanut butter chips with sunflower seed butter and sunflower chips for an allergy-friendly option.
Nutrition
- Serving Size: 1 bar
- Calories: 320
- Sugar: 22g
- Sodium: 180mg
- Fat: 18g
- Saturated Fat: 7g
- Unsaturated Fat: 10g
- Trans Fat: 0g
- Carbohydrates: 36g
- Fiber: 2g
- Protein: 6g
- Cholesterol: 55mg

