
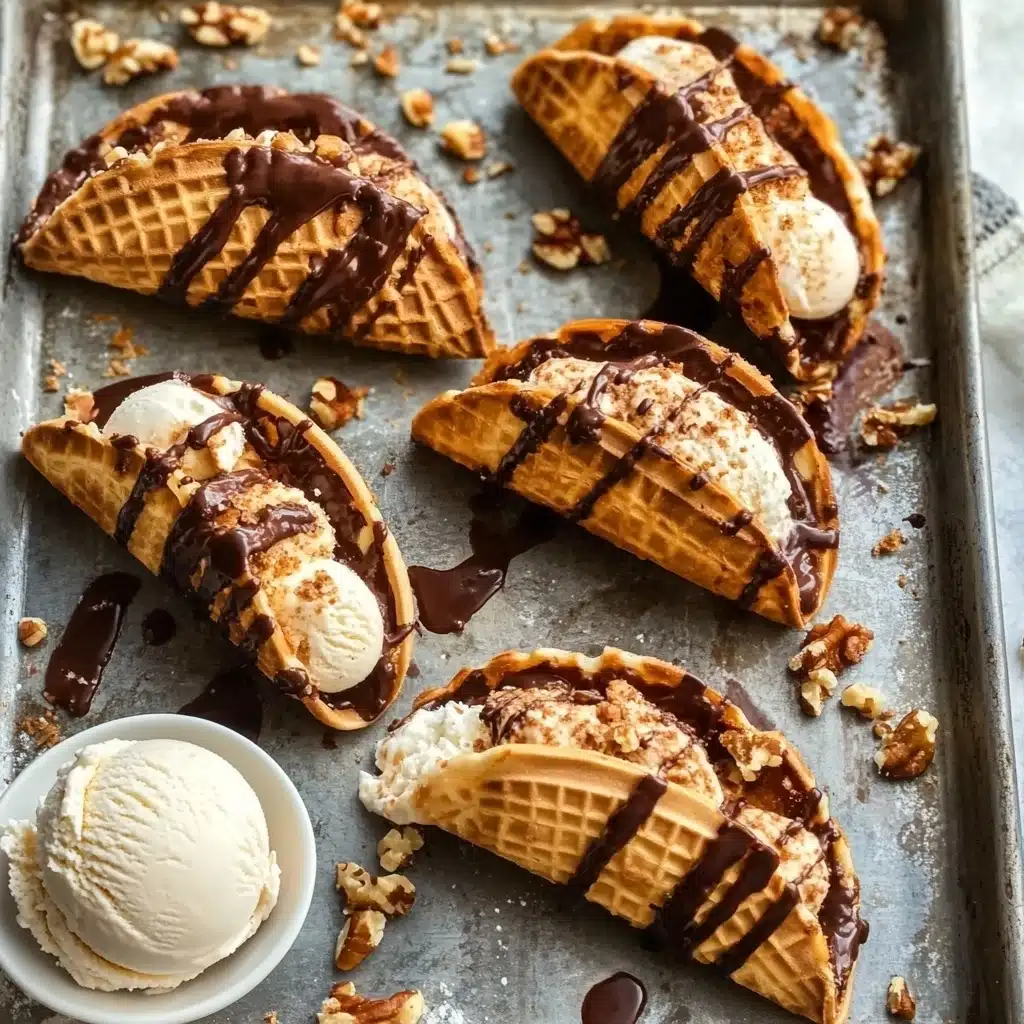
If you’ve ever craved that magical mix of crisp waffle shell, creamy ice cream swirl, and thick chocolate-peanut coating, these Homemade Choco Tacos are a dream come true. They’re a from-scratch treat that’ll take you straight back to childhood summers—with even more flavor, more crunch, and a whole lot more love baked in!
Why You’ll Love This Recipe
- All the Classics, Made Better: Enjoy the iconic Choco Taco flavor, made completely from scratch with high-quality ingredients you choose yourself.
- Customizable from Top to Bottom: Make them dairy-free, swap ice cream flavors, or play around with creative toppings to suit every craving.
- Kid-Friendly & Nostalgic: Nothing brings kids (and adults!) to the kitchen faster than the promise of making (and eating) Homemade Choco Tacos.
- Perfect for Parties or Make-Ahead Treats: They’re a show-stopping make-ahead dessert for any special celebration or a surprise weeknight treat stashed in the freezer.

Ingredients You’ll Need
Don’t be intimidated by the ingredient list—every element brings something special to these Homemade Choco Tacos! You’ll be using real, simple ingredients to build crisp shells, ripple-rich ice cream, and that signature chocolate-peanut crunch.
- Heavy cream: This makes your no-churn ice cream base extra fluffy, creamy, and scoopable—no ice cream maker needed.
- Sweetened condensed milk: Adds sweetness and that smooth, melt-in-your-mouth texture, so your filling tastes like true ice cream parlor magic.
- Vanilla bean paste or extract: For rich, fragrant vanilla flavor that’s the backbone of classic ice cream.
- Cocoa powder: Deep chocolate flavor for our fudge ripple; Dutch-process preferred for extra intensity!
- Granulated sugar & brown sugar: White sugar sweetens the shells and fudge; brown sugar adds that hint of caramel warmth in the waffle shell.
- Egg whites: These create a waffle cone batter that gets deliciously crisp once cooked and shaped.
- All-purpose flour: Essential for structure in the taco shells—don’t substitute with cake or bread flour.
- Unsalted butter: Adds flavor and richness to both fudge ripple and taco shells (and helps everything set up just right).
- Chocolate chips: The backbone of the choco dip that hardens when cold—choose good-quality semisweet or dark chocolate for best results.
- Coconut oil: Thins the chocolate coating slightly so you get that signature “crack” after dipping.
- Finely chopped peanuts: For the nutty crunch! Roasted and salted are especially delicious here.
- Salt: Brings out all the flavors—don’t skip the pinch in both the fudge ripple and ice cream base.
Variations
The beauty of Homemade Choco Tacos is how easily you can riff on the classic! Make them your own with different flavors, coatings, or fun dietary twists—these are endlessly customizable and always delicious.
- Dairy-free or Vegan: Swap in your favorite nondairy ice cream and plant-based butter for the waffle shell, plus dairy-free chocolate chips for the coating.
- Flavor Twists: Try adding a spoonful of espresso powder to the fudge ripple, or swapping vanilla for almond or coconut extract for a fun flavor surprise.
- Candy Coating: Scatter mini M&Ms, rainbow sprinkles, or chopped toffee over the chocolate layer instead of peanuts for a totally custom finish.
- Short on Time? Use store-bought ice cream or even ready-made waffle cones, gently warmed and shaped into tacos (no judgment!).
How to Make Homemade Choco Tacos
Step 1: Make the Fudge Ripple
Start by making that decadent fudge ripple! Combine cocoa powder, sugar, and a splash of heavy cream in a saucepan over medium-low heat. Once it starts to warm, whisk in the butter so everything becomes glossy and smooth, then finish with the vanilla and salt for the perfect chocolate richness. Set aside to cool—this needs to be at room temp before swirling into your ice cream.
Step 2: Make the No-Churn Ice Cream Base
Pour chilled heavy cream into a stand mixer or a big bowl, and beat until you get those glorious stiff peaks. In another bowl, blend together sweetened condensed milk, vanilla bean paste, and a pinch of salt. Gently fold in a scoop of your whipped cream to lighten the mixture, then carefully fold in the rest. The result is an airy, melt-in-your-mouth ice cream base ready for rippling!
Step 3: Layer and Freeze
Layer 1/4 of your ice cream base into a loaf pan, drizzle over 1/3 of your cooled fudge ripple, and repeat three more times—ending with a layer of just ice cream on top. This creates beautiful chocolate swirls in every scoop! Cover and freeze until solid, about three hours.
Step 4: Make the Waffle Taco Shells
Whisk egg whites, white and brown sugar, and vanilla together until frothy, then add salt, half the flour, the rest of the flour, and finally melted butter. You’ll get a thick, glossy batter. Cook heaping tablespoons in a preheated waffle cone maker until golden (usually about three minutes), then—while hot—shape each one into a taco form with your hands. Let harden; they’ll become deliciously crisp as they cool.
Step 5: Fill with Ice Cream
Once your taco shells are cooled and your ice cream is frozen, scoop slightly softened ice cream into each shell and smooth out with a spatula. Place them back in the freezer for about 10-15 minutes—this prevents any melty disaster when you go to dip them!
Step 6: Coat and Top with Chocolate & Peanuts
Melt chocolate chips and coconut oil together in short intervals in the microwave. Once smooth, fold in your chopped peanuts. Dip the filled tacos into the chocolate coating, letting excess drip off. Place them back in the freezer to set for a few minutes. Now, your Homemade Choco Tacos are ready for their dramatic debut!
Pro Tips for Making Homemade Choco Tacos
- Shape While Hot: Waffle shells set quickly, so shape each “taco” the second it comes out of your waffle cone maker—hold gently until it’s fully set for the perfect curve.
- Super-Cold Ice Cream Helps: Fill shells with ice cream that’s just soft enough to scoop, then return to the freezer to firm up before dipping—this prevents a melty mess in your chocolate coating.
- Cool Fudge is a Must: For beautiful fudge ripples, let your chocolate sauce cool completely before swirling into the ice cream—warm sauce will just melt everything!
- Don’t Rush the Chocolate Dipping: Let the chocolate-peanut topping cool slightly so it’s thick enough to cling, but not so hot it melts your creamy filling.
How to Serve Homemade Choco Tacos
Garnishes
You can have so much fun with toppings for Homemade Choco Tacos! Try a dusting of extra chopped peanuts, rainbow sprinkles, drizzled caramel, or a pinch of flaky sea salt on the chocolate shell for an extra pop of texture and color.
Side Dishes
Honestly, these are a superstar dessert all on their own. But if you’re serving Homemade Choco Tacos at a party, set out a platter with fresh berries, a bowl of whipped cream for dipping, or a frosty coffee drink to really amp up the nostalgia.
Creative Ways to Present
Display them upright in a decorative taco holder or shot glasses for a playful, Instagram-worthy line of treats. Or, set up a DIY sundae bar so everyone can decorate their own—with endless toppings, sauces, and shell flavors!
Make Ahead and Storage
Storing Leftovers
Layer your finished Homemade Choco Tacos in a freezer-safe container, separated with parchment paper so they don’t stick together. Keep tightly sealed, and they’ll stay fresh for up to two weeks (if they last that long!).
Freezing
Homemade Choco Tacos freeze beautifully. Just be sure to let any freshly dipped tacos freeze until the chocolate coating sets before moving or stacking them—this prevents smudged chocolate or cracked shells.
Reheating
No need to reheat, but if your shells get a touch soft from the freezer, let them sit at room temperature for 2-3 minutes before biting in. That gives you the perfect contrast between crisp shell, creamy middle, and crackly chocolate top.
FAQs
-
Do I need a special waffle cone maker for the taco shells?
A waffle cone maker is the easiest way to get those signature thin, crisp taco shells! However, you can try using a pizzelle maker or even cook the batter as thin pancakes in a skillet, then shape while warm. The results won’t be as crisp, but they’ll work in a pinch.
-
Can I use store-bought ice cream instead of homemade?
Absolutely—use any flavor you love for a shortcut! Just soften the store-bought ice cream briefly so it’s easier to scoop and spread inside your taco shells.
-
How do I prevent the taco shells from getting soggy?
Make sure the shells have cooled completely and hardened before adding ice cream—and return filled tacos to the freezer right away. The cold helps keep everything snappy and delicious.
-
Can I make Homemade Choco Tacos ahead of time?
Yes! Assemble, dip, and freeze them in an airtight container up to 2 weeks in advance. They’ll be ready for any celebration or sweet craving, no last-minute stress required!
Final Thoughts
If you’re looking for a dessert that makes everyone smile—kids, grown-ups, and anyone craving a taste of nostalgia—Homemade Choco Tacos are pure magic. So grab your scooper, your chocolate chips, and get ready to create a batch of frozen tacos that are even better than you remember!
Print
Homemade Choco Tacos Recipe
- Prep Time: 20 minutes
- Cook Time: 35 minutes
- Total Time: 4 hours 55 minutes
- Yield: 8-10 choco tacos
- Category: Dessert
- Method: Freezing, Baking
- Cuisine: American
- Diet: Vegetarian
Description
Indulge in the nostalgic delight of homemade choco tacos with a rich fudge ripple, creamy ice cream, all encased in a crispy waffle cone shell and topped with a decadent chocolate peanut coating.
Ingredients
Ice cream base:
- 2 cups heavy cream, cold
- 1 14oz can sweetened condensed milk
- 1 tbsp vanilla bean paste or 2 tsp vanilla extract
- Pinch of salt
Fudge ripple:
- 2 tablespoons cocoa powder
- 2 tablespoons granulated sugar
- 2 tablespoons heavy cream
- 1 tablespoon unsalted butter
- 1/2 teaspoon vanilla extract
- Pinch of salt
Waffle cones:
- 2 egg whites
- 3 1/2 tablespoons granulated sugar
- 3 1/2 tablespoons brown sugar
- 3/4 teaspoon vanilla extract
- 1/8 teaspoon salt
- 2/3 cup flour
- 2 tbsp melted butter
For coating:
- 1 1/2 cups chocolate chips
- 1 1/2 tablespoon coconut oil
- 3/4 cup finely chopped peanuts
Instructions
- Make the fudge sauce for the ice cream ripple: In a small saucepan, whisk together the cocoa powder, sugar and heavy cream over medium-low heat. Add butter, vanilla, and salt. Set aside to cool.
- Prepare the ice cream base: Whip heavy cream until stiff peaks form. Mix condensed milk, vanilla, and salt. Gently fold in whipped cream.
- Layer the ice cream: Alternate ice cream and fudge sauce in a loaf pan. Freeze.
- Make the waffle cones: Prepare batter, cook in waffle cone maker, shape into taco shells.
- Scoop ice cream into shells and freeze briefly.
- Prepare peanut-chocolate topping and assemble: Melt chocolate chips and coconut oil, stir in peanuts. Dip taco tops in mixture. Freeze until set.
Notes
- Waffle cone maker: This is the one we use.
- Make it dairy free: Use nondairy ice cream and butter.
- Store choco tacos in freezer after filling to prevent melting.
- Cool fudge sauce and taco shells before use.
- Cool chocolate topping before dipping tacos.
- Choco Taco is a registered trademark of Simco Logistics, Inc. and/or Klondike, a Unilever brand.
Nutrition
- Serving Size: 1 choco taco
- Calories: 574
- Sugar: 53 g
- Sodium: 565.3 mg
- Fat: 33.3 g
- Saturated Fat: 20.5 g
- Unsaturated Fat: 10.8 g
- Trans Fat: 0 g
- Carbohydrates: 63.7 g
- Fiber: 3.9 g
- Protein: 10.8 g
- Cholesterol: 69.5 mg


