
If you’ve ever wanted to bake those melt-in-your-mouth classic cookies that feel like a sweet hug from Denmark, you’re in the right place. This Danish Butter Cookies Recipe is my tried-and-true way to create those light, crisp delights that make tea time feel extra special. I absolutely love how simple the ingredients are, yet how fancy these cookies taste. Stick with me, and I’ll walk you through every step so your batch turns out perfect.
Why You’ll Love This Recipe
- Simplicity: Only four basic ingredients, making it super easy to whip up anytime.
- Texture: Delightfully light and crisp cookies that literally melt on your tongue.
- Versatility: Perfect plain or dressed up with a sprinkle of sugar or a dip in chocolate.
- Reliable Results: Follow these steps and you’ll avoid floppy cookies and get that iconic Danish shape every time.

Ingredients You’ll Need
The magic behind Danish butter cookies comes down to quality butter and just the right flour. I always opt for cake flour if I can get it; it gives the cookies that tender crumb that feels so luxurious. When cake flour’s unavailable, all-purpose flour works just fine — I’ll share a note on that below.
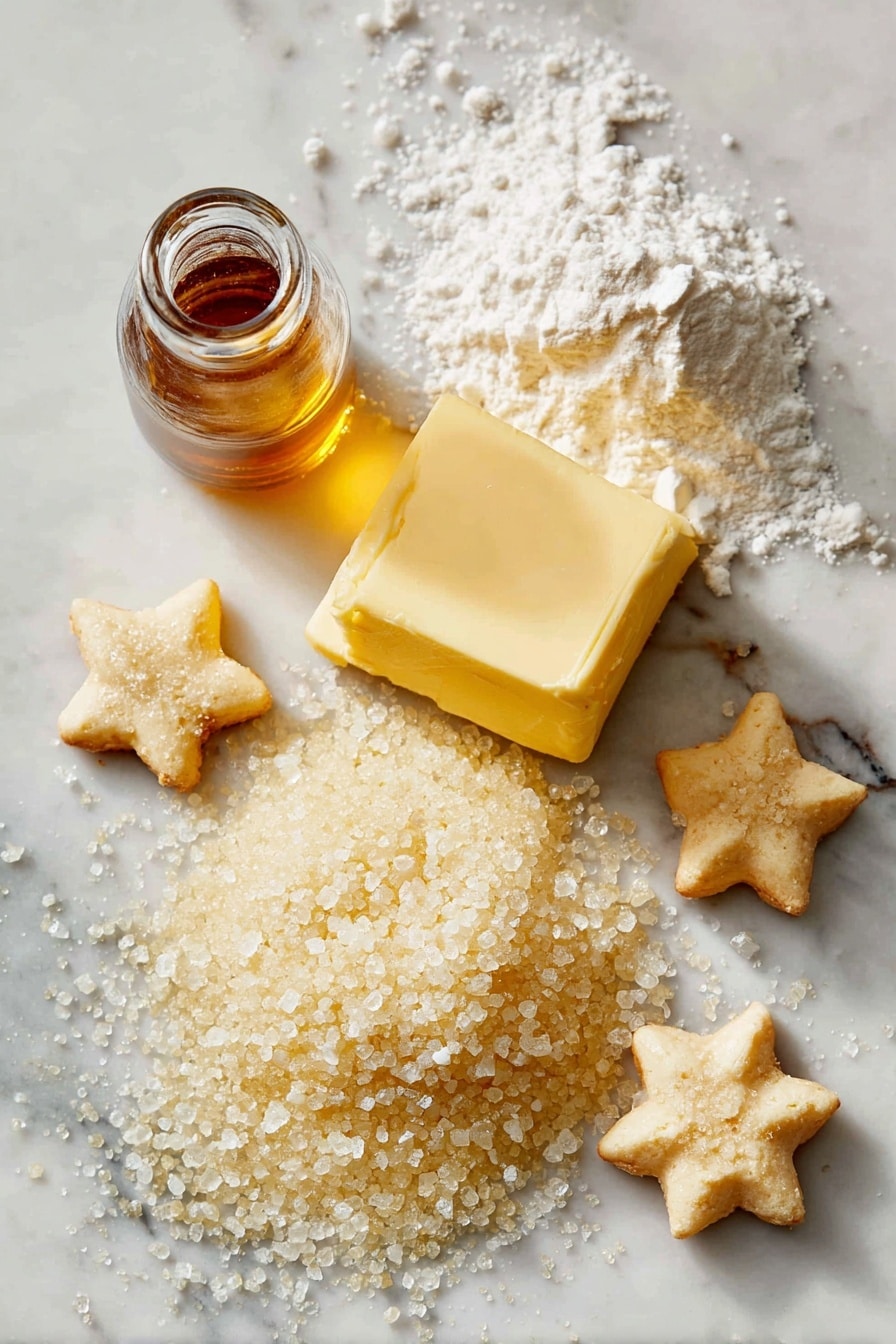
- Butter: Use unsalted and at room temperature for easy creaming and to control the saltiness of your cookies.
- Powdered sugar: This gives the dough a lovely fine texture and a delicate sweetness without graininess.
- Vanilla extract: Just a teaspoon amps up the flavor in a subtle, comforting way.
- Cake flour or all-purpose flour: Cake flour will make your cookies extra tender; all-purpose is a perfectly fine alternative, just expect a slightly sturdier bite.
Variations
I like to keep the classic Danish Butter Cookies Recipe straightforward, but don’t be shy to put your own spin on it — that’s where the fun begins. Whether you want to add zest or try a gluten-free option, there’s plenty to experiment with.
- Lemon Zest: Adding a teaspoon of fresh lemon zest to the dough is one of my favorite ways to brighten the flavor, especially in springtime baking.
- Chocolate Dip: After baking, dip half of each cookie in melted dark or milk chocolate and let them set for a decadent finish my family goes crazy for.
- Gluten-Free Version: Swap the flour for a gluten-free blend, but keep in mind the texture might change slightly — I recommend adding a touch more butter for moisture.
- Almond Flour Mix: For a nutty twist, replace a quarter of the flour with finely ground almond flour; it adds richness and a slight chewiness.
How to Make Danish Butter Cookies Recipe
Step 1: Soften Your Butter
This is key — take your butter out of the fridge at least an hour ahead so it’s perfectly soft but not melting. I’ve learned the hard way that cold butter just won’t cream properly, and melted butter makes the dough too wet. Soft butter lets you whip up that airy, fluffy base for your cookies, which means deliciously tender results.
Step 2: Cream Butter, Sugar & Vanilla Until Fluffy
Use a stand or handheld mixer to beat the butter with powdered sugar and vanilla extract for about 5 to 8 minutes. The goal is a pale, fluffy mixture that’s light and airy. This step adds air to the dough, creating that classic delicate crumb. Don’t rush it — I set a timer to make sure I don’t under or overdo this part.
Step 3: Fold In the Flour Gently
Sift your flour to remove any lumps and add it slowly, about a third at a time, folding gently with a spatula instead of mixing aggressively. This keeps the dough light and helps maintain all the air you just whipped in. When the flour is fully incorporated, your dough should be smooth but not sticky.
Step 4: Pipe the Dough Onto a Baking Sheet
Here’s a trick I discovered — transfer your dough onto plastic wrap and shape it into a log. Cut a small hole at one end, insert it into a piping bag fitted with an open star tip (I use size 1M), and get ready for that iconic swirl shape. If your dough feels too stiff, add a tablespoon of warm milk to soften it up for easier piping. Trust me, it makes a huge difference!
Step 5: Chill Before Baking
Pop your piped cookies into the fridge for 30 minutes. This step is crucial because it firms up the dough so the cookies don’t lose their beautiful ridged shapes as they bake. Patience here pays off in stunning results.
Step 6: Bake at Low Heat Until Golden
Bake your cookies at 300°F (150°C) for about 15 minutes. You want just the edges to turn golden, with the centers still pale — that’s when they’re perfectly crisp but still tender inside. Remove from the oven and let cool on the baking sheet for 10 minutes before transferring to a wire rack or container.
Pro Tips for Making Danish Butter Cookies Recipe
- Room Temperature Butter: I can’t stress this enough — soft butter creams better, giving you that irresistible fluff.
- Gentle Folding: Avoid overmixing when adding flour to keep the cookies tender, not tough.
- Chill Before Baking: Cooling the dough after piping helps preserve the pretty shapes you worked so hard on.
- Watch the Oven: Baking at a lower temperature prevents burning and lets cookies bake evenly — patience is key!
How to Serve Danish Butter Cookies Recipe

Garnishes
I usually like mine straight up, maybe just a light sprinkle of granulated sugar right before baking to add a subtle crunch. But I’ve also had success dipping half the cookie in melted chocolate once cooled — it adds a lovely richness without overpowering the buttery flavor. Sometimes, I even dust lightly with cinnamon sugar when I’m in a festive mood.
Side Dishes
These cookies shine alongside a cup of black tea or rich coffee — a perfect afternoon treat. I’ve also paired them with fruit preserves or a slice of sharp cheese for a fun contrast. My kids love dunking them in milk; it’s a total nostalgic classic in our house.
Creative Ways to Present
For holidays or parties, I like arranging these cookies in pretty boxes or clear jars tied with a ribbon — they make wonderful gifts. Another idea I tried was serving them stacked with small dollops of jam or whipped cream between for a casual dessert that everyone immediately asks for again.
Make Ahead and Storage
Storing Leftovers
Store your baked cookies in an airtight container at room temperature, and they’ll stay fresh and crisp for up to a week. I learned to avoid sogginess by not stacking them too tightly — a single layer with parchment paper in between works wonders.
Freezing
If you want to prep in advance, you can pipe the cookie dough onto baking sheets and freeze them before baking. Once frozen solid, transfer to freezer bags. When ready, just bake from frozen, adding a minute or two to the baking time. This trick has saved me so many times when unexpected guests show up!
Reheating
To refresh your cookies, pop them in a preheated oven at 300°F (150°C) for 3-5 minutes. This revives their crispness without drying them out. Avoid microwaving if you want to keep that perfect buttery crunch.
FAQs
-
Can I use salted butter for this Danish Butter Cookies Recipe?
You can use salted butter, but I recommend reducing or skipping any added salt in the recipe to avoid the cookies becoming too salty. Unsalted butter gives you better control over the cookie’s flavor.
-
Why do I need to chill the piped cookies before baking?
Chilling helps the dough firm up, so the cookies hold their shape during baking instead of spreading too much. This step is essential for achieving the classic ridged design and crisp edges.
-
What if my dough is too dry or crumbly?
If the dough feels dry, adding a tablespoon of warm milk can soften it and make piping easier. Just add slowly, so you don’t make it too soft.
-
Can I make these cookies without a piping bag?
While a piping bag with an open star tip gives the beautiful signature shape, you can also roll dough balls and flatten them gently for a simpler look. The texture and taste will be just as delightful!
-
How should I store leftover Danish butter cookies?
Keep them in an airtight container at room temperature, and they’ll stay fresh for about a week. Layer with parchment paper to avoid sticking or breaking.
Final Thoughts
This Danish Butter Cookies Recipe holds a special place in my heart because it’s one of the simplest ways to make something truly delightful with just a few ingredients. I remember serving these to friends and seeing their eyes light up at the first crispy bite — that moment always makes the time in the kitchen worth it. I promise, once you try this recipe, you’ll want to keep these buttery treasures in your cookie rotation forever. Go ahead, bake a batch today and share the love.
Print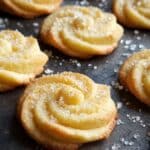
Danish Butter Cookies Recipe
- Prep Time: 15 minutes
- Cook Time: 15 minutes
- Total Time: 58 minutes
- Yield: 14 cookies
- Category: Cookies
- Method: Baking
- Cuisine: Danish
Description
These classic Danish Butter Cookies are light, crisp, and melt-in-your-mouth delicious. Made with just four basic ingredients, this easy-to-make recipe produces beautifully piped, buttery cookies that are perfect for any occasion. The dough is creamed to a fluffy texture, gently mixed with flour, chilled to hold shape, and baked until golden edged.
Ingredients
Cookie Dough
- ½ cup butter, at room temperature
- ½ cup powdered sugar
- 1 teaspoon vanilla extract
- 1 cup cake flour or all-purpose flour
Instructions
- Prepare the Butter: Remove the butter from the refrigerator at least one hour before starting so it becomes soft to the touch but not melted.
- Cream Butter and Sugar: Using a handheld or stand mixer, cream the butter, powdered sugar, and vanilla extract together for 5 to 8 minutes until the mixture is light in color and fluffy in texture.
- Incorporate the Flour: Sift the flour and add it gradually (in 1/3 cup portions) to the creamed butter mixture, folding gently with a spatula after each addition until fully combined.
- Shape the Dough: Transfer the dough onto a sheet of plastic wrap, roll it into a log, then cut a hole at one end of the wrap and insert it into a piping bag fitted with a flower-shaped nozzle.
- Pipe the Cookies: Pipe the dough onto a baking sheet lined with a silicone mat or parchment paper, shaping the cookies with a 1M open star tip. If the dough is too stiff to pipe, add one tablespoon of warm milk to soften it.
- Chill the Cookies: Place the baking sheet into the refrigerator for 30 minutes to firm up the cookies. This step helps them maintain their intricate piped shape during baking.
- Optional Sugar Topping: Before baking, sprinkle granulated sugar over the cookies if a sweeter, crunchier topping is desired.
- Bake: Preheat the oven to 300°F (150°C) or 148°C with a fan. Bake the cookies for 15 minutes or until the edges turn a golden color.
- Cool and Serve: Remove the cookies from the oven and let them cool on the baking sheet for 10 minutes before serving or storing in an airtight container.
Notes
- These Danish Butter Cookies are renowned for their light, delicate, and crisp texture that melts in the mouth.
- Only four basic ingredients are needed: butter, powdered sugar, vanilla extract, and flour.
- Chilling the piped cookies before baking prevents spreading and keeps their beautiful shape intact.
- Adding a tablespoon of warm milk to stiff dough helps make piping easier.
- Sprinkling granulated sugar on top before baking adds a subtle crunch and sweetness.
Nutrition
- Serving Size: 1 cookie
- Calories: 47 kcal
- Sugar: 3 g
- Sodium: 9 mg
- Fat: 1 g
- Saturated Fat: 1 g
- Unsaturated Fat: 0 g
- Trans Fat: 0 g
- Carbohydrates: 9 g
- Fiber: 0 g
- Protein: 0.5 g
- Cholesterol: 1 mg

