
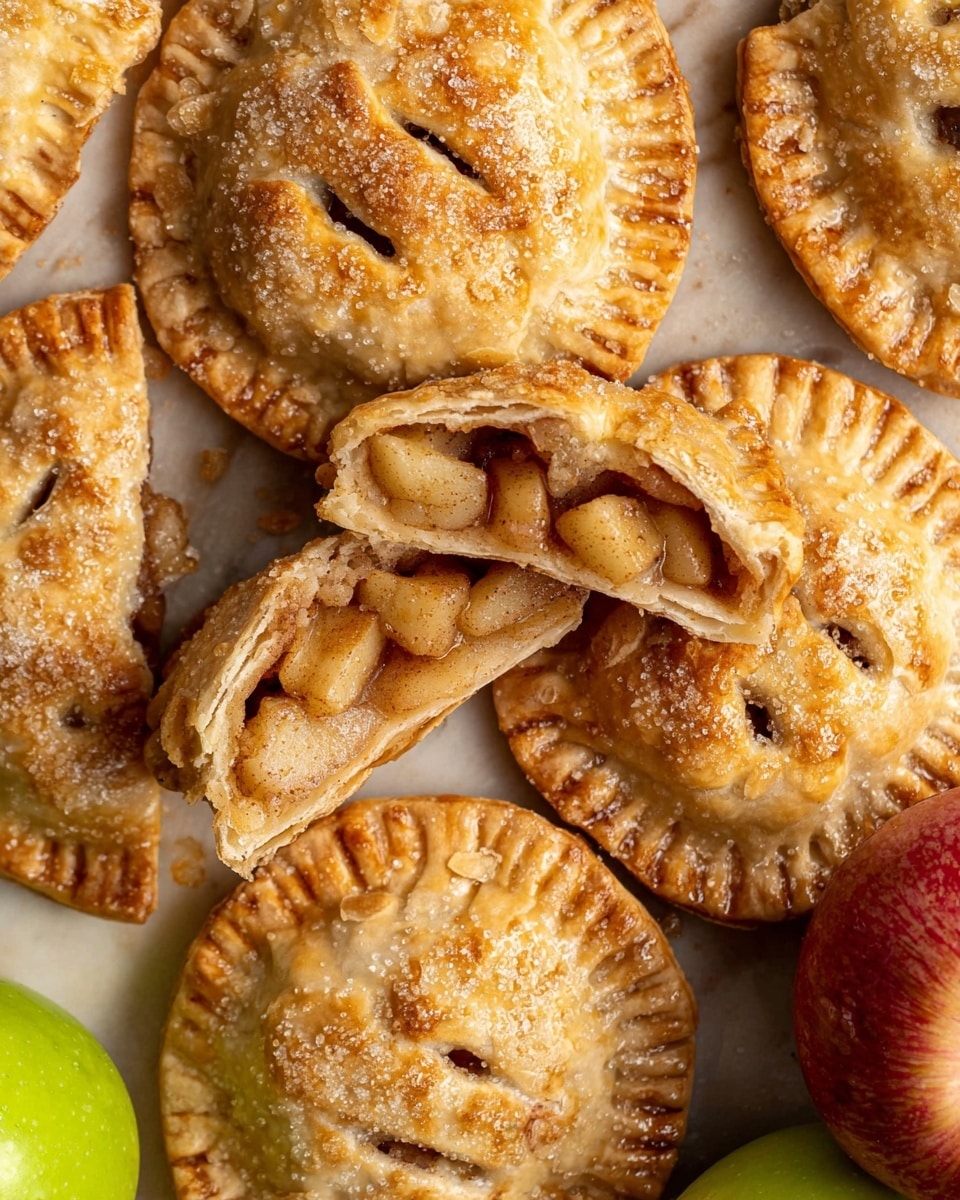
If you love cozy fall flavors wrapped up in a flaky little package, you’re going to adore this Apple Hand Pies Recipe. These hand pies are my absolute favorite for sharing—perfectly portable, bursting with warm cinnamon-spiced apple filling, and crust so buttery it practically melts in your mouth. I’m excited to walk you through this recipe because it’s straightforward, and I’ve picked up some handy tricks along the way to make sure your pies turn out bakery-worthy every time.
Why You’ll Love This Recipe
- Perfect Balance of Flavors: The cinnamon and nutmeg add just the right cozy kick that makes every bite feel like fall heaven.
- Easy to Make: With store-bought pie crusts, this comes together quickly and easily without sacrificing homemade charm.
- Portable and Shareable: Hand pies mean no forks or plates—great for gatherings or taking on the go.
- Great for Any Skill Level: Whether you’re an experienced baker or just starting, you’ll find this Apple Hand Pies Recipe totally doable and rewarding.

Ingredients You’ll Need
The magic of these Apple Hand Pies starts with simple, quality ingredients—especially your apples and pie crust. I like using a juicy yet firm apple, and either homemade or the refrigerated pie dough works beautifully here, so you have options depending on how much time you want to spend.
- Pie crusts: Use homemade if you’re feeling adventurous, or grab store-bought refrigerated dough to save time; both work wonderfully.
- Chopped apples: Choose a firm variety like Granny Smith or Honeycrisp to hold their shape when baked.
- Granulated sugar: Just enough to sweeten the filling without overpowering the apples’ natural flavor.
- All-purpose flour: Helps thicken the filling so it doesn’t leak out when baked.
- Pure vanilla extract: Adds a subtle warmth and depth to the apple mixture.
- Ground cinnamon: The star spice here—adjust the amount to your spice preference.
- Ground nutmeg: Just a pinch adds that lovely autumnal note.
- Large egg: Used for egg wash to seal and give those pies a beautiful golden finish.
- Milk: Mixed with egg for the wash, helps with browning.
- Butter: Optional, but placing a small pat on top of the filling before sealing adds a rich finish.
- Coarse sugar: Sprinkled on top for a lovely sparkle and crunch.
Variations
I love that this Apple Hand Pies Recipe is a great base for all sorts of fun twists. Personally, I like to swap out spices depending on the season or sneak in some mix-ins to keep things interesting. Don’t hesitate to make it your own—you’ll enjoy the creative freedom!
- Spiced Up: Once, I added a pinch of ground ginger and a dash of cloves for an extra warming spice blend, and my family went crazy for it.
- Cheesy Twist: Try grating a little sharp cheddar on the crust edges before baking for a sweet-and-savory surprise that’s out of this world.
- Healthier Swap: Use whole wheat pie crust or reduce the sugar slightly for a more wholesome version without losing that classic apple pie feel.
- Fruit Mix: Swap in pears or add dried cranberries to the apple filling for a seasonal flair that’s fun to experiment with.
How to Make Apple Hand Pies Recipe
Step 1: Prepare and Chill Your Pie Crust Circles
Start by preheating your oven to 400°F (204°C) and lining your baking sheets to keep things clean and non-stick. Roll out your pie crust on a lightly floured surface until it’s about 1/8-inch thick—thin enough to get that crisp, flaky finish, but sturdy enough to hold the filling. I use a 3.5-inch cookie cutter or a sturdy cup to cut out circles, and don’t worry about rerolling scraps—it’s easier than you’d think and yields about 18 to 20 pies. Pop those circles in the fridge while you make your filling; chilling helps prevent shrinking and keeps the crust flaky.
Step 2: Make the Apple Filling
Mix together your chopped apples, sugar, flour, vanilla, cinnamon, and nutmeg in a bowl. The flour is your secret weapon here—it thickens the juices just enough so your pies aren’t a soggy mess. I like to toss everything until each apple piece is well coated, so every bite bursts with flavor. This filling smells amazing already—try resisting the urge to just eat it by the spoonful!
Step 3: Fill and Seal Your Pies
Take your pie crust circles back out of the fridge and spoon the apple filling evenly onto half of them, leaving a little space around the edges for sealing. I usually add one or two small cubes of butter on top of the filling for richness—that’s a trick I learned from a friend, and it really elevates the flavor. Then cover each with another dough circle. To seal, you can lightly brush a little water or some of the egg wash you whisked earlier around the edges, then press with a fork for that classic crimped look and a tight seal. This prevents the filling from leaking while baking.
Step 4: Add the Final Touches and Bake
Brush each pie with egg wash to get that beautiful golden color and sprinkle with coarse sugar for a subtle crunch and sparkle. Don’t forget to cut 2 to 3 small slits across the top crust to let steam escape—this keeps the pies from puffing up unnecessarily or bursting. Bake for 18 to 22 minutes, or until they’re golden brown and the filling is bubbling. As soon as they come out of the oven, resist the urge to dig in immediately (I fail every time) and let them cool slightly so the filling sets perfectly.
Pro Tips for Making Apple Hand Pies Recipe
- Chill the Dough: Always keep your dough cold before and after shaping to prevent shrinking and keep it flaky.
- Don’t Overfill: Overstuffing often causes leaking; aim for a modest spoonful with a little border around the edges.
- Use a Sharp Cutter: I learned that clean edges from a sharp cutter create the best seals and neat pies.
- Vent the Pies Properly: Don’t skip slits on top! It lets steam escape and keeps the crust crisp instead of soggy.
How to Serve Apple Hand Pies Recipe
Garnishes
I love to keep it simple with a dusting of powdered sugar or a drizzle of warm caramel sauce. Sometimes, a scoop of vanilla ice cream on the side turns these into a real dessert showstopper—especially when they’re still a little warm and gooey inside.
Side Dishes
These hand pies stand strong on their own, but pairing them with a hot cup of chai or spiced apple cider is my favorite. For a brunch spread, I like serving alongside crisp bacon or a fresh green salad to balance the sweetness.
Creative Ways to Present
For celebrations, I’ve shaped these Apple Hand Pies into fun themed cutters—hearts, leaves, even mini pumpkins—and arranged them on a festive platter. They’re perfect for gifting or making a stunning dessert table centerpiece.
Make Ahead and Storage
Storing Leftovers
Leftover Apple Hand Pies keep beautifully in an airtight container at room temperature for up to two days. After that, I recommend refrigerating them to preserve freshness.
Freezing
I often freeze these before baking—just assemble the pies, freeze them on a baking sheet, then transfer to a bag. When you want them, just bake from frozen, adding a few extra minutes to the baking time. It’s such a lifesaver for busy days or unexpected guests.
Reheating
To reheat, pop the pies in a 350°F (175°C) oven for about 10-15 minutes, or until warmed through and crisp again. Microwaving works in a pinch but tends to soften the crust, so I try to avoid it if I want that perfect flakiness.
FAQs
-
Can I use frozen apples for this Apple Hand Pies Recipe?
Frozen apples tend to release more moisture, which can make the filling runny. If you use frozen, make sure to thaw and drain them well, then increase the amount of flour or add a little cornstarch to thicken the filling.
-
Is it better to make the pie crust from scratch or buy it pre-made?
Both are great! Homemade crust adds that fresh-baked flavor and lets you control ingredients, but store-bought dough saves time and still delivers delicious, flaky results—especially great if you’re new to baking.
-
How do I prevent the filling from leaking during baking?
Don’t overfill your pies and make sure to seal edges tightly by pressing with a fork or your fingers. Also, the flour in the filling helps thicken excess juices, reducing leaks.
-
Can I make these Apple Hand Pies vegan?
Absolutely! Use a dairy-free pie crust and replace the egg wash with a plant-based milk like almond or soy milk for brushing. Swap butter with coconut oil cubes or vegan butter to keep that rich flavor.
-
How long do Apple Hand Pies last when refrigerated?
Stored in an airtight container, they stay fresh in the fridge for up to 4 days. Reheat as needed to enjoy that fresh-baked taste again.
Final Thoughts
Honestly, this Apple Hand Pies Recipe has a special place in my heart. It’s one of those simple yet satisfying treats that bring people together. Every time I make them, the smell fills the house with that warming embrace of fall, and watching friends and family devour them never gets old. I really hope you try making these yourself—you’ll find it’s easier than it looks, and the payoff is pure deliciousness. Trust me, once you’ve made these, they’re bound to become a favorite in your recipe rotation just like they are in mine.
Print
Apple Hand Pies Recipe
- Prep Time: 45 minutes
- Cook Time: 20 minutes
- Total Time: 65 minutes
- Yield: 10 pies
- Category: Dessert
- Method: Baking
- Cuisine: American
Description
These Apple Hand Pies are a delightful treat featuring a sweet and spiced apple filling wrapped in a flaky, buttery pie crust. Perfect for fall or any time you crave a handheld dessert, these pies combine cinnamon, nutmeg, and vanilla-infused apples for a comforting and delicious snack or dessert.
Ingredients
Pie Crust
- 2 pie crusts (homemade or store-bought)
Filling
- 2 cups chopped apples (240 grams)
- ¼ cup granulated sugar (50 grams)
- 2 tablespoons all-purpose flour (15 grams)
- ½ teaspoon pure vanilla extract
- ½ to 1 teaspoon ground cinnamon (adjust to your preference)
- ⅛ teaspoon ground nutmeg
For Assembly & Topping
- 1 large egg (lightly beaten)
- 1 tablespoon milk (15 ml)
- 1 tablespoon butter (15 grams, cubed into small pieces, optional)
- Coarse sugar for sprinkling on top (optional)
Instructions
- Preheat and Prepare Baking Sheets: Preheat your oven to 400°F (204°C). Line 1 to 2 large baking sheets with parchment paper or silicone baking mats to prevent sticking and set aside.
- Cut Pie Crust Circles: On a lightly floured surface, roll out the pie crusts to about 1/8-inch thickness. Using a 3.5-inch cookie cutter or a cup, cut out as many circles as possible, rerolling scraps as needed to yield about 18 to 20 circles. Place these circles on the prepared baking sheets and refrigerate them while you make the filling to keep the dough firm.
- Make Apple Filling: In a mixing bowl, combine the chopped apples, granulated sugar, all-purpose flour, vanilla extract, ground cinnamon, and ground nutmeg. Stir well until all apple pieces are evenly coated with the mixture.
- Prepare Egg Wash: In a separate small bowl, whisk together the beaten egg and milk until well combined. Set aside for later use in assembling and glazing the pies.
- Assemble the Hand Pies: Remove pie crust circles from the refrigerator. Spoon the apple filling evenly onto half of the circles, leaving space around edges for sealing. Place 1 to 2 small cubes of butter on top of the filling for extra richness, if using. Cover each filled circle with an unfilled circle. Moisten the edges with a bit of water or the egg wash to help seal, then crimp edges firmly with a fork to enclose the filling.
- Apply Egg Wash and Vent Pies: Brush the tops of the assembled pies with the egg wash for a golden finish. Sprinkle coarse sugar over each pie for added crunch and sweetness. Cut 2 to 3 small slits in the top crust of each pie to vent steam during baking.
- Bake the Hand Pies: Bake in the preheated oven for 18 to 22 minutes, or until the pies are golden brown and the filling is bubbling. Once baked, remove from the oven and allow to cool slightly before serving to let the filling set and prevent burns.
Notes
- These Apple Hand Pies feature a sweet apple pie filling inside a buttery, flaky pie crust, making them perfect for fall or anytime comfort food cravings strike.
- For a richer flavor, add small cubes of butter on top of the filling before sealing the pies.
- Adjust cinnamon quantity according to taste preference, ranging from ½ to 1 teaspoon.
- Use coarse sugar for a crunchy topping, but this is optional.
- Make sure to chill the dough circles before assembling to help the crust maintain shape during baking.
- Leftover pies can be stored in an airtight container in the refrigerator for up to 3 days and reheated before serving.
Nutrition
- Serving Size: 1 pie (approximately)
- Calories: 250 kcal
- Sugar: 15 g
- Sodium: 150 mg
- Fat: 10 g
- Saturated Fat: 3.5 g
- Unsaturated Fat: 5 g
- Trans Fat: 0 g
- Carbohydrates: 35 g
- Fiber: 3 g
- Protein: 2 g
- Cholesterol: 40 mg


