
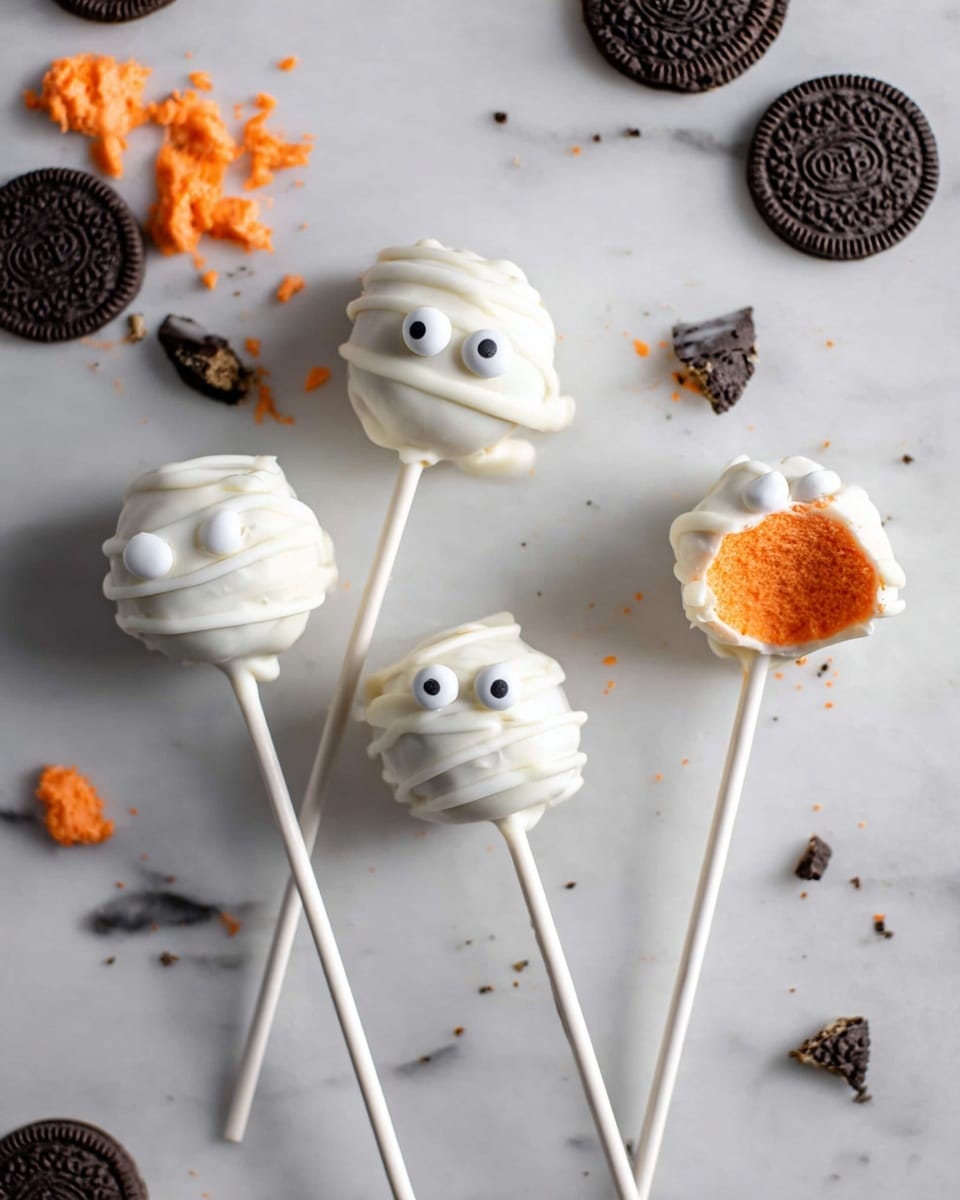
If you’ve been hunting for a fun, festive treat that’s both easy to whip up and utterly adorable, you’re going to love this Halloween Cake Pops Recipe. I absolutely love how these cake pops turn out—perfectly colorful, dipped in smooth white chocolate, and decorated with all the spooky little extras you can imagine. Whether you’re throwing a Halloween party or just want a sweet snack with your family, this recipe is super straightforward and yields those delightful pops everyone raves about. Stick around because I’ll share tips, tricks, and little personal secrets to help you nail them on your first try!
Why You’ll Love This Recipe
- Simple & Quick: You don’t have to be a pro baker to enjoy making these cake pops.
- Fun for All Ages: Kids and adults alike will adore decorating and eating these festive treats.
- Customizable Colors & Flavors: You can create any spooky vibe with easy color mixing and toppings.
- Perfect for Halloween Parties: They look amazing on any dessert table and vanish fast!

Ingredients You’ll Need
This recipe works beautifully with crowd-pleasing pantry staples and a few simple decorations. I’ve found that using angel food cake keeps the pops light and fluffy, while the white chocolate coating gives that gorgeous smooth finish for all your designs.
- Angel Food Cake: Its airy texture crumbles easily to blend perfectly with the frosting.
- Vanilla Frosting: Helps bind the cake crumbs, so your pops hold together but aren’t too dense.
- Vanilla Extract: Adds a lovely depth of flavor without overpowering.
- White Chocolate Chips or Melting Chocolate: Melts smoothly for dipping and sets with a nice sheen.
- Food Coloring: To create all your favorite Halloween hues—green, orange, purple—you decide!
- Optional Decorations: Think candy eyeballs, sprinkles, and crushed Oreos to amp up the spooky factor.
- Cake Pop Sticks: Essential for that classic cake pop look and easy dipping.
Variations
I love playing around with this Halloween Cake Pops Recipe depending on the occasion or who I’m making them for—it’s so easy to customize! Whether you want them extra spooky, kid-friendly, or allergy-conscious, there’s a variation that fits.
- Vegan Version: I swapped regular frosting for a dairy-free alternative and used vegan white chocolate melts—still got the same creamy, delicious coating.
- Chocolate Cake Base: When I used chocolate cake instead of angel food cake, the pops were richer and paired amazingly with colorful candy melts.
- Gluten-Free Option: Using gluten-free cake kept my friends safe without compromising flavor or texture.
- Different Color Combos: I once went all-out with neon colors for a ‘Day of the Dead’ theme—so fun! Pick any shades that get your creative juices flowing.
How to Make Halloween Cake Pops Recipe
Step 1: Crumble and Mix Your Cake Base
Start by breaking down your angel food cake into tiny crumbs by hand—it’s easier and gives you more control so no large chunks sneak in. Then add in the frosting and vanilla extract. I like to use my hands here because it helps really incorporate the frosting evenly without overmixing and making the mixture soggy. You want a dough-like consistency that holds together when squeezed.
Step 2: Divide and Dye the Dough
Separate your cake dough into bowls depending on how many colors you want. I usually go for three classic Halloween colors: green, orange, and purple. Add food coloring drop by drop, stirring until you get the perfect hue. Don’t rush this! It took me a few tries to find the right balance that wasn’t too bright or too dull. Pop these bowls in the freezer for about 10-15 minutes so the dough firms up—it’ll be much easier to roll.
Step 3: Roll Into Balls and Set the Sticks
Once chilled, roll the dough into 1½ inch balls—try to keep them the same size so they bake and dip evenly. Place them on parchment paper and freeze again while prepping your chocolate. Melt about a third of your white chocolate in short bursts, stirring frequently so it doesn’t burn. Dip the tip of each stick into melted chocolate, then push it halfway into the cake ball; this helps the stick stay put once dipped thoroughly. Freeze this setup for another 15-20 minutes to make sure everything’s firm.
Step 4: Dip and Decorate Like a Pro
Heat the remaining white chocolate until super smooth. Now carefully dunk each cake pop straight into the chocolate, slowly pulling it out to let excess drip off—patience here is key for a clean, glossy coating. Stand them up in a piece of styrofoam or a box lined with wax paper to dry. This is when you unleash your creativity: sprinkle on candy eyes, crushed Oreos, or Halloween sprinkles to make them truly stand out. Let them set completely before serving or storing.
Pro Tips for Making Halloween Cake Pops Recipe
- Perfect Consistency: If your cake mixture feels too wet, pop it back in the fridge to chill a bit longer before rolling—it makes shaping so much easier.
- Avoid Cracks: When dipping, make sure to swirl the pop gently instead of dipping straight down and pulling up quickly—that smooth motion keeps the coating even.
- Use Candy Melts for Vivid Colors: Using colored candy melts lets you skip the food coloring step and get perfectly vibrant pops every time.
- Drying Time Patience: Don’t rush setting the pops; give them ample time to harden upright—it prevents smudging and broken sticks.
How to Serve Halloween Cake Pops Recipe
Garnishes
For garnishes, I’m a sucker for eyeball candies and Halloween-themed sprinkles—they make the pops instantly festive and add great texture. Crushed Oreos are a sneaky favorite in my house because they add a little crunch and that classic chocolatey kick. Glittery sugar or edible glitter can also turn your cake pops into little gems that’ll wow your guests.
Side Dishes
I like to pair cake pops with slightly savory snacks, like cheesy Halloween popcorn or mini sliders, so there’s a balance of flavors at the party table. For a sweeter spread, pumpkin spice cookies or apple cider donuts complement the cake pops perfectly and keep the theme strong.
Creative Ways to Present
Presentation can really make these shine! I’ve had success piercing pops into a hollowed-out pumpkin filled with floral foam or even using a spooky decorative box lined with black tissue paper to stand them upright. Wrapping each pop individually in clear cellophane tied with orange and black ribbon turns them into party favors that guests adore.
Make Ahead and Storage
Storing Leftovers
I store leftover Halloween cake pops in an airtight container in the fridge, separating layers with parchment paper so they don’t stick. They stay fresh and delicious for up to one week, which is perfect if you want to prep early for your party.
Freezing
Freezing cake pops works well if you want to make them way ahead. I freeze them upright on a tray first, then transfer them to a sealed container. When thawing, I bring them back to the fridge overnight—this keeps the texture and flavor intact without condensation messing up the chocolate coating.
Reheating
Since these are already baked and frosted, reheating isn’t necessary. But if you want the chocolate coating a little less firm, I gently let the cake pops sit at room temperature for about 15 minutes. Avoid microwaving since it can soften the coating too much and cause melting.
FAQs
-
Can I use other types of cake for this Halloween Cake Pops Recipe?
Absolutely! While angel food cake works great for its light texture, you can use chocolate, yellow, or even pumpkin cake. Just keep in mind the moisture level; wetter cakes may require slightly less frosting to maintain the right dough consistency.
-
How do I prevent the cake pops from falling off the sticks?
Dipping the tips of the sticks in melted chocolate before inserting them into the cake ball acts like glue and helps secure them better. Freezing the pops after sticking also gives them time to set firmly, reducing falls during dipping.
-
What’s the best way to color the cake dough evenly?
Mix your food coloring gradually, stirring well after every few drops. Using gel or paste food colors provides more vibrant colors without adding liquid that might affect the mix. Also, keep the dough chilled before rolling for easier handling.
-
Can I make Halloween Cake Pops Recipe without sticks?
You can skip the sticks and simply make mini cake balls instead, but it’s less mess-free and lacks the classic cake pop look. If you want to forgo sticks, using mini cupcake liners to serve the balls can help keep things tidy.
-
How long do Halloween Cake Pops last?
Stored properly in the fridge, they last up to a week. For longer storage, freezing is a good option. Just be sure to thaw them carefully to avoid condensation ruining the chocolate shell.
Final Thoughts
Honestly, this Halloween Cake Pops Recipe has become a staple in my holiday baking lineup because it’s fun, customizable, and downright delicious every single time. I’ve shared these with friends, family, and kids at school parties, and they always spark such joy and excitement. Give this recipe a try—you might find it’s your go-to festive treat that makes Halloween a little sweeter and a lot more fun. Trust me, once you start making cake pops this way, you’ll be hooked!
Print
Halloween Cake Pops Recipe
- Prep Time: 30 minutes
- Cook Time: 0 minutes
- Total Time: 60 minutes
- Yield: 18 cake pops
- Category: Dessert
- Method: No-Cook
- Cuisine: American
Description
These Halloween Cake Pops are a delightful and festive treat perfect for the spooky season. Made with crumbled angel food cake mixed with vanilla frosting and colored with vibrant food dyes, these no-bake cake pops are coated in rich white chocolate and decorated with fun sprinkles, crushed Oreos, and candy eyeballs. They’re easy to make, fun to decorate, and a perfect grab-and-go treat for Halloween parties or gatherings.
Ingredients
Cake Mixture
- 1 Angel Food Cake, baked (12 oz.)
- ¾ cup vanilla frosting
- 1 teaspoon vanilla extract
Coating and Decorations
- 2 ½ cups white chocolate chips or melting chocolate
- Food coloring (green, orange, purple as desired)
- Optional: sprinkles, crushed Oreos, candy eyeballs, etc.
- 18 – 20 cake pop sticks
Instructions
- Crumble the Cake: Place the baked angel food cake into a medium bowl and use your hands to crumble it into very fine crumbs. Add the vanilla frosting and vanilla extract, then mix thoroughly using a spoon or your hands until the frosting is fully incorporated into the cake crumbs, forming a dough-like consistency.
- Divide and Color the Dough: Separate the cake mixture evenly into 3 bowls (or the number of colors you plan to use). Add approximately 25 drops of food coloring to each bowl: for green, add 25 drops green; for orange, add 13 drops yellow and 12 drops red; for purple, add 13 drops red and 12 drops blue. Stir each mixture well and adjust food coloring as needed until the desired colors are achieved. Freeze the colored mixtures for 10-15 minutes to firm up.
- Shape the Cake Pops: Roll the chilled cake dough into tight balls about 1 ½ inches in diameter. Place the balls on a parchment-lined tray and freeze again while preparing the chocolate coating.
- Prepare the Cake Pop Sticks: Melt ⅓ cup of white chocolate in the microwave in 15-20 second intervals, stirring thoroughly between each session to avoid burning. Dip the tip of each cake pop stick into the melted chocolate, then insert it halfway into each cake ball. Place the assembled pops back on the parchment and freeze for an additional 15-20 minutes or longer to set firmly.
- Coat the Cake Pops: Melt the remaining white chocolate in 15-20 second increments in the microwave, stirring well to ensure smooth, even melting. Dip each cake pop fully into the melted chocolate, then slowly lift and allow the excess chocolate to drip off. Place the dipped cake pops upright in a foam block, box, or cup to dry.
- Decorate and Store: After the chocolate coating sets (about 10-15 seconds), decorate with sprinkles, crushed Oreos, candy eyeballs, or other fun toppings. Store the finished cake pops covered in the refrigerator for up to one week.
Notes
- These cake pops are a no-bake version using pre-baked angel food cake, making them easy and quick to prepare.
- Vibrant food coloring allows you to customize the pops with festive Halloween colors.
- Freezing the cake balls multiple times helps them hold their shape better when dipped in chocolate.
- Use a microwave-safe bowl and stir frequently when melting chocolate to avoid burning.
- Store cake pops in an airtight container in the refrigerator to keep them fresh for up to one week.
Nutrition
- Serving Size: 1 cake pop
- Calories: 223 kcal
- Sugar: 26 g
- Sodium: 136 mg
- Fat: 10 g
- Saturated Fat: 5 g
- Unsaturated Fat: 4.5 g
- Trans Fat: 0 g
- Carbohydrates: 32 g
- Fiber: 1 g
- Protein: 3 g
- Cholesterol: 5 mg


