
If you’re looking for a fun, festive twist on classic treats, you’re going to adore this Monster Cake Pops Recipe. I’ve made these for parties and casual family gatherings, and let me tell you, they’re always a hit. The perfect mix of spooky and sweet, these little cake pops bring joy for both kids and adults alike. Keep reading—a few clever tricks I’ve learned will help you create pops that are as irresistible as they look!
Why You’ll Love This Recipe
- Kid-Friendly Fun: These cake pops are playful and engaging, perfect for Halloween parties or school events.
- Easy Decoration: No need for professional skills—the candy and licorice accents make decorating a breeze.
- Delicious Flavor Combo: Chocolate cupcakes combined with sweet candy fillings create a truly delightful bite.
- Perfect Portion: The pops are easy to serve, hold, and enjoy—no messy plates involved.

Ingredients You’ll Need
This Monster Cake Pops Recipe balances classic chocolate cupcake flavor with fun candy surprises and vibrant toppings. I always urge picking high-quality frosting since it plays a huge role in the texture and taste.
- Chocolate Cupcakes: Use your favorite recipe or premade cupcakes; moist bases work best for shaping into pops.
- Smarties or Mini Candies: These go inside the cake for a sweet surprise—try to find colored candies for more fun.
- Chocolate Frosting: I recommend a fluffy whipped chocolate buttercream to bind the cake crumbs perfectly.
- Black Licorice: Great for creating spooky monster features like mouths and antennae.
- Variety of Candies: Think gummy eyes, sprinkles, or mini chocolate chips for decorating.
- Orange Paper Cups: These add a festive Halloween accent and make serving simple.
- Black Marker: For drawing tiny details on the paper cups and adding extra character.
Variations
One of the things I love about Monster Cake Pops Recipe is how easy it is to make your own spin on it. Whether you’re watching sugar intake or just want to try a different flavor combo, there’s plenty of room for creativity.
- Flavor Switch: I’ve swapped the chocolate cupcakes for red velvet or pumpkin spice versions, and it adds a whole new festive vibe.
- Dairy-Free Twist: Using a dairy-free frosting recipe lets you keep this treat inclusive for guests with allergies.
- Decor Upgrade: Sometimes I use edible googly eyes or colored candy melts to create even more “monster” personality.
- Theme Variations: This recipe works well for any holiday—just switch the candy colors and decorations to match!
How to Make Monster Cake Pops Recipe
Step 1: Bake and Cool the Cupcakes
First things first—bake your chocolate cupcakes fully according to your recipe or the box instructions. I find that letting them cool completely (better if refrigerated for 30 minutes) makes the cake easier to crumble and handle without falling apart.
Step 2: Crumble and Combine with Frosting
Next, crumble the cooled cupcakes into a large bowl—don’t overdo it. You want mostly fine crumbs with a few slightly larger pieces to keep the texture interesting. Add about half the frosting, then mix gently but thoroughly. The mixture should hold together when pressed but not be overly sticky. This is your cake pop base.
Step 3: Shape the Monster Cake Pops
Here comes the fun part. Using your hands, form the cake mixture into small balls roughly the size of a golf ball. You can get creative and make some monster shapes—oval or slightly elongated shapes add personality! Pop them onto a tray lined with parchment paper.
Step 4: Chill Before Decorating
Refrigerate your cake pops for at least an hour to firm up. This step is crucial—it helps them hold their shape while you dip and decorate later on. I don’t skip this, especially in warmer weather.
Step 5: Add the Candy Face Features
Now the monsters really come to life! Use black licorice strips to create mouths, antennae, or funny “hair.” Add candy eyes or draw simple pupils on fondant or candy melts. This part becomes a little art project, so have fun making each cake pop uniquely spooky or silly.
Step 6: Display and Serve
Place each cake pop into an orange paper cup or stand them on a decorative platter. I like to write little monster names on the cups with a black marker—it makes serving a delight, especially for kids!
Pro Tips for Making Monster Cake Pops Recipe
- Don’t Overmix the Cake Crumbs: Too much frosting can make the mixture soggy; aim for a “play dough” consistency for easy shaping.
- Chill Thoroughly: Refrigerate pops before decorating to prevent them from falling apart when you add candies.
- Use Candy Wisely: Pick candies that stick well without sliding off, and press gently to secure them in place.
- Avoid Humidity: Make these on a dry day or use an air-conditioned room to keep frosting and decorations looking fresh.
How to Serve Monster Cake Pops Recipe
Garnishes
I personally love adding extra spooky details like edible glitter or mini candy eyeballs. Sometimes I sprinkle crushed candy canes for texture and color contrast—especially around Halloween, they add a festive crunch!
Side Dishes
These monster pops pair wonderfully with simple milk or hot cocoa for kids (and adults!), and a platter of fresh fruit balances the sweetness if you’re serving a crowd.
Creative Ways to Present
Try setting the cake pops in a “monster garden” by standing them in green shredded paper or edible grass inside a decorated box. At Halloween parties, I arrange them on a spooky-themed tray with mini pumpkins and cobweb decorations. Kids love choosing their “monster” from the lineup!
Make Ahead and Storage
Storing Leftovers
Store leftover Monster Cake Pops in an airtight container in the fridge. I like to place parchment paper between layers to keep decorations intact. They’ll stay fresh for up to 3 days—perfect if you want to prep early for an event.
Freezing
If you want to freeze them, wrap each pop individually in plastic wrap and then place in a freezer-safe container. When I tried freezing, the texture remained great after thawing overnight in the fridge, although decorations might be a little less vibrant.
Reheating
There’s no need to reheat cake pops—their magic is in their cool, creamy texture. Just take them out of the fridge a bit before serving to mellow the chill, and they’re ready to enjoy!
FAQs
-
Can I use another flavor of cake for Monster Cake Pops Recipe?
Absolutely! While chocolate is my personal favorite for this recipe, red velvet, vanilla, or even pumpkin spice cupcakes work beautifully. Just adjust frosting flavor to complement your chosen cake.
-
How long do Monster Cake Pops stay fresh?
Stored properly in an airtight container in the fridge, they should stay fresh for up to 3 days. For best texture and decoration, enjoy as soon as possible.
-
What’s the best way to make sure decorations stick?
Using a slightly softened frosting-based cake pop mix helps candies stick well. Also, gently pressing candy pieces into the cake pop right after chilling prevents them from slipping off.
-
Can I make Monster Cake Pops ahead of time for a party?
Yes! You can make and chill them a day or two ahead, then decorate shortly before your event for the freshest look and taste.
Final Thoughts
I absolutely love how this Monster Cake Pops Recipe adds a playful and delicious twist to party treats. When I first tried making them, I was amazed by how much fun decorating could be—and it’s such a great way to involve kids in the kitchen. Give these a try, and I promise they’ll become your go-to for spooky celebrations and sweet tooth cravings alike. Happy baking, and enjoy every festive bite!
Print
Monster Cake Pops Recipe
- Prep Time: 20 min
- Cook Time: 25 min
- Total Time: 45 min
- Yield: 12 cupcakes
- Category: Dessert
- Method: Baking
- Cuisine: American
- Diet: Vegetarian
Description
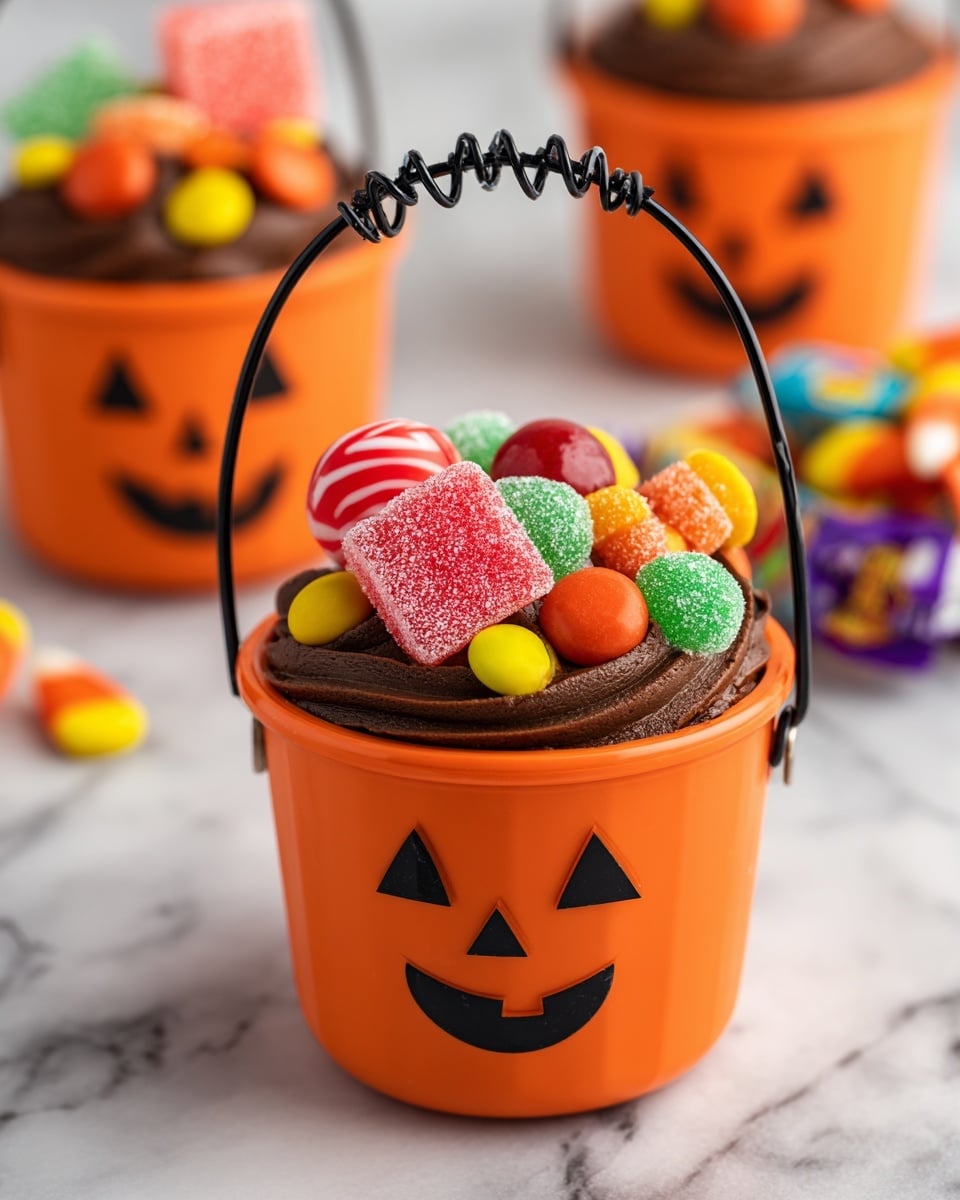
These Halloween Jack o’lantern Cupcakes are fun and festive chocolate pinata cupcakes filled with colorful candies inside and topped with more sweets, perfect for kids and adults at any Halloween party or potluck.
Ingredients
Cupcakes
- 12 chocolate cupcakes
Filling
- 2 boxes smarties (‘scaries’) or candies to fill cupcakes
Frosting
- 3 cups chocolate frosting (recommend Chocolate Whipped Cream Buttercream frosting)
Toppings
- 12 pieces black licorice
- Variety of candies for topping (leftover candy can be used)
Other
- 12 orange paper ice cream/dessert cups (6 oz)
- Black marker
Instructions
- Bake Cupcakes: Prepare and bake the chocolate cupcakes according to your chosen recipe’s instructions. Allow them to cool completely before proceeding to the next step.
- Hollow Cupcakes: Use an apple corer to carefully remove the centers of each cupcake. Set aside the removed cupcake centers for later use.
- Fill with Candies: Fill the hollowed-out centers of the cupcakes about three-quarters full with smarties or your chosen small candies.
- Replace Cake Tops: Cut the saved cupcake centers in half horizontally. Place only the top halves back into the holes on each cupcake, sealing the candy-filled cavity.
- Frost and Decorate: Generously frost each cupcake with the chocolate frosting. Decorate the tops with black licorice pieces and various candies to resemble Jack o’lantern faces for a fun Halloween theme.
- Serve: Place each cupcake into an orange paper ice cream or dessert cup to complete the presentation. Use a black marker to decorate the cups if desired, enhancing the Halloween look.
Notes
- These Halloween Jack o’lantern Cupcakes are chocolate pinata-style cupcakes filled with surprising candies inside and topped with more sweets, making them a hit with kids and adults alike.
- They are an excellent festive treat for Halloween parties and potlucks.
- You can use leftover candies for the topping to reduce waste and add variety.
- Chocolate Whipped Cream Buttercream frosting is recommended for a rich, light frosting; see the recipe notes for details.
Nutrition
- Serving Size: 1 cupcake
- Calories: 394 kcal
- Sugar: 50 g
- Sodium: 250 mg
- Fat: 16 g
- Saturated Fat: 5 g
- Unsaturated Fat: 9 g
- Trans Fat: 0 g
- Carbohydrates: 63 g
- Fiber: 1 g
- Protein: 3 g
- Cholesterol: 1 mg

