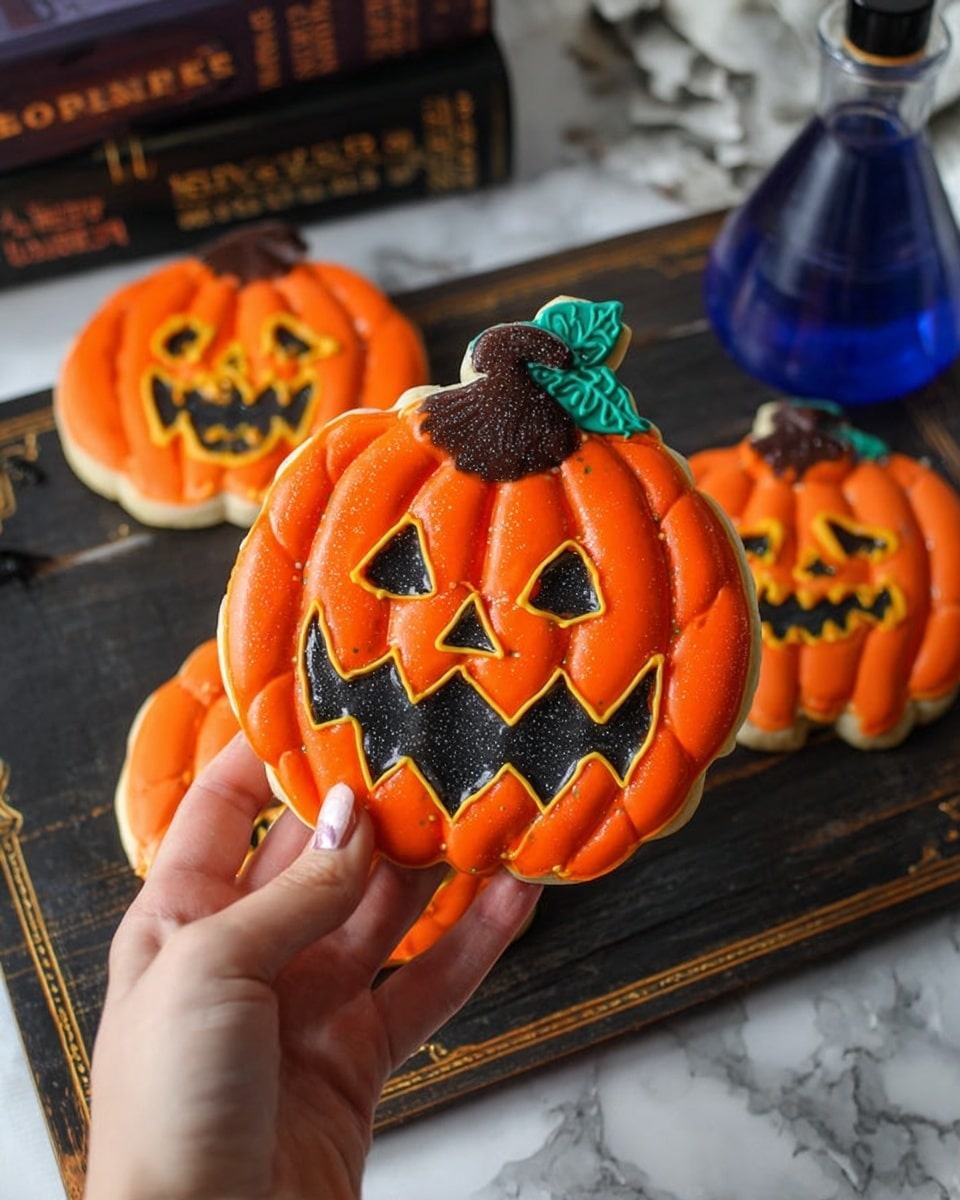
If you’re on the hunt for a treat that’ll make your Halloween celebrations unforgettable, this Halloween Sugar Cookies Recipe is my all-time favorite go-to. They come out perfectly soft, sweet, and sturdy enough to hold up all the spooky decorations you want to pile on. Trust me, these aren’t just any sugar cookies — they’re the kind that everyone in my family absolutely loses their minds over every fall.
Why You’ll Love This Recipe
- Soft & Perfect Texture: Rolling the dough to exactly 1/4″ thick makes these cookies irresistibly tender yet sturdy for decorating.
- Easy to Customize: Whether you want ghost shapes or pumpkins, the dough holds shapes beautifully.
- Reliable & Foolproof: I’ve tested this recipe dozens of times — it works perfectly every single time.
- Perfect for Decorating: The smooth surface and ideal firmness make royal icing and sprinkles look fantastic.
Ingredients You’ll Need
The ingredients for this Halloween Sugar Cookies recipe come together to create a dough that’s smooth, flavorful, and easy to work with. I always recommend using room temperature butter and eggs, as it helps everything blend evenly and keeps the dough from getting tough.
- Unsalted Butter: Room temp butter gives the dough softness and rich flavor without extra salt.
- Confectioner’s Sugar: This superfine sugar helps keep the cookies tender and gives that classic smooth sugar cookie sweetness.
- Egg: Use room temperature for best mixing results, adding structure and moisture to the dough.
- Vanilla Extract: Real vanilla enhances the flavor beautifully—fresh and aromatic.
- All-Purpose Flour: The base of the dough – provides structure without making cookies dry.
- Baking Powder: Just enough to give a slight lift without puffing up the cookie too much.
- Salt: Balances sweetness and rounds out the flavor.
- Meringue Powder: Essential for making that perfectly smooth, firm royal icing that’ll decorate your cookies like a pro.
- Water: Used in the icing to get just the right consistency for piping or flooding.
Variations
One of my favorite parts about this Halloween Sugar Cookies Recipe is how you can make it uniquely yours. I love switching up the flavors or decorating styles depending on the occasion, so don’t be shy to try your own spin!
- Spiced Version: Adding a pinch of cinnamon and nutmeg works magic for a cozy twist — my family gobbles these up faster when fall spices join the party.
- Gluten-Free: Swap in a trusty gluten-free flour blend and chill the dough a bit longer before rolling for best results.
- Vegan Adaptation: I’ve tried using vegan butter and flax eggs; the taste is lovely, especially if you leave out the meringue powder in icing and opt for a powdered sugar glaze.
- Colorful Frosting: Use gel food coloring for vibrant Halloween themes — neon green witches or classic orange pumpkins always steal the show.
How to Make Halloween Sugar Cookies Recipe
Step 1: Cream Butter and Sugar for the Softest Dough
Start by setting your stand mixer with the paddle attachment and cream together your room temperature butter and confectioner’s sugar on low speed. This gentle mixing keeps the texture smooth and silky. Don’t rush this part — scraping down the sides a few times really ensures everything combines evenly. When I first tried skipping this, my cookies came out uneven. About 2-3 minutes and you’ll see it turn airy and light.
Step 2: Add Egg and Vanilla, Keep it Fluffy
Next, toss in your egg and vanilla extract. Mix on medium speed for roughly two minutes until your mixture is fluffy and golden. This is where the magic starts for that melt-in-your-mouth texture.
Step 3: Combine Dry Ingredients Separately
While the wet ingredients are getting friendly, whisk together the flour, baking powder, and salt in a separate small bowl. Mixing the dry ingredients well upfront means even distribution, which is key to those perfectly tender cookies.
Step 4: Bring It All Together
Slowly add your dry ingredients to the wet, keeping your mixer on low. About a minute and a half of mixing is enough for the dough to start pulling away from the bowl sides. This dough will be a little soft but firm enough to roll without sticking. My big tip? Don’t overmix or you’ll lose that fluffiness we’re after.
Step 5: Roll Out the Dough to the Perfect Thickness
Here’s the secret to soft-centers — roll out your dough between two sheets of parchment paper to a 1/4-inch thickness exactly. No thicker, no thinner. When I roll too thick, the cookies get cakey; thinner and they lose that tender bite. You can place this parchment-and-dough sandwich on a baking sheet for easy chilling.
Step 6: Chill, Cut, and Chill Again
Pop your rolled dough in the fridge for at least an hour. This resting period firms things up so the cookie shapes don’t lose their charm when baking. After chilling, use your favorite Halloween cutters to create fun shapes. Feel free to reroll scraps once – I always do! Lastly, chill the cut cookies for another 10-15 minutes. This double chilling step helps get that just-right crisp edge with a soft center.
Step 7: Bake Until Golden and Perfect
Bake your cookies at 400°F (yes, a little hotter than normal) for 8-9 minutes, watching that bottom edge for a golden tan. The higher temperature helps set the cookies quickly, keeping them soft inside. Based on your cutter’s size, keep an eye to avoid overbaking. Removing cookies at the right time is a game changer—I learned that the hard way!
Step 8: Cool Completely Before Decorating
Once baked, transfer the cookies to a wire rack to cool fully before applying any icing or sprinkles. Decorating warm cookies can cause your royal icing to melt or run – and while that looks cool, it can get messy fast!
Pro Tips for Making Halloween Sugar Cookies Recipe
- Chill Twice: Always chill the dough before and after cutting for crisp edges and less spreading during baking.
- Parchment Paper Sandwich: Rolling dough between parchment sheets prevents sticking and makes transferring easier.
- Judge Doneness By Cookie Bottoms: Look for a golden-brown bottom instead of the top to avoid overbaking.
- Use Meringue Powder for Royal Icing: It provides stability that’s perfect for detailed Halloween designs and dries rock hard.
How to Serve Halloween Sugar Cookies Recipe

Garnishes
I love decorating these cookies with classic royal icing tinted in Halloween colors — think vibrant oranges, eerie greens, and spooky purples. Adding edible glitter or tiny candy eyes always gets oohs and aahs from friends and family; it’s just that little extra that makes them taste even better.
Side Dishes
Pairing Halloween Sugar Cookies with a warm cup of spiced apple cider or a creamy hot chocolate amps up the cozy vibes. For a party, layering them alongside pumpkin-shaped cupcakes or caramel popcorn makes the dessert spread irresistible.
Creative Ways to Present
For Halloween parties, I like stacking these cookies on tiered platters with festive toothpicks or arranging them on black trays with spider web doilies for dramatic effect. Wrapping a few decorated cookies in cellophane with orange ribbon makes the sweetest favors too!
Make Ahead and Storage
Storing Leftovers
Storing leftover cookies in an airtight container at room temp keeps them soft for about 3-4 days — just like fresh-baked. Layer parchment between to avoid sticking if decorated. I used to worry they’d go stale too fast, but trust me, wrapped well they stay tender longer than you think.
Freezing
I always freeze undecorated cookie dough or fully baked cookies for future cravings. For dough, roll it out and cut shapes, then freeze flat on a tray before transferring to bags — so easy to bake fresh anytime. Baked cookies can be frozen airtight for up to 2 months; just thaw at room temp before decorating.
Reheating
If you want to warm cookies up a bit, pop them in the microwave for 10 seconds, just enough to bring out that fresh-baked softness. Avoid reheating decorated cookies in the oven or you risk melting your perfect designs.
FAQs
-
Can I use salted butter in this Halloween Sugar Cookies Recipe?
It’s best to stick to unsalted butter for this recipe since it allows you to control the saltiness precisely. Using salted butter might make your cookies slightly too salty or throw off the flavor balance, but if that’s all you have, just skip any added salt and proceed.
-
Why is chilling the dough so important for these sugar cookies?
Chilling firms up the dough, which helps the cookies keep their shape when baking and creates that ideal texture with soft centers and crisp edges. Plus, it makes rolling easier and reduces spreading.
-
Can I make the royal icing ahead for decorating?
Absolutely! Royal icing made with meringue powder keeps well in an airtight container at room temperature for up to a week. Just give it a quick stir before using, and if it thickens, add a few drops of water to adjust.
-
How do I avoid my sugar cookies from spreading too much?
Double chilling the dough is your best friend here — chilling before cutting and again before baking helps cookies hold their shape. Also, make sure your butter is softened but not melted, and avoid overmixing the dough to prevent excess air.
Final Thoughts
I absolutely love how this Halloween Sugar Cookies Recipe brings everyone together around the kitchen. It’s easy enough to make with kids, fun to decorate, and always results in cookies that disappear way too fast. If you want festive, delicious, and foolproof cookies this October, I really recommend giving this recipe a try — it’s one I’m proud to share with friends time and time again. You’ll thank me when your kitchen smells like fall magic and those sweet, soft cookies start flying off the platter!
Print
Halloween Sugar Cookies Recipe
- Prep Time: 20 minutes
- Cook Time: 8 minutes
- Total Time: 28 minutes
- Yield: 15-18 servings
- Category: Dessert
- Method: Baking
- Cuisine: American
Description
Celebrate Halloween with these soft and delicious Halloween Sugar Cookies, perfect for decorating with your favorite spooky designs. With a tender, buttery texture and a sweet vanilla flavor, these cookies are rolled to the ideal thickness for a soft center and crispy edges. They are chilled before baking to maintain their shape and baked to a golden finish, making them perfect for parties or festive treats.
Ingredients
Cookie Dough:
- 1 cup unsalted butter, room temperature
- 1 1/2 cups confectioner’s sugar
- 1 egg, room temperature
- 3 tsp vanilla extract
- 3 cups all-purpose flour
- 1 tsp baking powder
- 1/2 tsp salt
Royal Icing:
- 3 cups confectioner’s sugar
- 2 1/2 Tbsp meringue powder
- 5-6 Tbsp water
Instructions
- Cream Butter and Sugar: Using a stand mixer fitted with the paddle attachment, cream together the butter and 1 1/2 cups confectioner’s sugar at low speed until smooth. Scrape down the sides and bottom of the bowl frequently to ensure even mixing.
- Add Egg and Vanilla: Mix in the egg and vanilla extract for about 2 minutes until the mixture is light and fluffy. Scrape down the sides again to combine everything well.
- Combine Dry Ingredients: In a separate bowl, whisk together the flour, baking powder, and salt until evenly combined.
- Mix Dry and Wet Ingredients: Slowly add the dry ingredients to the wet mixture. Mix at low speed until the dough starts to pull away from the sides of the bowl, about 1 1/2 minutes. Scrape down the bowl sides and bottom as needed.
- Roll Out Dough: Transfer the dough onto parchment paper. Place another sheet of parchment paper on top and roll the dough to about 1/4 inch thickness. This thickness is key for a soft center in your cookies.
- Chill Dough: Place the rolled dough with parchment onto a cookie sheet and chill in the refrigerator for at least one hour. For longer storage, wrap the cookie sheet in plastic wrap to prevent drying.
- Cut Shapes: After chilling, use cookie cutters to cut your desired shapes. Re-roll leftover scraps and continue cutting until all dough is used.
- Chill Cut Cookies: Arrange the cutouts on a parchment-lined cookie sheet about 2 inches apart. Chill again for 10-15 minutes before baking to help them hold their shape.
- Bake Cookies: Preheat oven to 400°F (204°C). Bake the cookies for 8-9 minutes or until the bottom edges turn golden brown. Baking time may vary slightly based on cookie size; check for a golden bottom as a doneness indicator.
- Cool Cookies: Remove cookies from oven and transfer to a wire rack. Allow them to cool completely before decorating with icing or other toppings.
Notes
- Rolling the dough to 1/4 inch thickness ensures a soft, tender cookie center.
- Chilling the dough before and after cutting helps maintain cookie shape during baking.
- Judging doneness by the bottom color prevents overbaking and keeps cookies soft.
- Use parchment paper to prevent sticking and for easy rolling and transfer.
- Royal icing can be prepared with confectioner’s sugar, meringue powder, and water for decorating once cookies are completely cool.
Nutrition
- Serving Size: 1 cookie (based on 18 cookies per batch)
- Calories: 150
- Sugar: 12g
- Sodium: 60mg
- Fat: 7g
- Saturated Fat: 4g
- Unsaturated Fat: 3g
- Trans Fat: 0g
- Carbohydrates: 20g
- Fiber: 0.5g
- Protein: 1g
- Cholesterol: 20mg

