
If you’re on the hunt for a fun, spooky, and utterly adorable treat to wow your friends or family this Halloween, you’ve got to try this Slimer Ghostbusters Cupcakes Recipe. I absolutely love how these cupcakes capture that iconic green Slimer spirit with a delicious twist that’s perfect for any Ghostbusters fan – plus, they’re surprisingly easy to whip up. Keep reading, and I’ll share my favorite tips and tricks so you can nail these cupcakes like a pro!
Why You’ll Love This Recipe
- Fun and Unique: These cupcakes bring the playful Slimer Ghostbusters theme right to your kitchen table, perfect for parties or fan events.
- Beginner-Friendly: You don’t need fancy decorating skills to make these look fantastic – I’ll show you easy steps.
- Delicious Flavor: Moist cupcakes topped with creamy frosting make these a treat everyone will devour.
- Great for All Ages: Kids and adults alike love these bright, fun cupcakes, making them a crowd-pleaser every time.

Ingredients You’ll Need
For this Slimer Ghostbusters Cupcakes Recipe, I like to use ingredients that pack a punch in both flavor and presentation, keeping things simple but effective. The green frosting is crucial – it gives that signature Slimer slime vibe, so choose your coloring carefully!
- Vanilla Cupcake Mix or Your Favorite Homemade Recipe: A classic base that pairs perfectly with the green frosting and decorations.
- The Best Buttercream Frosting: Creamy and smooth, this is your canvas for pimping the cupcakes with that slimy glow.
- Wilton Color Right Food Coloring System (Green and Yellow): To get just the right eerie green tone that screams Slimer.
- Regular Sized Marshmallows: These form the base of Slimer’s ghostly bubbly body.
- Green M&M’s: Use as the eyes and details to bring Slimer to life.
- Orange M&M’s: Optional for extra colorful accents or slime drops.
- Wilton Frosting Tip #233: For creating grass-like textures or the messy ghost potion effect on top.
Variations
I love making this Slimer Ghostbusters Cupcakes Recipe my own by mixing things up depending on the occasion or what ingredients I have on hand. Feel free to get creative here – this recipe is super adaptable!
- Gluten-Free Version: I swapped in my favorite gluten-free cupcake mix once, and the texture was just as fluffy – perfect for guests with sensitivities.
- Vegan Option: Using a vegan buttercream and egg replacer in your cupcake mix helps you still get beautifully green Slimers without missing out on taste.
- Candy-Free: If you want a less sweet version, try decorating with green tinted coconut flakes instead of M&M’s – it adds fun texture and looks great.
- Mini Cupcakes: For smaller bites, just adjust the baking time and use mini marshmallows for the Slimer bodies – these are perfect for parties with lots of snack options.
How to Make Slimer Ghostbusters Cupcakes Recipe
Step 1: Bake Your Cupcakes with Care
Start with a good quality vanilla cupcake mix or your homemade recipe. Line your cupcake pan with green liners or plain white ones if you want your own color shine through. Bake as directed and let them cool completely before decorating—this step is crucial because warm cupcakes can turn your frosting runny, and no one wants that slime meltdown!
Step 2: Prepare the Slimer Green Buttercream
Make your buttercream frosting creamy and smooth. I like to use a blend of green and a touch of yellow food coloring to get that perfect Slimer green – not too dark, just that ghostly glow. Mix until it’s uniform and fluffy. You’ll use most of this frosting to create a messy, almost slimy effect on the cupcake top.
Step 3: Shape the Slimer Body with Marshmallows
Take a regular size marshmallow and gently pull or trim a bit from the top to create Slimer’s uneven, playful shape. Then, lightly coat the marshmallow with just enough green frosting to help candies stick. I discovered that too much frosting here can get messy, so just a thin layer works best.
Step 4: Decorate Your Slimer Face
Press your green M&M’s onto the marshmallow to create Slimer’s eyes and mouth. For fun slime drips, you can add small orange or yellow M&M’s randomly on the cupcake surface or on the frosting drips. Using the Wilton Frosting Tip #233, pipe playful “slime” strands around the cupcake—this takes it to the next level in cuteness and authenticity!
Step 5: Assemble and Finish
Dollop a bit of green frosting on top of each cupcake before placing the marshmallow on it to secure the Slimer “body.” Then, pipe additional green frosting around to blend everything together. This layering makes the cupcake look like Slimer is oozing all over, which is just spot-on for the Ghostbusters vibe.
Pro Tips for Making Slimer Ghostbusters Cupcakes Recipe
- Color Mixing: Start with a tiny bit of green coloring and add yellow gradually to avoid making the frosting too dark or neon.
- Marshmallow Prep: I learned trimming the marshmallow’s top helps it sit better and look more like Slimer’s distinctive shape.
- Frosting Consistency: If your buttercream is too stiff, add a teaspoon of milk to get that perfect pipe-able consistency for slime effects.
- Avoid Overcrowding: Leave some cupcake surface visible – piling too many candies can weigh down your marshmallow and ruin the look.
How to Serve Slimer Ghostbusters Cupcakes Recipe
Garnishes
I usually pop a couple of green jellybeans or sour gummy worms around the base of each cupcake to add an extra dose of freaky slime fun that kids really enjoy. Plus, little edible glitter sprinkles make the slime sparkle under a party light, which always gets compliments.
Side Dishes
Pair these cupcakes with spooky snacks like “ectoplasm” punch (think lime sherbet soda float), or a simple bowl of popcorn tossed with green colored sugar for a full Ghostbusters-themed feast that’s easy and fun.
Creative Ways to Present
For Halloween parties or fan meetups, I like placing these cupcakes on a platter lined with faux slime decorations or glowing LED lights underneath for a haunting effect. You can also arrange them on a tiered stand decorated with Ghostbusters logos or green slime drips made from colored piping gel – it really amps up the presentation.
Make Ahead and Storage
Storing Leftovers
Once decorated, I keep the Slimer Ghostbusters Cupcakes in an airtight container in the fridge if I won’t be eating them within a day or so. The marshmallows stay nice and bouncy, and frosting holds up surprisingly well if you bring cupcakes back to room temp before serving.
Freezing
I’ve frozen these cupcakes successfully, though I suggest freezing before decorating for the best results. Wrap individual cupcakes tightly and freeze up to 2 months. Thaw overnight in the fridge, then decorate and serve for fresh, Slimer-approved goodness.
Reheating
Since these are cupcakes, reheating isn’t really necessary. But if you’re storing in the fridge and want room temperature treats, just let them sit out for about 30 minutes before eating – the frosting and marshmallows soften nicely and taste like freshly baked!
FAQs
-
Can I use pre-made cupcakes for this Slimer Ghostbusters Cupcakes Recipe?
Absolutely! Using store-bought cupcakes is a great shortcut, especially if you’re short on time. Just make sure they’re cooled and ideally use plain or lightly flavored ones so your green frosting really pops.
-
What’s the best way to get the green color for the frosting?
I recommend starting with a drop of green food coloring and adding a little yellow to warm it up. Too much green alone can be harsh, so the yellow sweetens the tone and gives that classic Slimer slime color.
-
Can kids help with decorating these cupcakes?
Definitely! Kids love placing the M&M eyes and piping the “slime.” Just supervise any cutting or trimming of marshmallows for safety. This recipe is perfect for fun Halloween cooking projects with the family.
-
How long do these cupcakes stay fresh?
Stored properly in an airtight container, they stay fresh up to 3 days at room temperature and about 5 days refrigerated. For the best slime effect, serve them within a day or two.
Final Thoughts
This Slimer Ghostbusters Cupcakes Recipe has quickly become a favorite of mine whenever Halloween rolls around. There’s something so joyful about making a treat that looks as fun as it tastes, and watching everyone’s faces light up when they see their own little slimy ghost. If you want to bring a little nostalgia and tons of flavor to your gathering, I can’t recommend these cupcakes enough. Trust me, once you make them, you’ll be itching to bust out the proton packs and start every Halloween with a batch of these green goodies!
Print
Slimer Ghostbusters Cupcakes Recipe
- Prep Time: 10 min
- Cook Time: 18 min
- Total Time: 28 min
- Yield: 18 cupcakes
- Category: Dessert
- Method: Baking
- Cuisine: American
Description
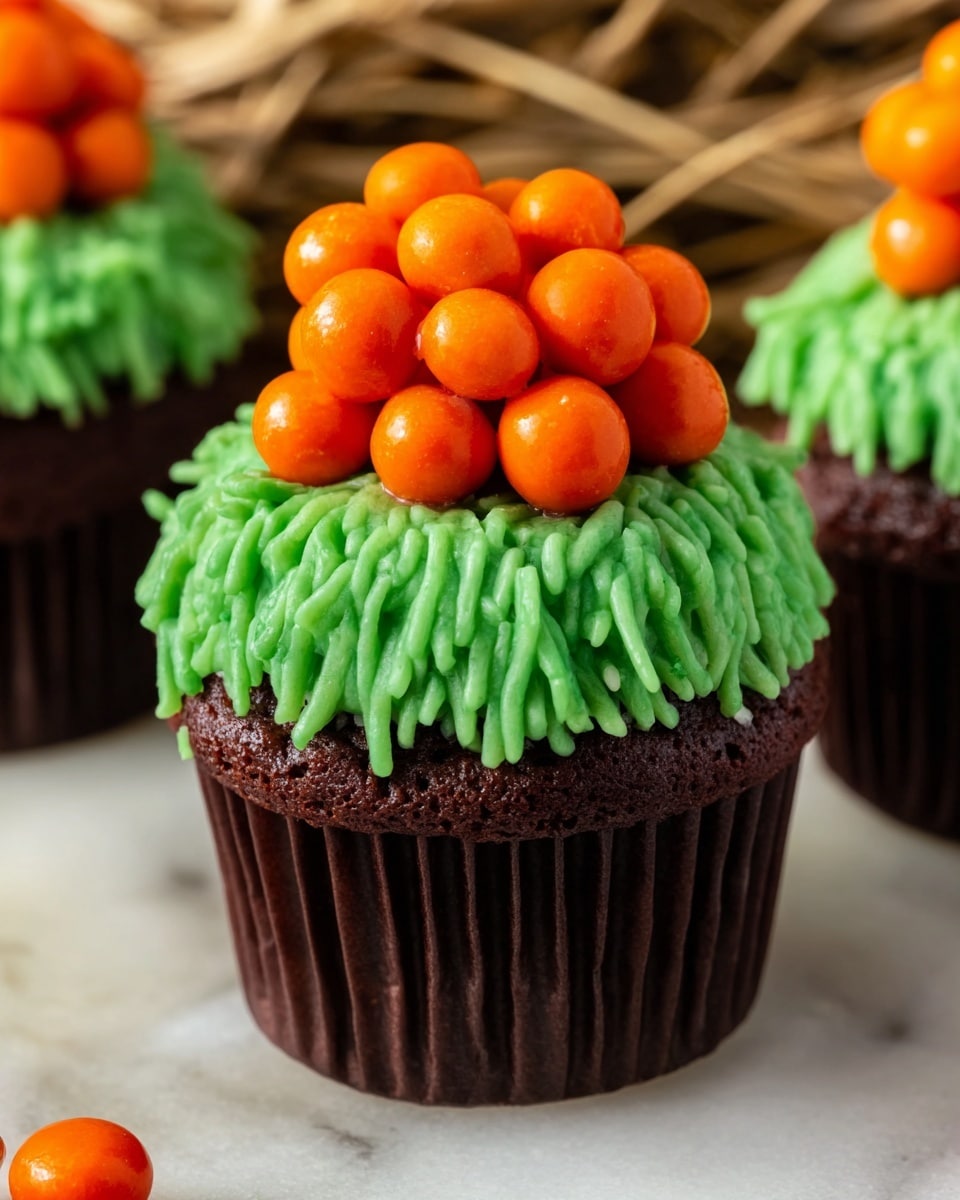
These Halloween Pumpkin Patch Cupcakes are delightfully festive treats perfect for any spooky celebration. Featuring moist cupcakes topped with vibrant green buttercream ‘grass’ and a charming pumpkin made from a marshmallow coated in orange frosting and decorated with orange and green M&M’s to resemble a pumpkin patch. Easy to assemble and visually enchanting, these cupcakes are ideal for Halloween parties or classroom snacks.
Ingredients
Cupcakes
- 18 cupcakes baked in black cupcake liners
Frosting
- 1 batch of The Best Buttercream Frosting
- Wilton Color Right Food Coloring System – Orange
- Wilton Color Right Food Coloring System – Green (using mix of Blue, Yellow, Red for orange; green straight or mix)
Decorations
- 18 regular-sized marshmallows
- Orange M&M’s, about 20-25 per cupcake
- Green M&M’s, one per cupcake for the pumpkin stem
Tools
- Wilton Frosting Tip #233 (grass tip)
- Pastry bag
Instructions
- Prepare M&M’s: Sort and pull out all the orange M&M’s from a large bag, making sure you have about 20-25 per cupcake to decorate the pumpkin’s body.
- Bake Cupcakes: Bake 18 cupcakes using black cupcake liners as per your favorite cupcake recipe or a boxed mix, baking for about 18 minutes until done. Allow cupcakes to cool completely before frosting.
- Tint Buttercream Frosting: Make a batch of your Best Buttercream Frosting. Tint a portion orange using Wilton Color Right Food Coloring System (by mixing red, yellow, and a touch of blue if needed) and tint another portion green for the ‘grass’.
- Pipe Green Grass Frosting: Cover the top of each cupcake with green buttercream frosting. Use a pastry bag fitted with Wilton Frosting Tip #233 to pipe grass around the cupcake top, or simply smooth the green frosting with a knife if preferred.
- Prepare Marshmallow Pumpkins: Take one regular-sized marshmallow per cupcake and pull off approximately one-third from the top to create a slight pumpkin shape. Using a knife or fingers, spread a thin layer of the orange buttercream frosting all over the marshmallow—just enough for the M&M’s to adhere.
- Assemble Pumpkin on Cupcake: Place a dollop of orange frosting in the center of the green-frosted cupcake to act as glue. Set the frosted marshmallow on top of this dollop.
- Decorate Pumpkin: Holding the marshmallow with the ‘M’ side of the M&M’s facing down, carefully place the orange M&M’s around the marshmallow in rows to simulate pumpkin ridges. Place five orange M&M’s on top of the marshmallow, then add a single green M&M in the center to represent the pumpkin stem.
Notes
- These cupcakes are super adorable and very easy to make—perfect for Halloween parties or school treats.
- Using black cupcake liners enhances the Halloween theme and makes the green and orange colors pop visually.
- If you prefer, smooth the green frosting with a knife instead of piping grass for a simpler look.
- Make sure cupcakes are completely cooled before frosting to prevent melting.
- Adjust M&M quantities slightly based on the size of marshmallows or personal decoration preferences.
Nutrition
- Serving Size: 1 cupcake
- Calories: 280
- Sugar: 28g
- Sodium: 150mg
- Fat: 12g
- Saturated Fat: 7g
- Unsaturated Fat: 4g
- Trans Fat: 0g
- Carbohydrates: 38g
- Fiber: 1g
- Protein: 2g
- Cholesterol: 35mg


