
If you’re craving a cookie that feels like a cozy hug on a chilly day, I’ve got just the thing for you—a Twix Cookies Recipe that’s absolutely fan-freaking-tastic. Imagine the perfect balance of buttery cookie base, a gooey caramel middle, and a smooth chocolate topping—all in one bite. Trust me, once you try this recipe, you’ll find yourself making it again and again because it’s just that good.
Why You’ll Love This Recipe
- Gooey Caramel Center: The star of the show—soft, chewy caramel that melts in your mouth.
- Buttery Cookie Base: A rich, tender cookie that holds everything together perfectly.
- Easy to Make: No fancy techniques or weird ingredients—just straightforward baking fun.
- Family Favorite: My family goes crazy for these and they’re a guaranteed hit at any party.

Ingredients You’ll Need
For the Twix Cookies Recipe, you want to use simple, readily available ingredients that blend beautifully to get that iconic twix taste and texture at home. Picking the right caramel and chocolate really makes a difference, so I’ll share some tips.
- All-purpose flour: The classic base for your cookies, gives that perfect chew and structure.
- Baking soda & baking powder: Helps the cookies rise just enough—not too puffy, just right.
- Ground cinnamon & pumpkin pie spice (optional twist): Adds subtle warmth and depth if you want to mix it up.
- Salt: Brings out all the flavors, don’t skip it.
- Unsalted butter: Make sure it’s softened for easy mixing and that rich buttery flavor.
- Light brown sugar & granulated sugar: Brown sugar adds moisture and chew, granulated sugar gives a nice crispness.
- Large egg and vanilla extract: Helps build a tender crumb with a fragrant kick.
- Pumpkin puree (optional twist): I sometimes add this for fall vibes—moist and lovely.
- Powdered sugar, whole milk, melted butter, vanilla, and salt (for icing): These come together to create a luscious glaze that tops the cookies beautifully.
- Caramel squares or caramel bits: The hero ingredient—go for the ones that melt smoothly without burning.
- Chocolate chips or melting chocolate: Use good-quality chocolate for that perfectly smooth finish.
Variations
One of the best things about my take on the Twix Cookies Recipe is how you can easily tweak it to fit your mood or dietary needs. I love switching things up to keep every batch exciting.
- Chocolate lovers’ upgrade: Double the chocolate drizzle or add white chocolate for a sweet contrast—I’ve done this when hosting friends who are big chocoholics.
- Nutty twist: Sprinkle some chopped pecans or almonds in the cookie dough for extra crunch—I found this adds a lovely texture contrast.
- Vegan swap: Replace butter with coconut oil and use flax egg to make a vegan-friendly batch that still hits that same delicious note.
- Seasonal flavors: During fall, I like adding pumpkin puree and spices like cinnamon and nutmeg for that warm twist that screams autumn.
How to Make Twix Cookies Recipe
Step 1: Mix Your Dry Ingredients
Start by whisking together the flour, baking soda, baking powder, and salt (plus cinnamon and pumpkin pie spice if you’re going for that fall vibe). This ensures all those little leavening agents are evenly distributed. I like to do this first so when I add the wet ingredients, everything comes together smoothly without overmixing.
Step 2: Cream Butter and Sugars
Using a mixer, beat the softened butter with both the brown and granulated sugar until the mixture is light and fluffy—that usually takes around 3-4 minutes. This step is key to getting that tender, melt-in-your-mouth cookie texture. Don’t rush it! I learned this the hard way when my cookies turned out dense the first time.
Step 3: Add Egg, Vanilla, and Pumpkin
Next, add your egg and vanilla extract, mixing just until combined. If you want that lovely pumpkin flavor, fold in the pumpkin puree here too. It keeps the dough soft and adds moisture that makes these cookies extra special.
Step 4: Combine Wet & Dry Ingredients
Slowly add the flour mixture in batches, mixing on low speed to avoid overworking the dough. You’ll want a soft but manageable dough. At this point, it should come together nicely without any dry patches.
Step 5: Bake the Cookies
Spoon or scoop the dough onto your baking sheets lined with parchment paper, spacing them about 2 inches apart. Bake at 350°F (175°C) for about 10-12 minutes until the edges are just starting to turn golden but the centers still look soft. I always keep a close eye here because you want soft cookies that hold their shape.
Step 6: Add the Caramel Layer
While the cookies are still warm, press a caramel square or caramel bits gently into the center of each cookie. The warmth will slightly melt the caramel and create that signature chewy middle. If you let the cookies cool too much, the caramel won’t meld as well, so timing is everything here.
Step 7: Chocolate Topping
Finally, melt your chocolate chips and spread or drizzle them over the top of each cookie to seal in all that luscious caramel goodness. Chill the cookies briefly to set the chocolate, and voilà—your homemade Twix Cookies are ready to impress.
Pro Tips for Making Twix Cookies Recipe
- Soft Butter is Key: Always soften your butter to room temperature before mixing for the creamiest dough.
- Don’t Overbake: Pull the cookies out when edges are golden but centers still look a bit underdone—they’ll firm up as they cool.
- Use Quality Chocolate: Better chocolate means smoother melting and a better finish, which I learned after trying just any old chips.
- Add Caramels While Warm: Pressing caramel on warm cookies helps it melt perfectly without burning or hardening too fast.
How to Serve Twix Cookies Recipe
Garnishes
I usually keep garnishes simple—some flaky sea salt sprinkled on the chocolate topping adds a perfect salty-sweet punch. Occasionally, I’ll drizzle a bit of caramel sauce or white chocolate on top just to jazz them up for company.
Side Dishes
These cookies pair wonderfully with a tall glass of cold milk or a warm cup of coffee. I’ve also served them alongside vanilla ice cream for an indulgent dessert plate that everyone raves about.
Creative Ways to Present
For special occasions, I like arranging these cookies on a tiered dessert stand or wrapping them individually with clear cellophane and a cute ribbon for gifting. They make fantastic party favors or a holiday treat basket inclusion.
Make Ahead and Storage
Storing Leftovers
I store leftover Twix Cookies in an airtight container at room temperature, layered with parchment paper to prevent sticking. They stay fresh and chewy this way for about 4 days—long enough to enjoy every last one.
Freezing
If you want to prep ahead, these cookies freeze really well. Just freeze unbaked dough balls or fully baked cookies on a sheet first, then transfer to a freezer-safe bag. Thaw at room temperature, or warm gently in the oven to refresh their soft texture.
Reheating
Reheat cookies for about 10-15 seconds in the microwave or pop them in a warm oven for a few minutes. This softens the caramel and chocolate, making the cookies taste freshly baked all over again. I often do this when sharing with unexpected guests.
FAQs
-
Can I use store-bought caramel sauce instead of caramel squares?
Yes! While caramel squares give a nice chewy texture, a thicker store-bought caramel sauce can be drizzled on top of the baked cookies before adding the chocolate layer for a gooey finish. Just be careful not to use too much, or the cookies might get soggy.
-
What type of chocolate works best for the topping?
I recommend using semi-sweet or milk chocolate chips for a classic twix flavor, but you can experiment with dark or even white chocolate for variations. Melting chocolate wafers or candy melts also work great and can give a smoother finish.
-
How do I prevent the caramel from oozing too much?
Pressing caramel onto warm but not hot cookies helps it soften without melting completely. Also, chilling the cookies after applying chocolate helps set everything in place and reduces caramel run-off.
-
Can this recipe be made gluten-free?
Absolutely! Swap the all-purpose flour for a 1:1 gluten-free baking flour blend. Just keep in mind that the texture might vary slightly, but the flavor will still shine.
Final Thoughts
Honestly, I absolutely love how this Twix Cookies Recipe turns out every single time. It’s become my go-to when I want a homemade treat that feels special but isn’t complicated. Whether you’re sharing with family or treating yourself, these cookies bring that iconic twix magic right into your kitchen—and I’m confident you’ll enjoy baking and eating them as much as I do. Give this recipe a try—you might just find a new favorite!
Print
Twix Cookies Recipe
- Prep Time: 10 min
- Cook Time: 11 min
- Total Time: 51 min
- Yield: 34 cookies
- Category: Dessert
- Method: Baking
- Cuisine: American
- Diet: Vegetarian
Description
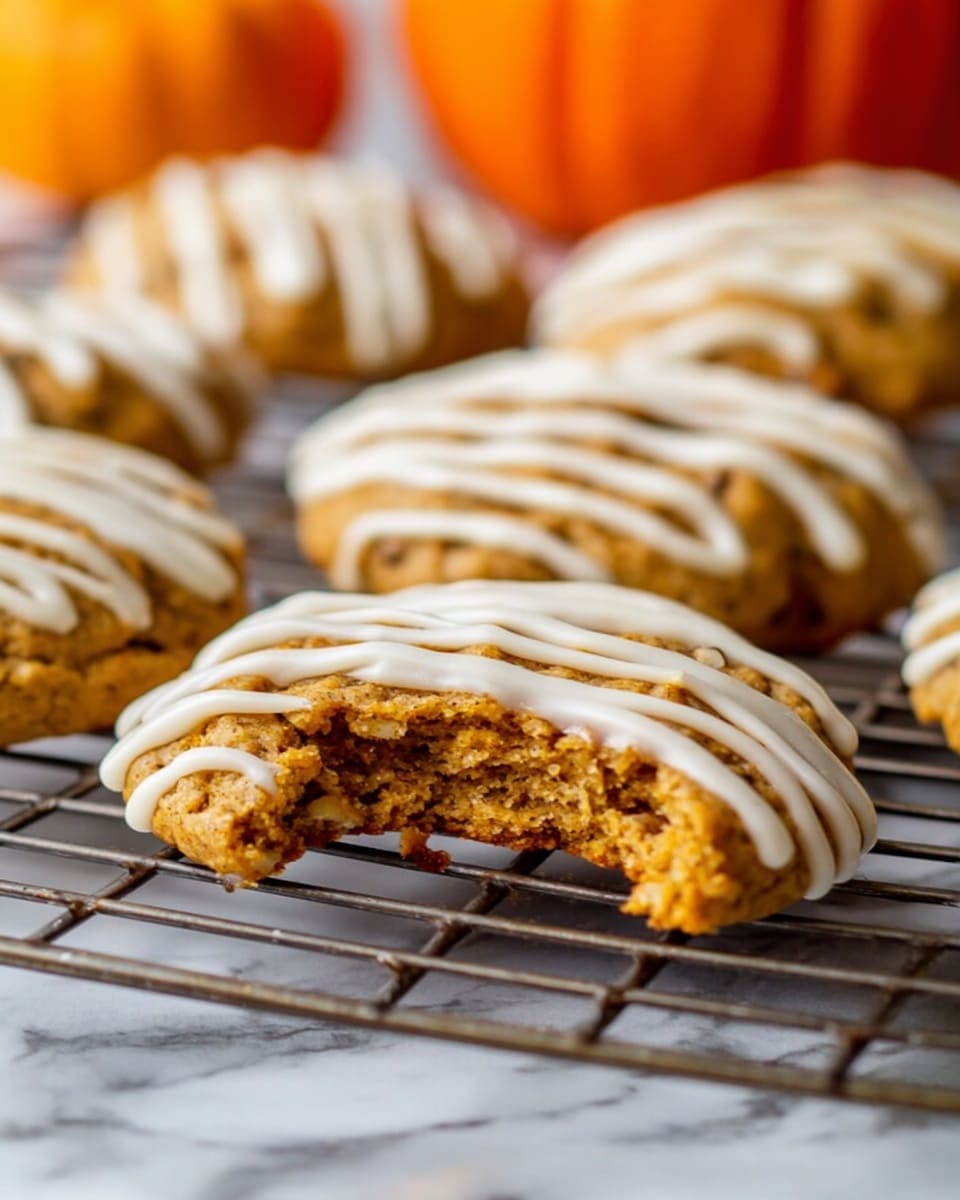
These soft and cakey pumpkin cookies are packed with warm fall spices and topped with a creamy vanilla glaze. Perfectly balanced with a tender texture and rich pumpkin flavor, they make an ideal treat for autumn gatherings or cozy afternoons.
Ingredients
Dry Ingredients
- 2½ cups all-purpose flour (300g)
- 1 teaspoon baking soda
- 1 teaspoon baking powder
- 2 teaspoons ground cinnamon
- 1 teaspoon pumpkin pie spice
- ½ teaspoon salt
Wet Ingredients for Cookies
- ½ cup unsalted butter, softened
- 1 cup light brown sugar, packed (220g)
- ½ cup granulated sugar (100g)
- 1 large egg, room temperature
- 1 teaspoon vanilla extract
- 1 cup pumpkin puree (240g)
Vanilla Glaze
- 2 cups powdered sugar (240g)
- ¼ cup whole milk (60mL)
- 2 tablespoons butter, melted and cooled
- 1 teaspoon vanilla extract
- Pinch of salt
Instructions
- Preheat Oven: Preheat your oven to 350°F (175°C). Line baking sheets with parchment paper or silicone baking mats to prevent sticking.
- Mix Dry Ingredients: In a medium bowl, whisk together the all-purpose flour, baking soda, baking powder, ground cinnamon, pumpkin pie spice, and salt until evenly combined.
- Cream Butter and Sugars: In a large mixing bowl, beat the softened butter, light brown sugar, and granulated sugar together using a hand mixer or stand mixer on medium speed until the mixture is light and fluffy, about 2-3 minutes.
- Add Egg and Vanilla: Add the egg and vanilla extract to the creamed butter and sugar, beating until well incorporated.
- Incorporate Pumpkin Puree: Mix in the pumpkin puree until fully blended and smooth.
- Combine with Dry Ingredients: Gradually add the dry ingredient mixture to the wet ingredients, mixing on low speed just until combined; avoid overmixing to keep the cookies tender.
- Portion the Dough: Using a cookie scoop or tablespoon, drop dollops of dough onto the prepared baking sheets, spacing them about 2 inches apart to allow for spreading.
- Bake the Cookies: Bake in the preheated oven for about 10-11 minutes or until the edges are set and the centers are slightly soft. Avoid overbaking to maintain a soft texture.
- Cool Completely: Let the cookies cool on the baking sheets for 5 minutes, then transfer them to wire racks to cool completely before glazing.
- Prepare the Vanilla Glaze: In a small bowl, whisk together powdered sugar, whole milk, melted cooled butter, vanilla extract, and a pinch of salt until smooth and pourable. Adjust consistency by adding more powdered sugar or milk as needed.
- Glaze the Cookies: Drizzle or spread the vanilla glaze over the cooled cookies. Allow the glaze to set for about 15-20 minutes before serving.
Notes
- For best results, use room temperature ingredients to ensure even mixing.
- These cookies are cakey and soft, perfect for those who prefer tender textures over crispy cookies.
- Store baked and glazed cookies in an airtight container at room temperature for up to 3 days.
- Freeze unbaked cookie dough balls on a baking sheet, then transfer to a freezer bag for up to 3 months; bake directly from frozen, adding a few extra minutes to the baking time.
Nutrition
- Serving Size: 1 cookie
- Calories: 134
- Sugar: 17 g
- Sodium: 90 mg
- Fat: 4 g
- Saturated Fat: 2 g
- Unsaturated Fat: 1.2 g
- Trans Fat: 0.1 g
- Carbohydrates: 24 g
- Fiber: 1 g
- Protein: 1 g
- Cholesterol: 15 mg


