
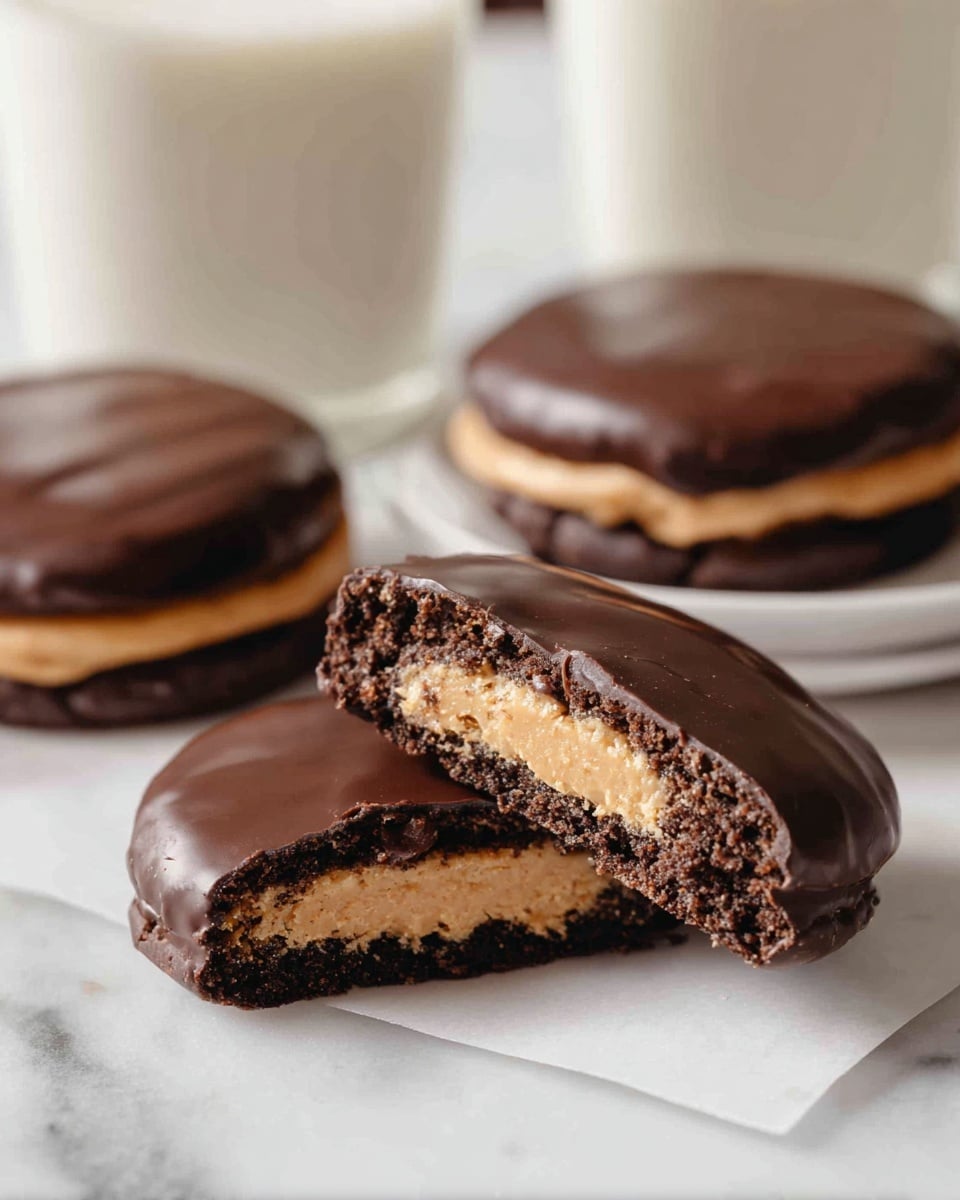
If you’re a fan of peanut butter and chocolate, you’re in for a serious treat with this Buckeye Cookies Recipe. I absolutely love how these cookies capture the magic of the classic buckeye candy — rich, chocolaty, and topped with a heavenly peanut butter layer. When I first tried making them at home, I knew right away they’d become a staple in my cookie rotation. Stick with me, and you’ll find these cookies are easier to make than you might think, with a big payoff in flavor and texture.
Why You’ll Love This Recipe
- Rich, Classic Flavors: Combines peanut butter and chocolate in the perfect balance–just like the iconic buckeye candy, but in cookie form.
- Soft & Chewy Texture: The chocolate cookie base stays tender, even after baking, making every bite irresistibly satisfying.
- Layered Goodness: The creamy peanut butter layer topped with a glossy chocolate finish adds luxurious depth to each cookie.
- Great for Gifting & Parties: These cookies look as impressive as they taste, making them perfect for holiday trays or sharing with friends.

Ingredients You’ll Need
For this Buckeye Cookies Recipe, the ingredients come together in a way that hits all the right notes—creamy peanut butter, rich cocoa, and buttery goodness. I recommend using room temperature eggs and the right kind of peanut butter for the best texture.
- Unsalted Butter: Using softened butter is key to getting a smooth cookie dough that bakes evenly.
- Light Brown Sugar: Adds moisture and a slight caramel flavor that deepens the cookie’s richness.
- Granulated Sugar: Balances the brown sugar to prevent the cookies from becoming too soft.
- Large Eggs (and Egg Yolk): Room temperature eggs blend better into the dough, ensuring the perfect texture.
- Pure Vanilla Extract: Enhances the overall flavor with a warm, sweet aroma.
- All-Purpose Flour: Spoon and level for accurate measurement to avoid dense cookies.
- Cocoa Powder (unsweetened, natural): Provides that deep chocolate flavor and beautiful color.
- Baking Powder & Baking Soda: Work together to give your cookies a nice rise and light texture.
- Salt: Balances sweetness and intensifies the peanut butter and chocolate flavors.
- Creamy Peanut Butter: I always recommend classic Jif or Skippy for their smooth texture and balanced flavor—avoid natural peanut butter as it can change the cookie’s consistency.
- Powdered Sugar: Sweetens and thickens the peanut butter layer for that luscious, melt-in-your-mouth feel.
- Semi-Sweet Chocolate Chips: The perfect dipping chocolate with just the right mix of sweet and bitter.
Variations
I love tweaking this Buckeye Cookies Recipe from time to time, depending on what I have in the pantry or my mood. Don’t hesitate to make it your own — that’s part of the fun!
- Use Crunchy Peanut Butter: For a little extra texture, a crunchy variety brings delightful surprise in each bite.
- Dairy-Free Option: Swap the butter for dairy-free margarine and use dairy-free chocolate chips to make these cookies vegan-friendly.
- Add a Sprinkle of Sea Salt: Just a tiny pinch on top after the chocolate layer sets can intensify the sweet and salty contrast.
- Mini Chocolate Chips: Using mini chips in the topping gives a smoother finish, especially if you don’t want thick chunks of chocolate.
How to Make Buckeye Cookies Recipe
Step 1: Cream the Butter and Sugars
Using a stand mixer with a paddle attachment (or a handheld mixer), beat the softened butter, brown sugar, and granulated sugar together for 1 to 2 minutes until the mixture is creamy and well combined. This creates the perfect base for your cookies—light and fluffy, setting the stage for chewy, tender results! Remember to scrape down the sides of the bowl once or twice so everything blends evenly.
Step 2: Add Eggs and Vanilla
Mix in the large egg, egg yolk, and vanilla extract one at a time. Adding the yolk separately gives the cookies extra richness. If you try this, you’ll notice your dough becoming silkier and more cohesive—making it easier to work with later.
Step 3: Combine Dry Ingredients and Mix
In a separate bowl, whisk together the all-purpose flour, cocoa powder, baking powder, baking soda, and salt. Gradually add this dry mix to your wet ingredients, mixing just until everything comes together—overmixing can lead to tougher cookies, so keep it gentle. The dough will look chocolatey and luscious!
Step 4: Chill the Dough
This step is key. Cover the dough tightly with plastic wrap and refrigerate for at least two hours. I learned this trick after my first batch spread too much in the oven! If you’re short on time, you can scoop the dough onto baking sheets and chill for 30 minutes—just be patient. Cold dough means cookies that hold their shape better and bake up thicker.
Step 5: Bake the Cookies
Preheat your oven to 350°F (177°C). Line baking sheets with parchment paper or silicone mats. Scoop the dough using a 1.5-tablespoon cookie scoop onto the sheets, leaving a little space between each. Bake for 10 to 12 minutes or until the tops look set—the edges might be just slightly firm, while the center remains soft. Let them cool for 5 to 10 minutes on the sheet before transferring to a wire rack. I always remind myself not to skip this cooling step to avoid breaking the cookies!
Step 6: Make the Peanut Butter Layer
In a microwave-safe bowl, combine creamy peanut butter and sliced butter, heating in 30-second increments until smooth and melted. Stir in vanilla extract and salt, then mix powdered sugar in two parts, ensuring there are no lumps or streaks. If the mixture gets a bit stiff, I find that kneading gently with my hands helps to smooth it perfectly. Using a tablespoon scoop, dollop the peanut butter filling onto each cookie and flatten or smooth it slightly with your hand or a spatula.
Step 7: Add the Chocolate Topping
Combine chocolate chips and sliced butter in a microwave-safe bowl. Melt gently at 50% power in 30-second bursts, stirring after each, until silky smooth. Spoon the melted chocolate over the peanut butter layer, smoothing it with an offset spatula or the back of a spoon. This glossy finish sets beautifully in the fridge.
Step 8: Chill and Set
Pop your tray of finished Buckeye Cookies in the fridge for 30 to 45 minutes to let that chocolate harden. This step transforms the cookies into those iconic layered delights—perfect for enjoying or sharing. Once the chocolate is firm, they’re ready to dig into (or carefully package for gifts!).
Pro Tips for Making Buckeye Cookies Recipe
- Softened Butter is Key: I learned that starting with properly softened (not melted) butter creates the best cookie texture—too cold or melted throws off the baking.
- Chill the Dough: Refrigerating the dough prevents spreading and helps the cookies bake up thick and chewy, which I personally prefer over thin, crispy ones.
- Use the Right Peanut Butter: Avoid natural peanut butter with oils that separate; creamy peanut butter like Jif or Skippy holds the peanut butter filling’s structure perfectly.
- Chocolate Melting Patience: Melting chocolate slowly at half power prevents scorching and ensures a smooth topping every time.
How to Serve Buckeye Cookies Recipe
Garnishes
While these cookies are beautiful on their own, I like to sprinkle just a tiny pinch of flaky sea salt on top of the chocolate layer once it’s set. It adds a wonderful salty-sweet contrast that makes the flavors pop. You could also dust a bit of cocoa powder or finely chopped roasted peanuts if you want some extra texture and a fancy touch.
Side Dishes
These cookies pair wonderfully with a cold glass of milk or a cup of freshly brewed coffee. For parties, I like setting them alongside assorted nuts or fresh fruit to balance the richness. They also make a fantastic addition to cookie trays or dessert boards with other classics like oatmeal raisin or sugar cookies.
Creative Ways to Present
One of my favorite ways to showcase these buckeye cookies for holidays is to arrange them on a tiered dessert stand, making them the star of the show. Wrapping them individually in clear cellophane with a festive ribbon also makes for adorable homemade gifts. If you’re feeling fancy, drizzle a small amount of contrasting white chocolate over the top for a pretty design that guests always ask about.
Make Ahead and Storage
Storing Leftovers
I usually store leftover Buckeye Cookies in an airtight container in the fridge. They keep beautifully for up to a week, but honestly, mine rarely last that long! Keeping them cool helps the chocolate topping stay firm and the peanut butter layer fresh without getting too soft.
Freezing
If I’m making a big batch or want to save some for later, freezing works like a charm. Simply place the cooled cookies in a single layer on a baking sheet to freeze individually for a couple of hours, then transfer them to a sealed freezer bag. They freeze well for up to a month and defrost in the fridge overnight without losing a bit of that amazing texture.
Reheating
When I want to freshen up frozen or refrigerated cookies, I let them come to room temperature first, then pop them in the microwave for 10-15 seconds. This softens them just enough without melting the chocolate topping too much. You’ll get that warm peanut butter and chocolate feeling all over again—a little warmed is truly heavenly!
FAQs
-
Can I use natural peanut butter for the peanut butter layer?
While you can use natural peanut butter, I don’t recommend it for this Buckeye Cookies Recipe because the oil in natural peanut butter tends to separate. This affects the texture of the peanut butter layer, making it runny or greasy. Stick with creamy, classic brands like Jif or Skippy for the best consistency.
-
How long do Buckeye Cookies stay fresh?
Stored in an airtight container in the fridge, these cookies stay fresh for about 5 to 7 days. Just make sure the chocolate layer is fully set before storing to avoid smudging or melting.
-
Can I make the dough ahead of time?
Absolutely! The dough can be made up to 2 days in advance and kept refrigerated. Just be sure to cover it tightly with plastic wrap. When ready to bake, scoop and chill for 30 minutes before popping them in the oven for best results.
-
Do I have to refrigerate the cookies after assembly?
Yes, chilling the assembled cookies helps the chocolate topping harden and sets the peanut butter layer. I recommend refrigerating them for at least 30 minutes before serving or storing to maintain that perfect buckeye cookie texture.
Final Thoughts
This Buckeye Cookies Recipe has become one of my absolute favorites to make, whether it’s for a holiday party, a special treat, or just because. They remind me of the best parts of the classic buckeye candy but are easier to share and bake in big batches. Trust me—you’ll love how the flavors melt together and the joyful reactions these cookies bring around the table. So here’s my friendly nudge: give this recipe a try. I promise, once you do, it’ll be a new favorite in your cookie repertoire too!
Print
Buckeye Cookies Recipe
- Prep Time: 60 minutes
- Cook Time: 10 minutes
- Total Time: 100 minutes
- Yield: 27 cookies
- Category: Dessert
- Method: Baking
- Cuisine: American
Description
Buckeye Cookies are a delightful twist on the classic no-bake buckeye candy. These treats feature a soft and chewy chocolate cookie base topped with a rich, creamy peanut butter layer and finished with a smooth chocolate coating. Perfect for peanut butter lovers, they deliver a perfect balance of chocolate and peanut butter flavors in every bite.
Ingredients
Chocolate Cookies
- ¾ cup unsalted butter, softened (170 grams; 1.5 sticks)
- 1 cup packed light brown sugar (200 grams)
- ⅓ cup granulated sugar (70 grams)
- 1 large egg, at room temperature
- 1 large egg yolk, at room temperature
- 1 ½ teaspoons pure vanilla extract
- 2 cups all-purpose flour, spooned & leveled (250 grams)
- ½ cup unsweetened natural cocoa powder (45 grams)
- ½ teaspoon baking powder
- ½ teaspoon baking soda
- ¼ teaspoon salt
Peanut Butter Layer
- 1 cup creamy peanut butter (250 grams, Jif or Skippy preferred, avoid natural peanut butter)
- 5 tablespoons unsalted butter, sliced (70 grams)
- ½ teaspoon pure vanilla extract
- ⅛ teaspoon salt
- 1 ½ cups powdered sugar (180 grams)
Chocolate Topping
- 1 ⅓ cups semi-sweet chocolate chips (240 grams)
- ½ cup unsalted butter, sliced into tablespoon-size pieces (115 grams; 1 stick)
Instructions
- Make the Chocolate Cookies: Using a handheld mixer or stand mixer fitted with the paddle attachment, beat the softened butter, brown sugar, and granulated sugar together for 1 to 2 minutes until well combined and creamy. Add the egg, egg yolk, and vanilla extract, mixing thoroughly and scraping down the sides of the bowl as needed.
- Combine Dry Ingredients: In a separate large bowl, whisk together the all-purpose flour, cocoa powder, baking powder, baking soda, and salt until evenly combined.
- Mix Wet and Dry Ingredients: Gradually add the dry ingredients to the wet ingredients and mix gently until just combined. Avoid overmixing to maintain a tender cookie texture.
- Chill the Dough: Cover the cookie dough tightly with plastic wrap and refrigerate for at least 2 hours. For a faster option, scoop the dough onto a baking sheet and chill for at least 30 minutes.
- Preheat Oven and Prepare Baking Sheets: Preheat your oven to 350°F (177°C). Line two to three large baking sheets with parchment paper or silicone mats to prevent sticking.
- Scoop and Bake Cookies: Remove the dough from the fridge. Using a 1.5 tablespoon cookie scoop, place dough balls evenly spaced on the prepared baking sheets. Bake for 10 to 12 minutes or until the tops are set but still soft.
- Cool Cookies: Let the cookies cool on the baking sheets for 5 to 10 minutes to firm up, then transfer to a wire rack to cool completely.
- Prepare Peanut Butter Layer: In a microwave-safe bowl, combine the peanut butter and sliced butter. Microwave in 30-second increments, stirring between each, until completely melted and smooth. Stir in the vanilla extract and salt.
- Add Powdered Sugar: Gradually add the powdered sugar in two additions, mixing well after each, until fully incorporated and smooth. If necessary, knead with your hands to remove lumps or streaks.
- Top Cookies with Peanut Butter Mixture: Using a 1 tablespoon scoop or measuring spoon, place peanut butter mixture onto each cooled cookie and slightly flatten with your hand or an angled spatula to spread evenly.
- Prepare Chocolate Topping: In a microwave-safe bowl, combine the semi-sweet chocolate chips and butter. Microwave at 50% power in 30-second increments, stirring well after each, until completely melted and silky smooth.
- Coat Cookies with Chocolate: Spoon the melted chocolate over each peanut butter-topped cookie and smooth the surface with an angled spatula or the back of a spoon for a neat finish.
- Chill to Set: Refrigerate the cookies for 30 to 45 minutes, or until the chocolate layer has fully hardened and set, making them ready to serve.
Notes
- These buckeye cookies offer a soft, chewy chocolate base combined with a creamy peanut butter topping and a rich chocolate finish, mimicking the classic buckeye candy in a cookie form.
- For best peanut butter texture and flavor, use creamy peanut butter brands like Jif or Skippy; avoid natural peanut butter to maintain consistency.
- Chilling the cookie dough thoroughly is crucial to prevent spreading and achieve perfect texture.
- Microwave melting in increments prevents burning the chocolate and butter mixture.
Nutrition
- Serving Size: 1 cookie
- Calories: 230
- Sugar: 18g
- Sodium: 120mg
- Fat: 15g
- Saturated Fat: 7g
- Unsaturated Fat: 7g
- Trans Fat: 0g
- Carbohydrates: 22g
- Fiber: 2g
- Protein: 4g
- Cholesterol: 30mg


