
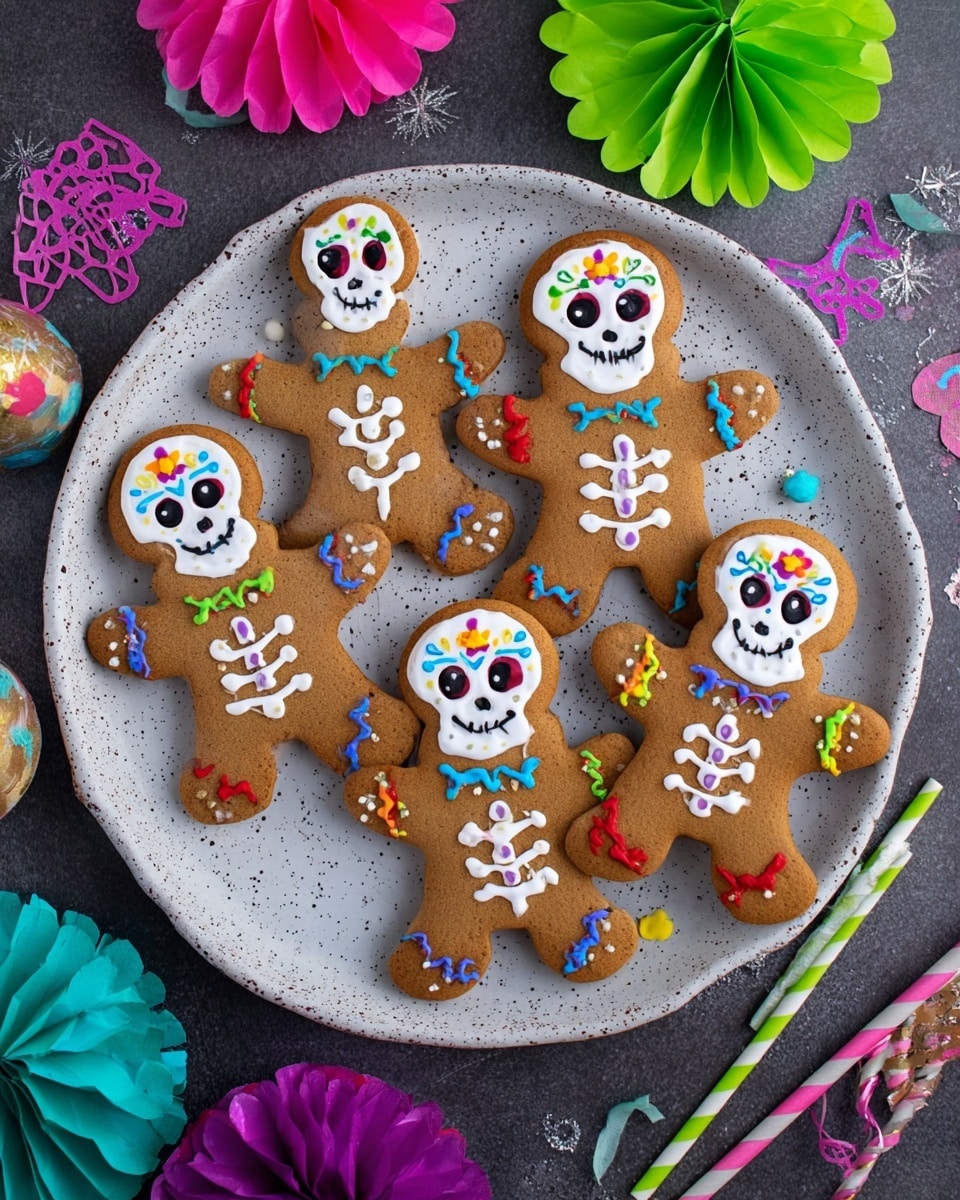
If you’re looking for a fun, festive treat that’s both adorable and delicious, this Day of the Dead Skeleton Cookies Recipe is an absolute winner. I absolutely love how these cookies come out—crispy, lightly spiced, and perfect for decorating with royal icing and food markers. Whether you’re celebrating Día de los Muertos or just want to delight your friends with something unique, this recipe will have you smiling from the first bite to the last crumb.
Why You’ll Love This Recipe
- Authentic Flavor: The anise and cinnamon give these cookies a wonderful warm spice that really brings the Day of the Dead spirit to life.
- Perfect Decorating Canvas: The thick royal icing sets beautifully, letting you get creative with piping and colorful food markers.
- Great for Beginners and Pros: Whether you’re trying your hand at decorated cookies for the first time or you’re a seasoned baker, this recipe is easy to follow and fun.
- Makes a Crowd-Pleaser: I’ve brought these to family gatherings and every time, everyone asks for more—they’re just that charming!

Ingredients You’ll Need
Every ingredient in this Day of the Dead Skeleton Cookies Recipe plays a role in creating the perfect texture and flavor—using good quality butter and fresh spices really makes a difference. Plus, anise extract adds a subtle, slightly sweet licorice touch that’s irresistible.
- All-purpose flour: Provides the structure for the cookies; make sure it’s well sifted for a smooth dough.
- Salt: Balances the sweetness and deepens the flavors.
- Baking powder: Helps the cookies keep a light texture without getting too cakey.
- Unsalted butter: Room temperature butter creams perfectly with sugar for a tender bite.
- Granulated sugar: Sweetens the dough and helps with that slight crisp on the edges.
- Anise extract or anise seeds: The star spice of the recipe for that signature Day of the Dead cookie flavor.
- Cinnamon: Adds warm complexity to complement the anise.
- Large egg: Binds everything together and enriches the dough.
- Orange juice: Just a splash for brightness and tender crumb.
Variations
I like to switch things up occasionally with this Day of the Dead Skeleton Cookies Recipe to keep it fresh and cater to different tastes. Don’t be afraid to make it your own because honestly, that’s part of the fun!
- Spice it up: Once, I swapped the anise for a little ground cardamom for a unique twist, and my family went crazy for the new flavor profile.
- Gluten-free option: I experimented with a gluten-free flour blend, and the cookies held their shape beautifully—just remember to chill the dough well before rolling.
- Natural food coloring: If decorating with royal icing, try beet or matcha powders mixed into your icing for vibrant colors without artificial dyes.
- Alcohol-free version: Use extra orange juice instead of any extracts if you prefer to avoid alcohol-based flavor extracts.
How to Make Day of the Dead Skeleton Cookies Recipe
Step 1: Mix Dry Ingredients with Care
Start by whisking together the flour, salt, and baking powder in a medium bowl. I like to set this aside while I get the butter and sugar going. This dry mix will be perfect for folding into the wet ingredients later, and sifting everything well will help avoid lumps that ruin your dough’s smoothness.
Step 2: Cream Butter and Sugar Until Fluffy
In a large bowl, beat the softened butter and granulated sugar together until the mixture is nice and creamy. You’ll know it’s ready when it lightens in color and looks fluffy. This step is key—if your butter is too cold, the texture won’t come out just right, so warm up your butter if it’s been in the fridge.
Step 3: Add Flavor and Bind
Stir in the anise extract and cinnamon with the butter-sugar mixture. Then beat in the egg until everything looks smooth and uniform. The little whiff of anise makes me think right away of traditional Mexican flavors—it’s subtle but unforgettable.
Step 4: Incorporate Orange Juice and Dry Ingredients
Slowly add the orange juice to your wet ingredients while mixing. This keeps the dough tender and adds a slight citrus brightness, which balances the spices nicely. Then, gradually add the flour mixture until the dough just comes together. If it feels sticky, lightly dust your work surface and hands with a bit more flour.
Step 5: Chill and Prepare for Rolling
Divide your dough into two equal disks, wrap them tightly in plastic wrap, and pop them in the fridge for at least 30 minutes. When I first tried this recipe, I skipped chilling and the dough was too soft to roll well—lesson learned! The chill helps with cleaner cookie shapes and less sticking.
Step 6: Roll, Cut, and Bake
On a floured surface, roll out one dough disk to about 1/4 inch thick. Use skeleton-shaped cookie cutters or any fun shapes you have. Place them on a parchment-lined baking sheet, leaving a bit of room to let them spread just a tiny bit. Bake at 350°F (175°C) for 10-12 minutes, until the edges start to turn a light golden color. Let them cool before moving on.
Step 7: Decorate with Royal Icing and Food Markers
Prepare your royal icing following the package directions until it’s thick but spreadable. I learned it’s easier to pipe if you add just a few drops of water until it’s like thick yogurt. Pipe the basic skeleton shapes using a small round tip, then let the icing dry for a few hours or overnight. When the icing is completely set, use colored food markers to add intricate, colorful details. This is where your creativity shines—each cookie becomes a miniature work of art!
Pro Tips for Making Day of the Dead Skeleton Cookies Recipe
- Butter Temperature Matters: I found that letting butter come to room temp for at least an hour makes creaming smooth and dough easier to work with.
- Chill Twice for Best Results: After rolling and cutting, pop shaped cookies back in the fridge for 10 minutes before baking — helps them keep their skeleton shape crisp.
- Patience with Icing: Let your royal icing set completely before decorating with markers — it makes all the difference in preventing smudges.
- Avoid Overflouring: Dust your surface lightly — too much flour can make cookies dry. I use a pastry brush to sweep off excess flour before baking.
How to Serve Day of the Dead Skeleton Cookies Recipe
Garnishes
I usually keep garnishes simple—a sprinkle of edible glitter or a few tiny sugar pearls to add sparkle without overpowering the delicate skeleton designs. Sometimes, I add colorful mini candy skulls nearby to amp up the festive vibe, especially if this is for a Día de los Muertos table.
Side Dishes
Since these cookies are fairly sweet and spiced, I love serving them alongside hot drinks like cinnamon-spiced hot chocolate or Mexican coffee. They’re also a great ending to a meal featuring classic dishes like tamales or mole because the flavors echo the warmth of traditional Mexican cooking.
Creative Ways to Present
One year, I arranged a “Day of the Dead” cookie platter with colorful tissue paper, marigold flowers (real or faux), and sugar skull decorations, which was a total hit at a party. Wrapping individual cookies in clear cellophane tied with a bright ribbon also makes beautiful, edible gifts!
Make Ahead and Storage
Storing Leftovers
I store leftover cookies in an airtight container on the counter, layering parchment paper between them to avoid smudging the icing. They usually stay fresh and tasty for about 4-5 days, which means plenty of time to enjoy or share.
Freezing
If you want to prep ahead, these cookies freeze wonderfully. I freeze the baked, cooled cookies without icing for up to 2 months. When you’re ready to decorate, just thaw them at room temp before applying royal icing and food markers.
Reheating
Honestly, these cookies are best eaten as is, no reheating needed. If you prefer warm cookies, pop them in a 300°F oven for 3-4 minutes—just enough to warm the inside without melting the icing.
FAQs
-
Can I make these cookies without anise extract?
Absolutely! If you don’t have anise extract, you can substitute with a teaspoon of anise seeds crushed finely or try other warm spices like fennel seed or cardamom to keep a similar flavor profile. The key is to retain that slight licorice hint that characterizes the Day of the Dead flavors.
-
What if my dough is too sticky to roll out?
That’s pretty common! Dust your work surface and rolling pin with flour and chill the dough a bit longer if possible. You can also gently knead in a tablespoon of additional flour—but be careful not to add too much or your cookies might become tough.
-
How do I make sure my royal icing sets properly?
Ensure your kitchen isn’t too humid and let the icing dry slowly at room temperature for several hours or overnight. Avoid touching or stacking the cookies until the icing hardens. This sets the perfect canvas for food markers and prevents smudging.
-
Can I use store-bought royal icing?
Definitely! Store-bought royal icing works great and saves time. Just make sure to adjust the consistency as needed with a bit of water to make it pipeable but not runny.
-
What’s the best way to store decorated Day of the Dead Skeleton Cookies?
Keep them in an airtight container, layering parchment paper between each cookie to avoid smudging. Store at room temperature away from direct sunlight and heat, ideally for up to a week.
Final Thoughts
Making this Day of the Dead Skeleton Cookies Recipe always feels like celebrating life with every bake—there’s something truly special about crafting a cookie that’s both meaningful and fun to eat. I love sharing this with friends and family, and I promise you’ll enjoy the process and the smiles that follow. So go ahead, gather your ingredients, roll out the dough, and let your decorating imagination run wild. Trust me, these cookies are a festive treat you’ll come back to year after year!
Print
Day of the Dead Skeleton Cookies Recipe
- Prep Time: 20 minutes
- Cook Time: 12 minutes
- Total Time: 1 hour 10 minutes
- Yield: 24 cookies
- Category: Dessert
- Method: Baking
- Cuisine: Mexican
Description
Celebrate the Day of the Dead with these charming and easy-to-make skeleton cookies. Featuring a lightly spiced anise and cinnamon flavored sugar cookie base decorated with royal icing and colorful food markers, these festive cookies are perfect for sharing at any gathering or as a delightful treat during the holiday season.
Ingredients
Cookies
- 2 1/2 cups all-purpose flour
- 1/2 teaspoon salt
- 1/2 teaspoon baking powder
- 1 cup (2 sticks) unsalted butter, at room temperature
- 1 cup granulated sugar
- 1 teaspoon anise extract or anise seeds
- 1 teaspoon cinnamon
- 1 large egg
- 1/4 cup orange juice
Decoration
- Royal icing (prepared according to package instructions)
- Colored food markers for decorating
Instructions
- Prepare dry ingredients: Whisk together the flour, salt, and baking powder in a medium-sized bowl. Set aside this dry mixture.
- Cream butter and sugar: In a separate large mixing bowl, beat the unsalted butter and granulated sugar until creamy and light in texture.
- Add flavorings: Mix in the anise extract (or seeds) and cinnamon until fully incorporated into the butter-sugar mixture.
- Incorporate egg: Beat in the large egg until the mixture is smooth and homogeneous.
- Add orange juice: Slowly pour in the orange juice, continuing to mix until the mixture is well combined.
- Combine wet and dry: Gradually add the dry flour mixture to the wet ingredients, mixing until the dough comes together. If the dough is sticky, add a little more flour to achieve workable consistency.
- Chill dough: Divide the dough into two equal portions. Shape each into a disk, wrap tightly with plastic wrap, and refrigerate for at least 30 minutes or overnight to firm up.
- Roll out dough: On a lightly floured surface, roll out one disk to approximately 1/4 inch thickness.
- Cut shapes: Use cookie cutters to cut out skeleton shapes and place them on a parchment-lined baking sheet, spacing cookies apart.
- Preheat oven: Preheat the oven to 350°F (175°C).
- Bake cookies: Bake the cookies for 10-12 minutes or until edges are lightly golden.
- Cool cookies: Remove from oven and allow cookies to cool on the baking sheet for a few minutes before transferring to a wire rack to cool completely.
- Repeat rolling and cutting: Roll out the second dough disk and repeat the cutting and baking process.
- Prepare royal icing: Make royal icing according to package instructions, ensuring it is thick but spreadable.
- Adjust icing consistency: Thin the royal icing with a few drops of water at a time, stirring well after each addition, to achieve a thickness similar to thick yogurt for easier piping.
- Pipe skeleton details: Transfer icing to a piping bag fitted with a small round tip and pipe the head, rib cage, and bones onto the cookies.
- Allow icing to set: Let the piped icing harden by setting the cookies for a few hours or preferably overnight.
- Decorate with food markers: Use colored food markers to add intricate details and vibrant decorations over the set icing.
- Dry decorated cookies: Let the designs dry completely to ensure the marker ink is set before handling or storing.
Notes
- For best results, chill the dough thoroughly to make rolling and cutting easier.
- If you don’t have anise extract, substitute with seeds or omit for a milder flavor.
- The orange juice adds moisture and a subtle citrus note enhancing the flavor profile.
- Royal icing consistency can be adjusted to suit piping or flooding techniques as needed.
- Allow sufficient drying time so the icing and food coloring do not smudge.
- Store decorated cookies in an airtight container at room temperature for up to one week.
Nutrition
- Serving Size: 1 cookie
- Calories: 95
- Sugar: 9 grams
- Sodium: 65 milligrams
- Fat: 1 grams
- Saturated Fat: 0 grams
- Unsaturated Fat: 1 grams
- Trans Fat: 0 grams
- Carbohydrates: 20 grams
- Fiber: 0 grams
- Protein: 2 grams
- Cholesterol: 9 milligrams


