
If you’re looking for a spooky, fun, and downright delicious treat to wow your guests this season, you’ve got to try this Halloween Dirt Cups Recipe. I absolutely love how this turns out — it’s creamy, chocolatey, and topped with the cutest creepy-crawly decorations that kids (and adults!) go crazy for. When I first tried this, I didn’t expect it to be such a crowd-pleaser, but it quickly became my go-to Halloween dessert. Keep reading, because I’m sharing everything you need to make these eerie little cups of delight right in your own kitchen.
Why You’ll Love This Recipe
- Easy and Quick: You’ll appreciate how fast it comes together, with no baking required.
- Crowd-Pleaser: Kids and adults alike can’t get enough of the creamy mousse and cookie crumbs combo.
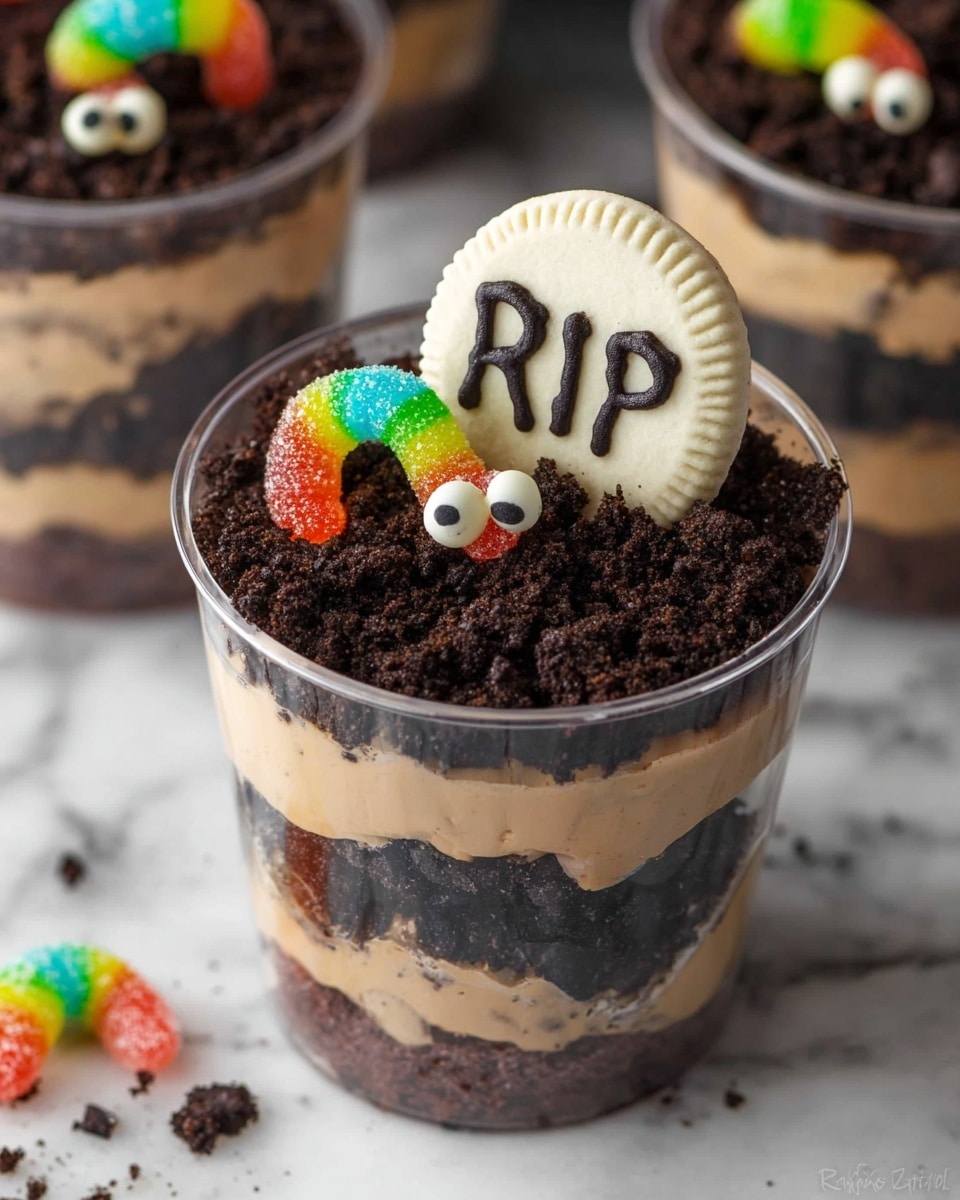
- Fun Presentation: That creepy graveyard setup with gummy worms and “RIP” tombstones adds the perfect Halloween flair.
- Flexible and Customizable: You can easily tweak it with different toppings or even make it dairy-free!

Ingredients You’ll Need
I love how these ingredients work together to build the perfect texture — creamy, crunchy, and totally indulgent. When you shop, look for fresh Cool Whip or make your own whipped cream for an extra-special touch.
- Oreos: These cookies are the backbone of your dirt — I like to pulse some finely and crush some chunky for texture.
- Instant Chocolate Pudding Mix: The secret to that velvety mousse; super easy to whip up.
- Milk: Full-fat works best to get a rich pudding.
- Cool Whip: Gives the mousse that fluffy lightness; you can swap with homemade whipped cream if you prefer.
- Milano Cookies: Perfect for making those tiny “RIP” tombstones — sturdy and delicious.
- Gummy Worms: The cutest creepy crawler topping ever.
- Black Writing Gel Icing: Essential for adding spooky “RIP” lettering on your tombstones.
- Edible Candy Eyes: Because what’s a dirt cup without some spooky eyes peeking out?
Variations
I like to switch up the toppings depending on who I’m serving — mixing in some personal touches always makes this Halloween Dirt Cups Recipe even more fun!
- Dietary swaps: I’ve made this with dairy-free pudding and coconut whipped cream before, which still turned out fabulous.
- Flavor twist: Adding a spoonful of peanut butter or cream cheese to the mousse layer creates a creamy surprise that my family loved.
- Decoration ideas: I once layered in crushed candy pumpkins and spider ring candies for an extra festive touch.
How to Make Halloween Dirt Cups Recipe
Step 1: Prepare Your Oreo Crumbs
Start by grinding 12 Oreo cookies into fine crumbs using a food processor. This gives you that ‘dirt’ look on the top and bottom layers. Then crush the remaining Oreos into smaller chunks — I do this by placing them in a large Ziploc bag and gently smashing with a rolling pin or heavy object. This crunchier texture gives your mousse the right amount of bite and balance. Set both aside separately.
Step 2: Whisk Up the Chocolate Pudding
Grab a medium bowl and whisk together the instant chocolate pudding mix and milk until the powder dissolves completely. It only takes a couple of minutes but make sure to whisk well so there are no lumps. Then pop the bowl in the fridge while your pudding sets — around 10 minutes should do it.
Step 3: Fold in Whipped Cream and Cookies
Once your pudding is set and thickened, gently fold in the Cool Whip until mostly mixed. Then add the crushed Oreo chunks (the ones you smashed by hand) and fold those in too. This turning your pudding into a mousse with just the right amount of texture. I like to chill this mixture for 1 to 2 hours before assembling because it helps everything firm up — but you can also move straight to assembly if you’re short on time.
Step 4: Create Tombstones
To get that fun graveyard vibe going, carefully cut Milano cookies in half with a sharp knife. Then use the black writing gel icing to write “RIP” on each cookie half. This little touch always makes my kids giggle and it’s surprisingly simple to do! Set aside these edible tombstones until it’s time to decorate.
Step 5: Assemble Your Halloween Dirt Cups
Now for the fun part — layering! Spoon about 1 tablespoon of the fine Oreo crumbs at the bottom of each cup to create a dirt base. Next, add a heaping scoop of your Oreo mousse and smooth it out with the back of a spoon. Repeat the layering with crumbs, mousse, and a final dusting of crumbs on top. To decorate, pop a Milano tombstone right in the center, scatter a few gummy worms crawling around, and add some edible candy eyes peeking out from the dirt. Voilà — your spooky dessert is ready to impress!
Pro Tips for Making Halloween Dirt Cups Recipe
- Crush Wisely: Don’t pulverize all your Oreos finely — the contrast between fine crumbs and chunkier bits really brings the texture alive.
- Chill Time Is Key: I learned the hard way that letting the mousse chill before assembling makes a huge difference in how it holds its shape.
- Write Slow and Steady: When decorating tombstones, give the writing gel a steady hand and a moment to dry for crisp letters.
- Layer Like a Pro: Building up the layers gently prevents the crumbs from mixing too much and keeps the visual effect vibrant.
How to Serve Halloween Dirt Cups Recipe
Garnishes
I usually keep it simple with gummy worms, edible eyes, and those Milano cookie tombstones because honestly, they capture the Halloween vibe perfectly. Sometimes I add a few candy pumpkins or sprinkles to mix things up, but you can’t go wrong with classic creepy elements that give that fun dirt look.
Side Dishes
Pair your Halloween Dirt Cups with some pumpkin spice popcorn or candy corn for a sweet Halloween snack table. I’ve also served them alongside mini caramel apples or a spiced hot cocoa for a full seasonal treat experience.
Creative Ways to Present
For Halloween parties, I love serving these dirt cups in clear mini plastic flowerpots or mason jars so the layers show through. Another fun idea is to place them on a tray decorated with fake spider webs and plastic spiders for an immersive spooky setup everyone notices.
Make Ahead and Storage
Storing Leftovers
I store leftover dirt cups tightly covered in the fridge to keep that mousse nice and creamy. They stay fresh for up to 2 days — but honestly, they rarely last that long in my house!
Freezing
I haven’t personally frozen this recipe because the texture of pudding and whipped cream can change when thawed, but if you do freeze, make sure to do it before assembling with the toppings, and thaw completely in the fridge before serving.
Reheating
Dirt cups are best served cold so reheating isn’t recommended. If you want to freshen them up after storage, just give them a gentle stir before serving to fluff up the mousse a bit.
FAQs
-
Can I make the Halloween Dirt Cups Recipe ahead of time?
Absolutely! You can prepare the mousse and cookie layers a day in advance and assemble just before serving. Just keep everything covered in the fridge to maintain freshness.
-
What can I use instead of Cool Whip?
Great question! You can substitute with homemade whipped cream or any dairy-free whipped topping if you prefer a less processed option or have dietary needs.
-
Can I use a different cookie in place of Oreos?
Sure! While Oreos are classic for this recipe, you can use other chocolate sandwich cookies or even chocolate chip cookies for a unique twist.
-
How do I prevent the pudding from getting watery?
Make sure you use the right amount of milk and chill the pudding fully before folding in the whipped topping to help it hold its shape and prevent separation.
-
Is this recipe kid-friendly?
Definitely! Kids love the fun toppings and the creamy mousse. Plus, it’s easy enough to make together as a family activity.
Final Thoughts
This Halloween Dirt Cups Recipe is one of those delightful treats I keep coming back to every spooky season. It’s easy, fun, and tastes way better than it looks on paper — the layers of Oreo crunch, smooth chocolate mousse, and playful decorations always steal the show. Whether you’re hosting a party or just want to surprise your family with a sweet Halloween surprise, these dirt cups never disappoint. Give them a try — I promise they’ll become your Halloween favorite too!
Print
Halloween Dirt Cups Recipe
- Prep Time: 15 minutes
- Cook Time: 0 minutes
- Total Time: 1 hour 25 minutes (including chilling time)
- Yield: 6 to 8 servings
- Category: Dessert
- Method: No-Cook
- Cuisine: American
Description
Halloween Dirt Cups are a fun, easy-to-make dessert perfect for spooky celebrations. Layers of creamy Oreo chocolate mousse alternating with crushed Oreo cookie crumbs create a delicious ‘dirt’ effect, topped with Milano cookie tombstones, gummy worms, and edible candy eyes for a playful graveyard scene that’s sure to delight kids and party guests alike.
Ingredients
Crumb & Mousse Base
- 1 bag (14oz/305g) Oreos
- 1 pkg (3.4oz) instant chocolate pudding mix
- 1 ½ cups milk
- 1 container (8 oz) Cool Whip (or homemade whipped cream)
Decorations
- 4 Milano Cookies
- Gummy Worms, as needed
- Black writing gel icing
- Edible candy eyes
Instructions
- Prepare Oreo Crumbs: Using a food processor, grind 12 Oreo cookies into fine crumbs. Place the remaining Oreos in a large Ziploc bag and crush them into smaller pieces using a heavy object, then set both aside.
- Make Chocolate Pudding: In a medium bowl, whisk together instant chocolate pudding mix and milk until smooth and powder is fully dissolved. Refrigerate for about 10 minutes until the pudding sets.
- Fold in Whipped Cream and Crushed Oreos: Once the pudding has set, gently fold in the Cool Whip until mostly combined. Add the crushed (larger pieces) Oreos and fold gently to create a mousse. Chill this mixture in the refrigerator for 1 to 2 hours for best texture.
- Create Tombstone Decorations: Carefully cut each Milano cookie in half with a sharp knife. Use black writing gel icing to write “RIP” on each half, creating tombstone decorations.
- Assemble the Dirt Cups: In individual serving cups, start by adding 1 tablespoon of the fine Oreo crumbs at the bottom. Add one or two heaping scoops of Oreo mousse and smooth the surface. Repeat with another tablespoon of Oreo crumbs, more mousse, and finish with a final layer of Oreo crumbs on top.
- Decorate: Insert a Milano cookie tombstone in the center of each cup, add gummy worms to look like they are crawling out of the dirt, and place edible candy eyes around for a spooky effect.
Notes
- Halloween Dirt Cups are a simple no-bake dessert that kids love and are easy to assemble for parties.
- For a homemade whipped cream alternative, whip heavy cream with a little sugar until stiff peaks form.
- These cups can be prepared a few hours ahead and stored in the refrigerator until serving.
- Use gluten-free cookies to adapt for gluten-free diets.
Nutrition
- Serving Size: 1 cup
- Calories: 222
- Sugar: 25.6 g
- Sodium: 345.6 mg
- Fat: 8 g
- Saturated Fat: 4.4 g
- Unsaturated Fat: 3.2 g
- Trans Fat: 0 g
- Carbohydrates: 35.2 g
- Fiber: 0.6 g
- Protein: 2.7 g
- Cholesterol: 1.2 mg


