
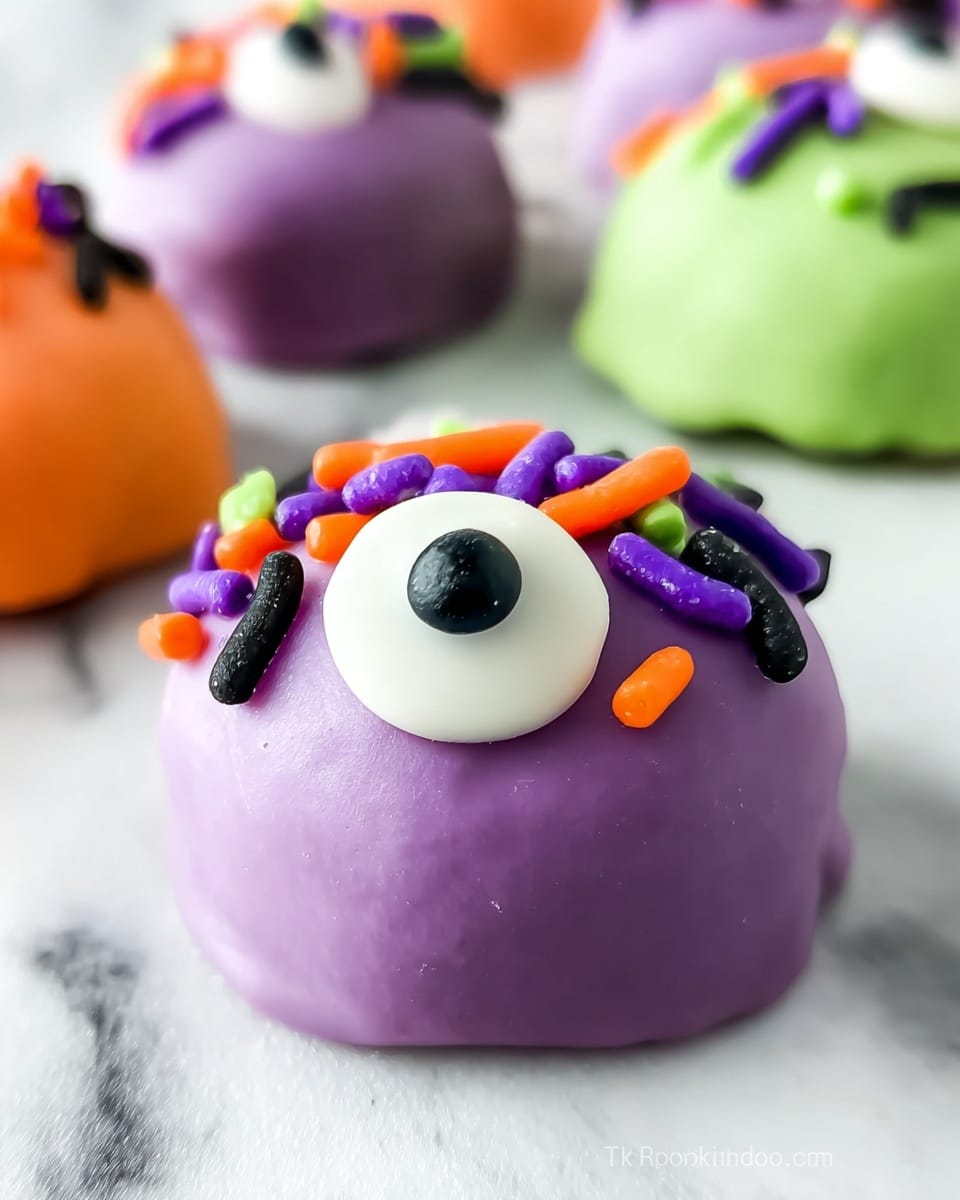
If you’re on the hunt for a fun, show-stopping treat that’s as delicious as it is adorable, you’re in for a real treat. I’m sharing my absolutely favorite Monster Oreo Balls Recipe that’s become a total crowd-pleaser at every party I’ve made it for. These bite-sized monsters with candy eyes are spooky, sweet, and surprisingly simple to whip up. Whether you’re prepping for Halloween or just want a playful dessert, this recipe will have you hooked!
Why You’ll Love This Recipe
- Easy to Make: No baking required — just mix, chill, dip, and decorate.
- Kid-Friendly Fun: Decorating with candy eyes makes it a fun kitchen activity for the little ones.
- Customizable: You can use different candy melts and sprinkle combos to make it your own.
- Perfect for Parties: These tasty treats are always a hit whether it’s Halloween or anytime you want a cute dessert.

Ingredients You’ll Need
The magic of this Monster Oreo Balls Recipe is in its simplicity — just a few basic ingredients that come together to create an indulgent treat with fun monster vibes. Using good-quality cream cheese and smooth candy melts will give you the best texture and finish.
- Oreo Cookies: Classic Oreos add that perfect cookies-and-cream base; crushing them finely is key.
- Cream Cheese: Softened cream cheese binds the crumbs for a rich, smooth dough.
- Green, Lavender, and Orange Candy Melts: These vibrant colors bring your monsters to life — pick colors you love or have on hand.
- Candy Eyes: The cutest touch — grab sets of candy eyes from the baking aisle or online.
Variations
I love how forgiving this Monster Oreo Balls Recipe is. Once you get comfortable, feel free to customize the colors or even the decorations to match YOUR party theme or taste. I often tweak the “monster hair” sprinkles depending on the occasion.
- Different Candy Melt Colors: I once used spooky purple and black candy melts, which made the “monsters” extra Halloween-appropriate.
- Nut-Free Version: Use allergen-safe sprinkles and confirm your candy eyes have no nut cross-contamination — perfect for school treats.
- Flavor Infusions: Adding a splash of peppermint extract to the cream cheese mix creates a fun, minty twist my family adores.
- Mini Oreo Option: Swap in mini Oreos for bite-sized monsters — they’re great for bite-sized parties or buffet tables.
How to Make Monster Oreo Balls Recipe
Step 1: Crush Those Oreos Into Fine Crumbs
First off, get your Oreos crushed to almost powder. I usually throw mine into a food processor and pulse until I get nice fine crumbs. If you don’t have one, no worries! Pop them in a large ziplock bag and smash them with a rolling pin — just be patient and crush them thoroughly so the texture is smooth once mixed.
Step 2: Mix Oreo Crumbs and Cream Cheese
Transfer those gorgeous crumbs to a mixing bowl, add your softened cream cheese, and stir. Sometimes I use a stand mixer on low speed to make life easier. You’re aiming for a soft, dough-like consistency that holds together well — if it’s too crumbly, a tad more cream cheese helps.
Step 3: Scoop and Chill Your Monster Balls
Now the fun part: rolling! I recommend using a cookie scoop to get consistent-sized balls (about 1-inch diameter is perfect). Place them on a lined cookie sheet and pop them into the freezer for about an hour. This step makes coating way easier — trust me, it’s worth the wait.
Step 4: Melt Candy Melts and Coat Each Ball
Pour out one cup of each candy melt color into separate microwave-safe bowls. Heat in 20-second bursts, stirring in between, until your melts are silky smooth. Dip each chilled ball—one at a time!—into your chosen candy melt until fully coated. Let the excess drip back into the bowl.
Step 5: Decorate Your Monster Oreo Balls
The best part: adding the candy eyes! Stick one on the side of each coated ball immediately after dipping so it adheres well. Don’t forget to add sprinkles on top for monster “hair” — this little detail really brings the character to life. Then place them back on parchment to set completely before serving.
Pro Tips for Making Monster Oreo Balls Recipe
- Crush Thoroughly: Fine crumbs mix better and create smoother balls — skipping this makes them crumbly.
- Chill Well Before Coating: Freezing helps the candy melt cling perfectly without sliding off.
- Microwave Candy Melts Gradually: Heating in short bursts prevents burning and keeps the coating glossy.
- Work Quickly When Decorating: Candy melts set fast; placing eyes and sprinkles right after coating avoids mistakes.
How to Serve Monster Oreo Balls Recipe
Garnishes
I usually stick with candy eyes and colorful sprinkles because it’s simple and so cute. Sometimes I’ll add edible glitter or tiny googly-faced toppers for extra whimsy—kids can’t get enough! You could also sprinkle crushed Oreos or mini chocolate chips to add texture.
Side Dishes
These Oreo balls are complete on their own, but I love pairing them with a glass of cold milk or a warm cup of coffee to balance the sweetness. For parties, a plate of fresh fruit or some light cheese can complement the richness nicely.
Creative Ways to Present
For Halloween, I arrange mine on a platter lined with red tissue paper to mimic monster skin, or set them on small cupcake liners for individual servings. I’ve also tied sticks into the balls to make “monster pops” — great for kids’ gatherings and super easy to eat on the go.
Make Ahead and Storage
Storing Leftovers
Leftover Monster Oreo Balls last beautifully in an airtight container in the fridge for up to a week. I’ve found keeping them cool preserves the candy coating’s snap and the cream cheese texture inside — just bring them to room temp before serving for the best flavor.
Freezing
If you want to prep ahead or save leftovers longer, pop them into a freezer-safe container with layers separated by parchment. Freeze for up to 2 months. When you’re ready, just thaw in the fridge overnight—it’s a total time-saver!
Reheating
You really don’t need to heat these up, but if you prefer a slightly softer center, let them sit at room temperature for about 15-20 minutes. Avoid microwaving as it can melt the candy coating and make things messy.
FAQs
-
Can I use different flavors of Oreos for the Monster Oreo Balls Recipe?
Absolutely! I’ve tried this with classic Oreos, Golden Oreos, and even limited-edition seasonal Oreos. Each adds a unique twist to the flavor, so feel free to experiment and find your personal favorite monster base.
-
What if I don’t have candy melts — can I use chocolate chips instead?
Yes, you can melt chocolate chips as a substitute, but be aware that candy melts are designed to harden nicely at room temperature. If you use chocolate chips, try adding a little coconut oil to thin them out, and keep your balls refrigerated to maintain a good coating.
-
How do I prevent the Oreo balls from cracking after dipping?
The key is chilling the balls well before dipping. If they’re too soft, the melted coating can crack as it sets. Also, handle them gently during coating and avoid sudden temperature changes once coated.
-
Can I make these vegan or dairy-free?
Definitely! Look for dairy-free cream cheese alternatives and Oreos (most Oreos are vegan but double-check). For candy melts, explore vegan-friendly brands or try dipping in dark chocolate made without dairy.
Final Thoughts
Honestly, the Monster Oreo Balls Recipe is one of those gems I keep coming back to because it never fails to impress. It’s simple but so fun, and those candy eyes bring a smile every single time. If you want to create a dessert that’s as playful as it is tasty, give this one a try — you’ll be so glad you did, and I promise your family and friends will too!
Print
Monster Oreo Balls Recipe
- Prep Time: 30 minutes
- Cook Time: 0 minutes
- Total Time: 90 minutes
- Yield: 48 Monster Oreo Balls
- Category: Dessert
- Method: No-Cook
- Cuisine: American
Description
Monster Oreo Balls are a fun and spooky Halloween treat made by mixing crushed Oreo cookies with cream cheese, rolling the mixture into balls, and dipping them in vibrant colored candy melts. Each ball is decorated with candy eyes and sprinkles to create playful monster faces, perfect for festive parties and kid-friendly snacks.
Ingredients
Base Ingredients
- 36 Oreo Cookies (1 package, regular)
- 8 ounces Cream Cheese (softened)
Coating and Decoration
- 1 cup Vibrant Green Candy Melts
- 1 cup Lavender Candy Melts
- 1 cup Orange Candy Melts
- Candy Eyes
- Sprinkles (for monster “hair”)
Instructions
- Crush Oreos: Place the Oreo cookies in a food processor and pulse until they become fine crumbs. Alternatively, put the Oreos in a large ziplock bag and crush them thoroughly using a rolling pin.
- Mix with Cream Cheese: Pour the Oreo crumbs into a mixing bowl and add the softened cream cheese. Stir together by hand or mix on low speed with a stand mixer until a soft dough forms.
- Form Balls: Using a cookie scoop or your hands, roll the mixture into equal-sized balls. Arrange them in a single layer on a parchment paper-lined cookie sheet.
- Freeze: Place the cookie sheet with the balls in the freezer for 1 hour or until they are firm enough to dip.
- Melt Candy Melts: Divide each cup of candy melts into separate bowls. Microwave one bowl at a time in 20-second intervals, stirring between intervals, until the candy melts are smooth and fully melted.
- Dip Oreo Balls: Dip each chilled Oreo ball into the melted candy coating until fully covered. Allow any excess candy melt to drip back into the bowl.
- Decorate: Immediately add a candy eye to the side of the dipped ball and sprinkle sprinkles on top to create monster “hair.” Place the decorated balls back on the parchment paper.
- Set Coating: Let the candy coating fully set at room temperature before serving.
Notes
- Using a cookie scoop helps create uniform balls for even dipping and decorating.
- Freezing the balls before dipping prevents them from falling apart in the melted candy.
- Work with one color of candy melts at a time to avoid mixing colors and to keep coatings smooth.
- You can substitute any candy melt colors for different themes or holidays.
- Store the finished Oreo balls in an airtight container in the refrigerator to keep them fresh.
Nutrition
- Serving Size: 1 Monster Oreo Ball
- Calories: 61
- Sugar: 4 g
- Sodium: 50 mg
- Fat: 3 g
- Saturated Fat: 1.5 g
- Unsaturated Fat: 1.2 g
- Trans Fat: 0 g
- Carbohydrates: 7 g
- Fiber: 0.5 g
- Protein: 1 g
- Cholesterol: 5 mg


