
If you want to wow your Halloween guests with a fun and sweet treat, this Halloween Candied Apples Recipe is absolutely the way to go. I’ve made these bright, spooky apples a bunch of times, and every single time, they’re a hit that disappears fast. The best part? They’re surprisingly easy to make, and you don’t need a candy thermometer or complicated tools. Stick with me, and I’ll share all my favorite tips to get those glossy, colorful apples looking like Halloween came to your kitchen!
Why You’ll Love This Recipe
- Super Easy to Make: You won’t need fancy equipment or a candy thermometer—just simple candy melts and apples.
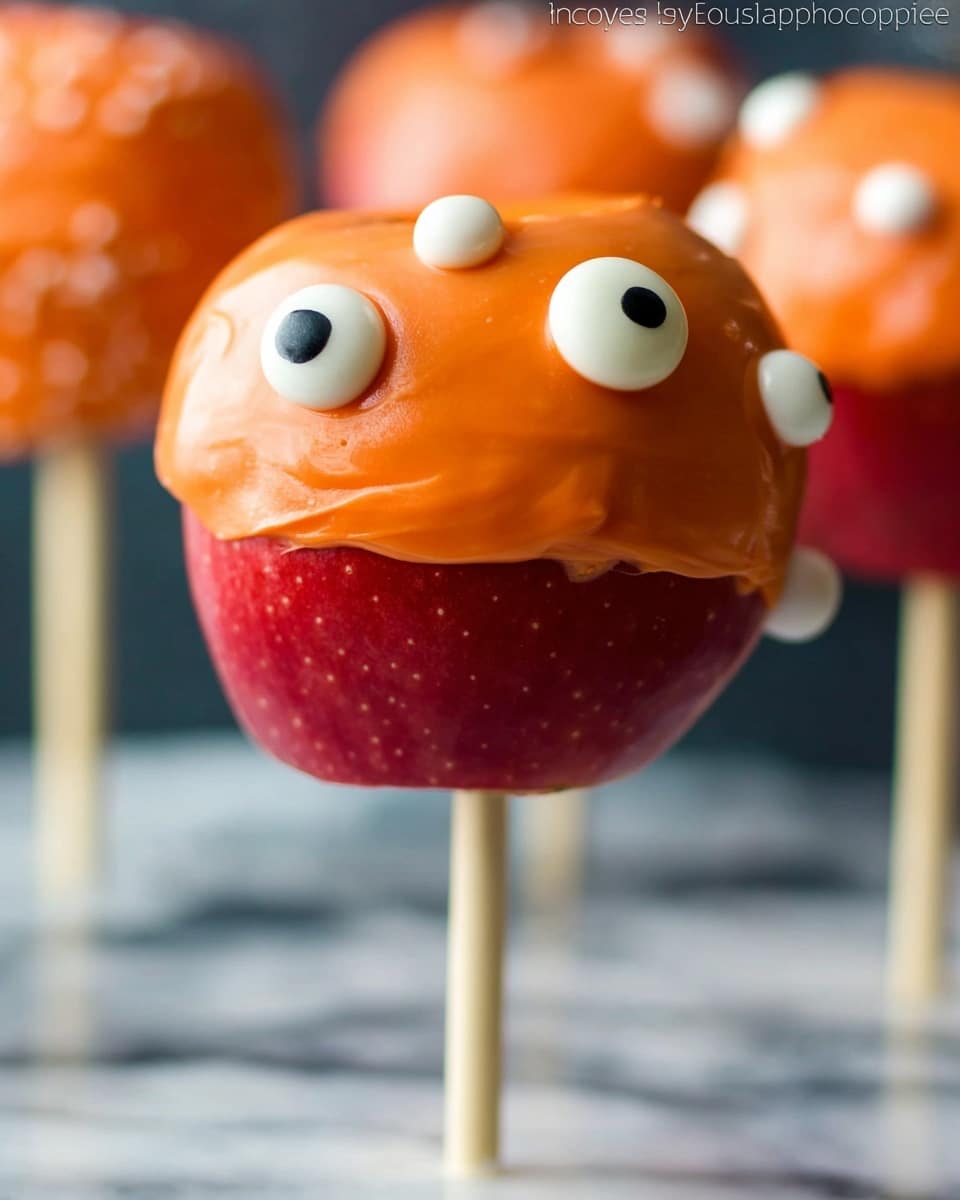
- Eye-Catching Halloween Fun: Those candy eyeballs add a playful, spooky vibe that’s perfect for the holiday.
- Quick to Prepare: In about 30 minutes, you can have a dozen vibrant candied apples ready to impress.
- Kid-Friendly and Customizable: Perfect to make with kids or to tailor colors and decorations to your party theme.

Ingredients You’ll Need
The ingredients here come together beautifully — the crispness of the apples pairs perfectly with smooth, colorful candy melts that give you that classic shiny coating. When shopping, pick apples that feel firm and polished, and choose candy melts in fun Halloween colors to make those eyeballs pop.
- Wilton Candy Eyeballs: These add that fun Halloween twist; you can choose sizes to mix things up.
- Wilton Candy Melts: Opt for festive colors like lavender, green, and orange to keep things spooky and bright.
- Wood Treat Sticks: Make sure they’re sturdy enough to hold the apples without bending.
- Medium Apples (like McIntosh or Granny Smith): Firm apples with a tart bite work best because their texture stands up to the candy coating.
Variations
I love playing around with this Halloween Candied Apples Recipe to surprise my family and guests. You can easily swap colors or add adventurous toppings to make it your own—there’s no limit to spooky creativity here!
- Color Variation: I once did a black and neon green combo using candy melts and it was a showstopper at a Halloween party.
- Chocolate Drizzle: Drizzle dark or white chocolate on top after the candy coating sets for an extra layer of flavor and visual interest.
- Nutty Crunch: Sprinkle chopped nuts, crushed cookies, or candy sprinkles onto the candy before it hardens to add texture.
- Dietary Mods: You can find vegan-friendly candy melts if you want to keep things plant-based without sacrificing flavor or fun.
How to Make Halloween Candied Apples Recipe
Step 1: Prep Your Apples and Sticks
Start by washing and drying your apples really well — moisture is the enemy of candied coating sticking properly. I like to polish them with a clean towel until they’re smooth and shiny. Next, push the wood sticks firmly into the stem end of each apple. This step might seem small, but a stubborn stick can throw off your whole dipping process!
Step 2: Melt the Candy Melts
Place your chosen Halloween-colored candy melts in a microwave-safe bowl and heat in 30-second bursts, stirring between each, until completely smooth. I learned that stirring well after each burst really saves you from burned or lumpy chocolate. Your coating should be silky and pourable but not too runny.
Step 3: Dip and Decorate
Hold each apple by the stick and dip it into the melted candy, swirling to coat evenly. Lift it out and let the excess drip off before setting it on a parchment-lined tray. Before your coating hardens, place some candy eyeballs onto the apples — I like to gently press them in to make sure they stay put without damaging the candy shell.
Step 4: Let Them Set
Leave the apples out at room temperature until the candy sets — usually about 20 to 30 minutes. If your house is warm, you can pop them in the fridge for a few minutes to speed things up, but don’t leave them too long or the candy can sweat and lose its glossy shine.
Pro Tips for Making Halloween Candied Apples Recipe
- Dry Apples Thoroughly: I learned the hard way that even a little water prevents the candy from sticking—dry them until they’re perfectly shiny and moisture-free.
- Don’t Overheat Candy Melts: Heat in short bursts and stir well to avoid scorching that can ruin the texture or flavor.
- Use Parchment Paper: This keeps your apples from sticking and makes cleanup a breeze—trust me, it saves lots of frustration.
- Work Quickly with Candy Eyeballs: The candy sets fast, so have your eyes ready and press gently to avoid cracking the coating.
How to Serve Halloween Candied Apples Recipe
Garnishes
I love topping mine with a few extra candy sprinkles or a tiny drizzle of contrasting colored candy melts to add dimension. The candy eyeballs steal the show, but a little extra sparkle keeps things festive and fun — plus, kids adore adding their own touch right before serving.
Side Dishes
If you’re hosting a Halloween party, these apples pair wonderfully with simple popcorn balls or a platter of roasted pumpkin seeds. I usually keep sides light because the apples are satisfyingly sweet and filling all on their own!
Creative Ways to Present
One year, I arranged the apples standing upright in a foam block decorated like a haunted graveyard—talk about a conversation starter! You can also bundle them in cellophane with themed ribbons or place them on a platter with candy corn scattered around to up the spooky factor.
Make Ahead and Storage
Storing Leftovers
I keep leftover candied apples at room temperature in a single layer to avoid condensation, covering loosely with wax paper. Refrigeration tends to make the candy coating sticky and dull. They stay delicious for up to 2 days this way, but honestly, they rarely last that long in my house!
Freezing
Freezing candied apples isn’t something I recommend because the texture of the apples changes once thawed, becoming mushy. If you want to make ahead, it’s better to prep the apples and sticks, then coat and decorate fresh on the day of your event.
Reheating
If the candy coating loses its shine, gently warming the apples in a low oven (around 170°F) for a few minutes can help restore gloss—but don’t overheat or the candy will melt. I usually skip reheating and just serve them fresh.
FAQs
-
Can I use regular chocolate instead of candy melts for this Halloween Candied Apples Recipe?
You can, but candy melts are specially designed to melt smoothly and harden quickly at room temperature, giving that shiny, glossy finish. Regular chocolate tends to seize or stay soft, which might make coating tricky and less durable.
-
How do I prevent the candy coating from cracking on my apples?
Make sure your apples are at room temperature and thoroughly dry before dipping. Avoid dropping them or banging them while the candy is still setting. Also, be gentle when adding decorations like candy eyeballs to prevent cracking the candy shell.
-
Why aren’t my candy melts setting properly?
This can happen if the candy melts get too warm or if the coating is applied too thickly. Try stirring well during melting, cooling melted candy slightly before dipping, and using a thin even coat on each apple.
-
Can I make these Halloween Candied Apples Recipe ahead of time?
Yes, but for best results, make them the same day you plan to serve. The candy coating looks and tastes best fresh, and apples maintain their crispness. If you must prep earlier, store the apples separately and dip just before serving.
Final Thoughts
I absolutely love how this Halloween Candied Apples Recipe brings a little bit of magic and whimsy to my holiday celebrations. It’s one of those treats that’s simple but still impresses, and I always enjoy making it with my kids—there’s just something about sticking candy eyeballs on an apple that gets everyone giggling! Give this a try, and I have no doubt it’ll become a Halloween tradition in your household, too.
Print
Halloween Candied Apples Recipe
- Prep Time: 15 minutes
- Cook Time: 15 minutes
- Total Time: 30 minutes
- Yield: 12 apples
- Category: Dessert
- Method: No-Cook
- Cuisine: American
Description
These Halloween Candied Apples are a festive and fun treat perfect for the spooky season. Coated in vibrant Wilton Candy Melts and decorated with creepy candy eyeballs, these apples combine a crunchy, tart bite with a sweet, colorful shell. Easy to prepare in just 30 minutes, they make a playful and eye-catching treat for parties, trick-or-treaters, or Halloween-themed gatherings.
Ingredients
Apples
- 12 medium apples (such as McIntosh or Granny Smith), washed and polished dry
- 12 wood treat sticks
Candy Coating and Decoration
- 12 ounces Wilton Candy Melts (choose colors like Lavender, Green, and Orange for Halloween)
- 1 package Wilton Candy Eyeballs (small-sized, medium-sized, or a mix)
Instructions
- Prepare Apples: Thoroughly wash and dry each apple to ensure the candy coating sticks well. Insert a wood treat stick firmly into the stem end of each apple, making them easy to dip and hold.
- Melt Candy Melts: Place the Wilton Candy Melts in a microwave-safe bowl and melt them according to package instructions, usually heating in 30-second intervals and stirring in between until smooth and fully melted.
- Dip Apples: Holding each apple by the stick, dip it into the melted candy until fully coated. Allow excess candy to drip back into the bowl to avoid thick clumps.
- Add Candy Eyeballs: Before the coating sets, press the Wilton Candy Eyeballs onto the surface of each apple to create fun, creepy eyes. Use multiple eyeballs to create a Halloween monster effect.
- Set and Cool: Place the dipped and decorated apples on a parchment-lined tray to cool and harden completely. This usually takes about 30 minutes at room temperature.
Notes
- This Halloween treat has its eyes on you! Brightly-colored Halloween Candied Apples are sweet, fun, and take only 30 minutes to make.
- Make sure apples are completely dry before dipping to prevent the candy from sliding off.
- Use parchment paper or a silicone mat to prevent sticking while the candy coating sets.
- You can mix and match candy melt colors for a more festive look.
- Store candied apples at room temperature and consume within 1-2 days for best freshness.
Nutrition
- Serving Size: 1 apple
- Calories: 157 kcal
- Sugar: 27 g
- Sodium: 15 mg
- Fat: 4 g
- Saturated Fat: 3 g
- Unsaturated Fat: 1 g
- Trans Fat: 0 g
- Carbohydrates: 33 g
- Fiber: 4 g
- Protein: 1 g
- Cholesterol: 0 mg


