
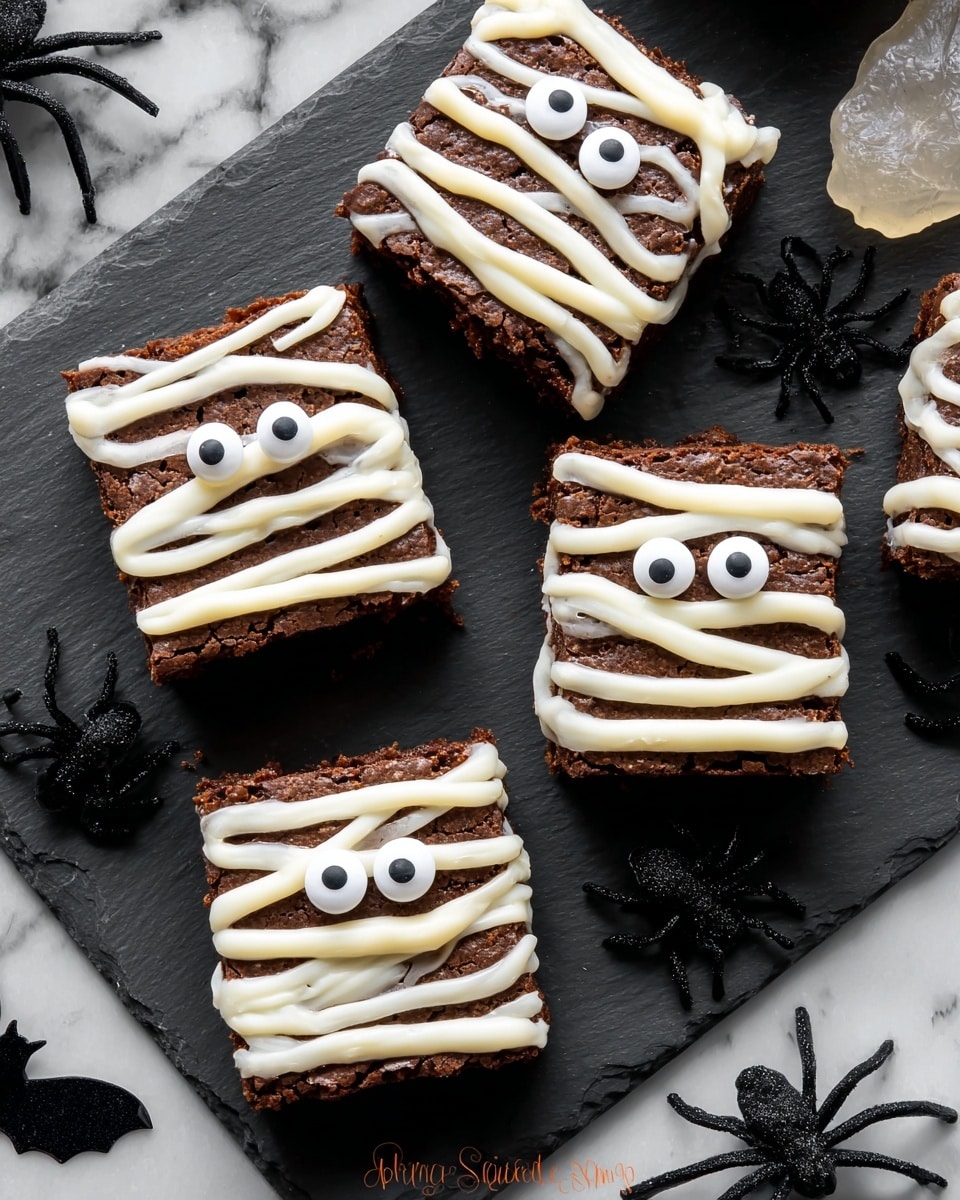
If you’ve been hunting for a Halloween treat that’s both ridiculously easy and wildly adorable, let me introduce you to my absolute favorite: the Mummy Brownies for Halloween Recipe. These fudgy little morsels covered in creamy “mummy wraps” and googly candy eyes never fail to bring a smile, whether you’re serving kids or adults at your Halloween party. Trust me, once you try this recipe, it’ll become your go-to every spooky season.
Why You’ll Love This Recipe
- Super Easy Prep: You need just a handful of ingredients and less than 10 minutes to whip up the mummy frosting.
- Perfect for Halloween Parties: These little mummy brownies are both spooky and cute, making them party crowd-pleasers.
- No Baking Required: If you use store-bought brownies, your hardest job is just mixing and decorating.
- Customizable and Fun: You can swap eyes or add sprinkles to make them uniquely yours.

Ingredients You’ll Need
All the ingredients for this Mummy Brownies for Halloween Recipe come together beautifully to create a rich, creamy frosting that contrasts perfectly with the fudgy chocolate. I love how simple pantry staples can transform plain brownies into a festive masterpiece.
- Cream Cheese: Make sure it’s softened to room temperature; this makes for smooth, lump-free frosting.
- Unsalted Butter: Also softened—helps the frosting set nicely without being too soft.
- Vanilla Extract: Just a splash adds a lovely warmth and depth.
- Confectioners Sugar: The finer sugar ensures your frosting is silky and easy to pipe.
- Brownie Pieces: You can use store-bought or homemade brownies, cut into squares or rounds.
- Candy Eyeballs: These are the key to bringing the mummies to life—fun and creepy!
Variations
One of the things I adore about this Mummy Brownies for Halloween Recipe is how easy it is to make it your own. Feel free to get creative with flavors or decorations; it’s all about having fun and making your spooky brownies just right for your crowd.
- Chocolate Lovers: Try mixing cocoa powder into the cream cheese frosting for extra chocolatey “wraps.” I did this once and my kids couldn’t get enough!
- Nut-Free Version: This recipe is naturally nut-free, so it’s safe to share with most kids’ parties.
- Spice It Up: Sprinkle a pinch of pumpkin pie spice into the frosting for a cozy fall twist that pairs wonderfully with the brownie’s chocolate.
- Gluten-Free: Just swap in your favorite gluten-free brownies – no one will guess!
How to Make Mummy Brownies for Halloween Recipe
Step 1: Whip Up the Cream Cheese ‘Mummy Wrap’ Frosting
First things first, you’ll want to cream together your softened cream cheese and butter until silky smooth. I usually use an electric mixer for this part—it saves time and gives the best texture. Add in your vanilla extract, then gradually mix in the confectioners sugar until your frosting is thick but still easy to pipe. If it feels too stiff, a quick stir with a tablespoon or two of milk can loosen it up, but be careful not to overdo it!
Step 2: Prepare Your Brownies
You can’t go wrong with fudgey, rich brownies here. I usually grab a box of my favorite store-bought kind for ease, then slice them into uniform squares or rounds (because shape matters when you’re wrapping!). Make sure brownies are completely cooled before frosting—that way the cream cheese mixture won’t melt and lose shape.
Step 3: Pipe Your Mummy Wraps
Fill a piping bag or a zip-top bag with the frosting, snip off a tiny corner, and zigzag horizontal lines across each brownie to mimic mummy wraps. Don’t worry if it’s not perfect—some messy lines just add character! When I first tried this, I was worried about neatness but honestly, kids loved the homemade look.
Step 4: Add Candy Eyes for Personality
Finish your mummy faces by pressing two candy eyeballs onto each brownie while the frosting is still soft. It’s amazing how such a small detail turns a simple treat into a spooky character. My family goes crazy for this part—sometimes I’ve caught them trying to sneak eyeballs before the party even starts!
Pro Tips for Making Mummy Brownies for Halloween Recipe
- Use Room Temperature Ingredients: It helps create the creamiest frosting without lumps or clumps, making piping easier.
- Don’t Pipe Too Thickly: Thin lines look more like mummy wraps and prevent the frosting from overpowering the brownie.
- Chill Brownies Before Decorating: Cold brownies keep the frosting firm and prevent melting or sliding.
- Secure the Eyes Quickly: Place candy eyeballs soon after piping so they stick well into the frosting before it sets.
How to Serve Mummy Brownies for Halloween Recipe
Garnishes
I usually keep garnishes simple—just those candy eyeballs do the trick! Sometimes I add a sprinkle of edible silver dust or a few black sugar sprinkles for a little extra spooky sparkle. It’s subtle but adds a professional touch that guests always comment on.
Side Dishes
These mummy brownies pair perfectly with a chilled glass of milk (classic), a warm cup of spiced cider, or even a scoop of vanilla ice cream if you want to turn it into a dessert mashup. For a party, I like to serve them alongside pumpkin-shaped sugar cookies or caramel apples to keep the Halloween spirit going strong.
Creative Ways to Present
For a really fun presentation, I like to set the mummy brownies on a platter lined with “spider web” spun sugar or place them on Halloween-themed cupcake liners. Once, I even added small paper tombstones behind each brownie for a “graveyard” effect—it was a huge hit with the kids and sparked so many laughs!
Make Ahead and Storage
Storing Leftovers
If you have leftovers (which is rare in my house!), store them in an airtight container in the fridge. The cream cheese frosting stays fresh and delicious for up to 3 days. I find that letting them come to room temperature before serving brings back that perfect fudgy texture.
Freezing
You can freeze the brownies before decorating. Wrap them tightly in plastic wrap and foil, then thaw in the fridge overnight when ready to frost. I don’t recommend freezing after adding the cream cheese frosting since texture can get a bit off.
Reheating
I usually enjoy these brownies cold or at room temperature, but if you want to warm one up, pop it in the microwave for about 10 seconds—just enough to soften the brownie without melting the frosting. Always remove candy eyes before microwaving to avoid melting.
FAQs
-
Can I use homemade brownies for this Mummy Brownies for Halloween Recipe?
Absolutely! Homemade brownies work beautifully here, especially if they’re dense and fudgy. Just be sure they’re fully cooled before decorating so the frosting holds up perfectly.
-
What can I substitute for candy eyeballs if I can’t find them?
If candy eyeballs aren’t available, you can use mini chocolate chips, raisins, or even small dots of black icing to create eyes. I sometimes get creative and use white chocolate chips with a dark chocolate dot in the center for a homemade eyeball effect.
-
How long does it take to make these mummy brownies?
Once your brownies are baked and cooled (or if you use store-bought brownies), the assembly takes about 10 minutes to make the frosting and decorate. Totally doable last minute!
-
Can I prepare these mummies ahead of time?
You can prep the frosting and slice the brownies ahead of time, but I recommend decorating the mummies on the day you plan to serve for the freshest look and best texture.
-
Is this recipe kid-friendly?
Definitely! Kids love the fun appearance and the tasty combination of fudgy brownies and sweet cream cheese frosting. Plus, they’ll enjoy helping decorate the mummies.
Final Thoughts
I absolutely love how this Mummy Brownies for Halloween Recipe turns an everyday brownie into a festive hit that’s both spooky and sweet without any fuss. Every Halloween, it’s become a tradition in my kitchen because it’s quick, fun, and everyone—kids and adults alike—gets excited to dig in. I hope you have as much fun making (and eating!) these as I do. So, grab your piping bag, some candy eyes, and let’s make this Halloween extra sweet and spooky!
Print
Mummy Brownies for Halloween Recipe
- Prep Time: 10 min
- Cook Time: 0 min
- Total Time: 80 min
- Yield: 16 brownies
- Category: Dessert
- Method: No-Cook
- Cuisine: American
Description
Celebrate Halloween with these fun and spooky Mummy Brownies, featuring rich, fudgy brownies topped with creamy homemade cream cheese icing and candy eyeballs for a delightful and festive treat.
Ingredients
Brownies
- 16 brownie pieces (square or round, store-bought or homemade)
Cream Cheese Icing
- 8 oz cream cheese (at room temperature, 1 bar)
- 8 tablespoons unsalted butter (at room temperature, 1/2 cup or 1 stick)
- 1 teaspoon vanilla extract
- 1 cup confectioners sugar
Decoration
- 1 pack Candy Eye Balls
Instructions
- Prepare the Cream Cheese Icing: In a mixing bowl, combine the softened cream cheese and unsalted butter. Beat them together until smooth and creamy. Add the vanilla extract and gradually mix in the confectioners sugar until the icing reaches a thick but spreadable consistency.
- Assemble the Brownies: Arrange the brownie pieces on a serving tray or plate. Using a piping bag or a small spatula, spread or pipe the cream cheese icing in overlapping lines across each brownie to resemble mummy bandages.
- Add Eyes: Place two candy eyeballs on each iced brownie piece to complete the mummy look.
- Serve and Enjoy: Chill the brownies briefly if desired to set the icing. Serve these festive mummy brownies at your Halloween party and enjoy their delicious, creamy texture alongside the rich brownies.
Notes
- Use store-bought brownie pieces or homemade brownies for convenience and flavor.
- The cream cheese icing can be prepared in advance and refrigerated for easier decorating.
- Store leftover brownies in an airtight container in the refrigerator to maintain freshness.
- For a different twist, add a pinch of cinnamon or cocoa powder to the cream cheese icing.
Nutrition
- Serving Size: 1 brownie
- Calories: 134 kcal
- Sugar: 8 g
- Sodium: 99 mg
- Fat: 11 g
- Saturated Fat: 6 g
- Unsaturated Fat: 4 g
- Trans Fat: 0 g
- Carbohydrates: 9 g
- Fiber: 1 g
- Protein: 1 g
- Cholesterol: 31 mg

