
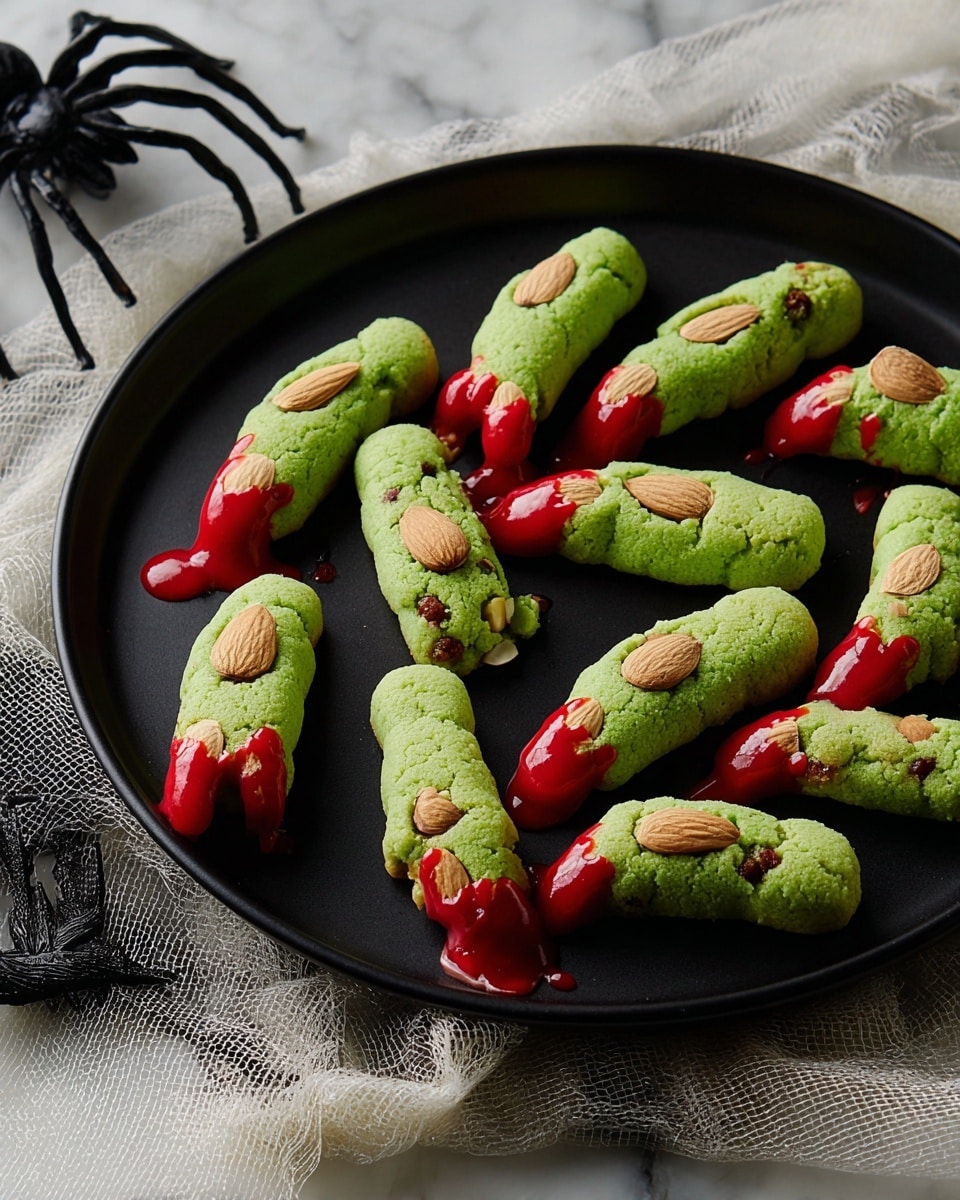
There’s something irresistibly fun and a little bit spooky about making homemade witch finger cookies, and I’m excited to share my absolutely fan-freaking-tastic Witch Finger Cookies Recipe with you! These creepy yet delicious treats blend the perfect buttery shortbread with a pop of fruity jam that oozes out just right. Perfect for Halloween parties or whenever you want to bring a little magic to your cookie jar, I promise you’ll get hooked on how fun and tasty these turn out.
Why You’ll Love This Recipe
- Fun & Festive: These cookies look like creepy witch fingers but taste like amazing pistachio-almond shortbread.
- Simple Ingredients: You probably already have everything in your pantry or can easily find it.
- Great Make-Ahead: The dough can chill overnight, which is perfect if you want to spread out the work.
- Showstopper Presentation: The jam-filled nail detail is a game-changer for wow factor with almost no extra effort.

Ingredients You’ll Need
The magic of this Witch Finger Cookies Recipe lies in balancing nutty, buttery, and fruity flavors — and in those spooky details that really make the fingers come alive. I always recommend using fresh nuts for the best crunch and flavor, plus a good-quality jam for that oozing effect.
- Confectioners’ sugar: This ensures a smooth texture and a sweet base without grittiness.
- Unsalted butter: Softened, not melted — it adds richness and tenderness.
- Large egg: Helps bind everything and lends a bit of moisture to the dough.
- Almond extract: A little goes a long way for that subtle, nutty warmth.
- Pure vanilla extract: Deepens flavor and complements the nuts beautifully.
- Green food coloring: Brings a fun, eerie color just like a witch’s finger should have.
- All-purpose flour: The foundation for your cookie dough.
- Kosher salt: Just enough to balance sweetness and enhance flavors.
- Finely chopped pistachios: These add crunch and make the fingers feel a bit more “warty” and real.
- Sliced almonds: Used for nails, adding texture and the perfect finishing touch.
- Cherry, strawberry, or raspberry jam: This is the “blood” that oozes out — go for your favorite red jam for maximum effect.
Variations
I love how versatile this Witch Finger Cookies Recipe is! Feel free to get creative with nuts, extracts, even the jam — you can make it your own and still keep that spooky vibe.
- Nut swaps: I once swapped pistachios for finely chopped walnuts or pecans and it gave the fingers a different but still great texture.
- Extract variations: Try swapping almond extract for a tiny bit of anise or orange extract for an unexpected twist.
- Jam options: Raspberry jam offers the perfect tart contrast to the sweet dough; you could also try fig jam for a darker, richer effect.
- Coloring: If you don’t want green food coloring, you could leave the dough natural or add a little red to make more of a bloody finger.
How to Make Witch Finger Cookies Recipe
Step 1: Cream the Sugar and Butter
Start by beating the confectioners’ sugar and softened unsalted butter together until the mixture is pale and fluffy — about two minutes on medium speed. This is where you build a light, tender crumb for the cookies. Adding the egg next and beating until fluffy keeps the dough light and moist enough, so don’t skip that step. Then stir in almond and vanilla extracts, plus your green food coloring, for flavor and that eerily perfect color.
Step 2: Mix Dry Ingredients and Chill the Dough
In a separate bowl, whisk the flour and kosher salt. Add this to your butter mixture on low speed, mixing just until combined — over-mixing will toughen the dough. Fold in finely chopped pistachios at this stage; they add texture and a subtle nuttiness that works so well. Cover the bowl tightly and chill in the fridge for at least 30 minutes, or up to two days if you want to prep in advance.
Step 3: Shape and Decorate the Fingers
After chilling, portion the dough into small balls about a tablespoon each. Roll each between your palms into a finger shape roughly 3 inches long and half an inch thick — think of the length of your pinky but a bit thinner. Place them on parchment-lined baking sheets. Press a sliced almond where the fingernail would be, then pinch the dough below to create knuckle shapes. Use a sharp knife to carve horizontal lines for added realism, and tuck in a couple of tiny pistachio pieces to resemble warts. Freeze these for 30 minutes before baking; this helps the fingers keep their shape better.
Step 4: Bake and Add ‘Bloody’ Jam Details
Preheat your oven to 375°F and bake the cookies for 7 to 9 minutes, rotating trays halfway to ensure even baking. You want the edges to be firm and the tops dry but not browned. Let the cookies cool slightly, then gently lift off each almond nail. Dab a little jam on the finger tip, then press the almond nail back on to make the jam ooze out – the signature creepy “bloody nail” effect. Spread some more jam on the bottom of each finger and let the cookies cool completely before serving.
Pro Tips for Making Witch Finger Cookies Recipe
- Chill the dough well: I learned the hard way that chilling for at least 30 minutes (or overnight!) helps the fingers hold their shape during baking.
- Use soft butter, not melted: This gives you the perfect creamy texture and keeps the dough from getting greasy.
- Pinch carefully but firmly: When creating knuckles and indentations, be gentle but firm so the details stay after baking.
- Adding jam after baking: Putting jam after baking is key — it prevents it from burning and creates that fresh “bloody” effect that everyone loves.
How to Serve Witch Finger Cookies Recipe
Garnishes
I usually keep garnishes pretty simple here because the fingers themselves steal the show. However, you can sprinkle extra chopped pistachios around the platter for a “witchy” effect or dust a little edible glitter for some Halloween sparkle. If you want to get really theatrical, a drizzle of extra red jam around the plate amps up the gross-out factor.
Side Dishes
Pair these witch fingers with a hot cup of spiced cider or rich hot chocolate — something warm to balance the buttery crispness. If you’re hosting a party, maybe add a variety of Halloween-themed treats like candy corns or mini pumpkin cupcakes for a fun mix of flavors and textures.
Creative Ways to Present
I once served these arrayed on a wooden board covered in “cobweb” spun sugar, which really drove home the spooky vibe. Another time, I placed the cookies sticking out of a “witch’s cauldron” centerpiece made from a big black bowl filled with dry ice for a smoky effect — that was a major hit! You can also set them nestled amongst fresh herbs like rosemary to mimic eerie fingers crawling out of the earth.
Make Ahead and Storage
Storing Leftovers
I like to store these cookies in an airtight container at room temperature for up to 4 days. The jam keeps the cookies moist without getting soggy, but after a couple of days, I usually find them best enjoyed within the first two days. Line your container with parchment between layers to prevent sticking.
Freezing
If you want to freeze, it’s best to freeze the dough logs before baking. I shape the fingers, freeze them on a tray, then transfer them to a freezer bag. When you’re ready, bake straight from frozen, just add a minute or two to your baking time. This is a lifesaver when you want fresh, spooky cookies on short notice.
Reheating
These cookies are best enjoyed fresh, but if you have leftovers, pop them in a warm oven (about 300°F) for 5 minutes to refresh that crispness. Avoid microwaving, as that can make them soft and chewy rather than delightfully crunchy.
FAQs
-
Can I make these cookies without nuts if I have allergies?
Absolutely! You can omit the pistachios and almonds and substitute with sunflower seeds or simply increase the flour slightly. Keep the almond extract if tolerated or swap for vanilla extract to maintain flavor.
-
Why do you freeze the cookies before baking?
Freezing the shaped cookies helps them keep their shape in the oven, so your fingers look realistic and don’t spread out too much. It’s a simple step that makes a big visual difference.
-
What’s the best jam to use for the “bloody” effect?
I find tart red jams like cherry, raspberry, or strawberry work beautifully. They’re bright in color and not overly sweet, which balances the shortbread perfectly.
-
Can I make these cookies vegan or dairy-free?
With some recipe tweaks you can! Substitute vegan butter and a flax egg for the egg, but keep in mind the texture might be slightly different. It’s worth experimenting if you have dietary needs.
Final Thoughts
I genuinely love how this Witch Finger Cookies Recipe combines a bit of spooky fun with real deliciousness that everyone will rave about. Making them feels like a playful Halloween tradition, and they’re such a crowd-pleaser in my family. I can’t wait for you to try shaping, decorating, and maybe even daring your friends to take a bite of these “fingers” — it’s one of those recipes that makes baking into a memorable moment. Go ahead, grab your apron, get a little messy, and enjoy every creepy, sweet bite!
Print
Witch Finger Cookies Recipe
- Prep Time: 15 minutes
- Cook Time: 9 minutes
- Total Time: 1 hour 50 minutes
- Yield: 50 cookies
- Category: Dessert
- Method: Baking
- Cuisine: American
Description
These Witch Finger Cookies are a spooky and delicious treat perfect for Halloween. Made with almond and vanilla scented shortbread dough, chopped pistachios, and decorated with almond slices for fingernails dipped in fruity jam, they offer a creepy yet delightful twist to classic cookies. The slightly crunchy texture with nutty flavor and sweet jam makes them irresistible and fun to make.
Ingredients
Dough
- 1 1/4 cups (145 g) confectioners’ sugar
- 1 cup (2 sticks) unsalted butter, softened
- 1 large egg
- 1 teaspoon almond extract
- 1 teaspoon pure vanilla extract
- 5 to 6 drops green food coloring
- 2 3/4 cups (330 g) all-purpose flour
- 1 teaspoon kosher salt
- 1/2 cup finely chopped pistachios (about 70 g), plus more for decorating
- 3/4 cup sliced almonds (about 85 g)
Decoration
- 1/2 cup (135 g) cherry, strawberry, or raspberry jam
Instructions
- Prepare the Butter and Sugar Mixture: In the large bowl of a stand mixer fitted with the whisk attachment (or in a large bowl using a handheld mixer), beat confectioners’ sugar and butter on medium speed until the mixture is pale and fluffy, about 2 minutes. Then add the egg and continue beating until incorporated and fluffy, about 1 minute more. Add the almond extract, vanilla extract, and green food coloring, and beat until fully combined.
- Mix Dry Ingredients and Combine: In a small bowl, whisk together the all-purpose flour and kosher salt. Add this flour mixture to the butter mixture and beat on low speed until just combined. Fold in the finely chopped pistachios gently with a spatula. Cover the bowl with plastic wrap and refrigerate the dough for at least 30 minutes or up to 2 days to firm up.
- Shape the Cookies: Line two rimmed baking sheets with parchment paper. Remove one-quarter of the chilled dough from the refrigerator and divide it into 12 to 13 balls, each about 1 tablespoon. Roll each ball between your palms into a finger shape, approximately 3 inches long and 1/2 inch wide, about the length and thickness of a pinky finger but slightly thinner. Place the shaped dough logs on the prepared baking sheets.
- Add Fingernail and Details: Press an almond slice into each dough finger where the fingernail should be. Carefully pinch the dough just below the almond and halfway down the log to create knuckle indentations. Using a sharp knife, carve horizontal lines of varying lengths into the knuckle area to mimic finger joints. Place one or two small pistachio pieces in each finger to represent warts. Repeat shaping with the remaining dough portions. Freeze the shaped cookies for 30 minutes to help them hold their shape when baking.
- Bake the Cookies: Preheat the oven to 375°F (190°C). Bake the cookies on the prepared baking sheets, rotating trays front to back halfway through baking, until the edges are firm and the tops feel dry to the touch, about 7 to 9 minutes. Remove from oven and let cool slightly.
- Add Jam Decoration: Gently lift off each almond fingernail. Place a small dab of cherry, strawberry, or raspberry jam on the tip of each finger, then replace the almond fingernail pressing down slightly to make the jam ooze out like blood. Spread additional jam on the bottom of each finger to enhance the effect. Allow the cookies to cool completely before serving.
Notes
- The combination of pistachio and almond shortbread with cherry jam creates a deliciously nutty and fruity flavor.
- Freezing the shaped dough before baking helps maintain the intricate finger shapes and details.
- Using green food coloring adds an eerie effect to these Halloween cookies.
- These cookies can be stored in an airtight container for up to 5 days to keep fresh.
- For extra detail, you can use a small dab of jam to create a ‘bloody’ effect along the knuckles or base of each finger.
Nutrition
- Serving Size: 1 cookie
- Calories: 95
- Sugar: 4.4 g
- Sodium: 41 mg
- Fat: 5.3 g
- Saturated Fat: 2.5 g
- Unsaturated Fat: 2.8 g
- Trans Fat: 0 g
- Carbohydrates: 10 g
- Fiber: 0.56 g
- Protein: 1.5 g
- Cholesterol: 13 mg


