
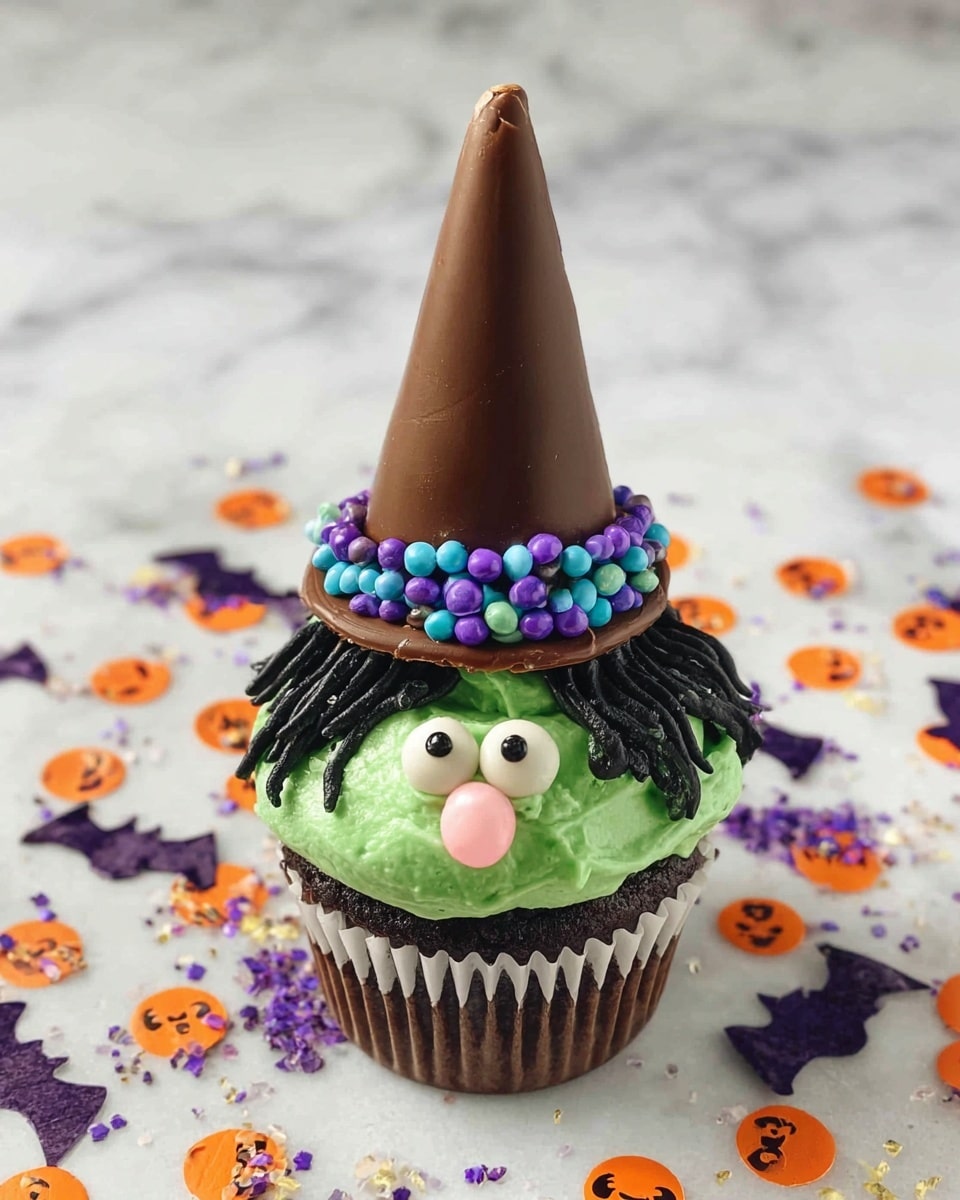
If you’re looking for a Halloween treat that’s as cute as it is delicious, you’re going to love this Sugar Ice Cream Cone Witch Hat Cupcakes (Dipped in Chocolate) Recipe. These whimsical cupcakes turn ordinary sugar ice cream cones into magical witch hats perched atop moist chocolate cupcakes, all dipped in shiny chocolate for that extra wow factor. I remember the first time I made these for my family’s Halloween party – my kids went absolutely bonkers for them, and honestly, I couldn’t stop myself from sneaking a few cupcakes when no one was looking!
Why You’ll Love This Recipe
- Adorable Presentation: Those dipped sugar cones transformed into witch hats are show-stoppers at any party.
- Easy to Assemble: Even if you’re short on time, the steps are straightforward and fun to do with kids.
- Customizable Frosting: You can mix and match purple, green, and gray frostings to create unique spooky looks.
- Great for All Ages: My whole family loves these, and they’re perfect for Halloween festivities from classroom parties to grown-up gatherings.

Ingredients You’ll Need
The magic of this recipe comes from combining a classic chocolate cupcake base with playful sugar ice cream cones and fun frostings. I always grab good-quality chocolate and colorful frostings — it really makes a difference when assembling the hats and decorating.
- Chocolate cake mix: Use your favorite boxed mix or homemade recipe for a moist, chocolate-y base.
- Sugar ice cream cones: These act as the perfect base for the witch hat shape, so pick sturdy cones that won’t easily break.
- Round flat cookies: For the hat brims – I like chocolate-covered or plain depending on the flavor combo you want.
- Purple frosting: Adds a Halloween-friendly pop of color with a fun twist.
- Green frosting: Great for variety and gives a classic witchy vibe.
- Gray frosting: Perfect for ‘witch hair’ detailing on your cupcakes.
- Sprinkles: Use festive shapes and colors to decorate the hat bands.
- Candy eyeballs: They immediately bring your cupcake witches to life.
- Jelly beans: For a cute little nose that adds personality.
- Chocolate: Melted along with shortening to dip cookies and cones, giving a smooth, glossy finish.
- Vegetable shortening: Helps thin the chocolate so it coats evenly without seizing.
Variations
I love to switch things up with these cupcakes depending on the occasion or mood — and honestly, they’re so versatile you can create lots of fun versions. Don’t hesitate to play around with colors, toppings, and even the flavors of frosting.
- Flavor twist: Instead of a chocolate cupcake, try a red velvet or pumpkin spice base for an autumnal feel my guests adored last fall.
- Frosting swap: Cream cheese frosting adds a lovely tang and richness to balance the sweetness.
- Allergy-friendly: Use dairy-free chocolate and frostings if you’re baking for sensitive eaters—still just as fun!
- Seasonal sprinkles: Red and green for Christmas, or orange and black for Halloween — it’s an easy way to transform the look.
How to Make Sugar Ice Cream Cone Witch Hat Cupcakes (Dipped in Chocolate) Recipe
Step 1: Bake the Cupcakes and Cool
Start by baking your chocolate cupcakes according to your chosen recipe or box instructions. I like to line my tins well to avoid sticking and ensure smooth removal. Once baked, let them cool completely before decorating — warm cupcakes will melt the frosting and chocolate dipped decorations, leading to a messy disaster!
Step 2: Melt Chocolate and Shortening
Next, gently melt the chocolate together with the vegetable shortening in a microwave or double boiler. The shortening helps thin out the chocolate so it’s easier to dip the cookies and cones without clumping or becoming too thick. Stir frequently and be careful not to overheat, or the chocolate can seize and turn grainy.
Step 3: Dip Cookies and Cones
Dip your flat cookies and ice cream cones into the melted chocolate, covering them completely or partially depending on your look. Lay them out on parchment or wax paper to set, or pop them in the fridge for faster hardening. The glossy coating turns these into that perfect witch hat shape you’ll love.
Step 4: Pipe Frosting onto Cupcakes
Once cupcakes are cool, use a piping bag to add frosting — I like to alternate purple and green colors to give each witch its own personality. Don’t worry about perfection here; the charm is in the playful, imperfect look.
Step 5: Assemble the Witch Hats
Pipe a line of frosting around the opening of each dipped cone, then set it in the center of the cookie to create a sturdy hat brim. Pipe more frosting around where the cone meets the cookie and scatter sprinkles atop to form a festive hat band. Use gray frosting to pipe witch hair on one side of the cupcake for a finishing flourish.
Step 6: Add Eyes and Nose
Finally, add candy eyeballs and a jelly bean nose to give each witch cupcake its own quirky face. These little details really bring the cupcakes to life and get everyone smiling.
Pro Tips for Making Sugar Ice Cream Cone Witch Hat Cupcakes (Dipped in Chocolate) Recipe
- Make Sure Cupcakes Are Fully Cool: Trust me, I’ve learned the hard way that warm cupcakes make the frosting melt and hats slip off.
- Use Shortening to Thin Chocolate: This little trick keeps your chocolate smooth and shiny for a flawless dip every time.
- Pipe on the Frosting in Layers: It gives a fuller look and makes placing the cones easier to secure.
- Chill Dipped Components Before Assembly: This prevents melting and helps maintain that iconic hat shape while decorating.
How to Serve Sugar Ice Cream Cone Witch Hat Cupcakes (Dipped in Chocolate) Recipe
Garnishes
I usually stick with candy eyeballs and jelly bean noses as featured in the recipe because I love the whimsical effect they create—but sometimes I add edible glitter or tiny candy stars for sparkle. A few colorful sprinkles on the hat band always add cute seasonal charm.
Side Dishes
These cupcakes steal the show, so I usually pair them with simple beverages like hot apple cider or a classic punch. For a fuller party table, a fresh fruit platter or a small assortment of Halloween-themed cookies complements the cupcakes nicely without overshadowing them.
Creative Ways to Present
I’ve had great luck displaying these cupcakes in a tiered stand surrounded by mini pumpkins and autumn leaves for Halloween parties. Another favorite is arranging them on a dark platter with edible spider webs for a spooky touch. They also make fun party favors when wrapped individually in cellophane bags tied with festive ribbons.
Make Ahead and Storage
Storing Leftovers
I like to keep these cupcakes in an airtight container at room temperature if I plan to eat them within 2 days. If your house is warm, refrigerate them, but bring to room temp before serving so the frosting is creamy and the chocolate hat isn’t too hard.
Freezing
I’ve frozen these cupcakes assembled by placing them on a tray to harden, then wrapping them tightly in plastic wrap and storing in a freezer-safe bag. When ready, thaw in the fridge overnight—the chocolate hats hold up surprisingly well and the frostings maintain their texture.
Reheating
Because these are cupcakes with decorative frosting and dipped chocolate, I don’t recommend reheating as it can melt the frosting and cause the decorations to slide off. Instead, let frozen cupcakes thaw fully in the fridge or at room temperature for best results.
FAQs
-
Can I make these cupcakes gluten-free?
Absolutely! Use a gluten-free chocolate cake mix or your favorite homemade gluten-free recipe. Just double-check the cookies and ice cream cones are certified gluten-free as well.
-
How do I prevent the chocolate from seizing when melting?
Adding a tablespoon or two of vegetable shortening thins the chocolate and keeps it smooth. Also, melt it slowly over low heat or short intervals in the microwave, stirring often.
-
Can kids help with decorating?
Definitely! Kids love assembling the hats and decorating with sprinkles and eyes. Just supervise around the melted chocolate and make sure cones have set before handling.
-
What if my cones break when dipping?
Handle cones gently, and dip quickly rather than soaking. If a cone breaks, use it as a whimsical “witch hair” decoration or crumble it over cupcakes as toppings!
Final Thoughts
I have to say, this Sugar Ice Cream Cone Witch Hat Cupcakes (Dipped in Chocolate) Recipe is one of those desserts that brings pure joy in the kitchen — from baking and dipping to the littlest decorating details. It’s perfect for Halloween, but honestly, my family sometimes requests these “witches” year-round because they’re just that fun and tasty. So, if you want to impress your guests (or kids) with something whimsical and delicious, grab those sugar cones and give this recipe a whirl. I bet it becomes a family favorite fast!
Print
Sugar Ice Cream Cone Witch Hat Cupcakes (Dipped in Chocolate) Recipe
- Prep Time: 60 min
- Cook Time: 20 min
- Total Time: 80 min
- Yield: 24 cupcakes
- Category: Dessert
- Method: Baking
- Cuisine: American
Description
These Sugar Ice Cream Cone Witch Hat Cupcakes are an adorable and festive treat perfect for Halloween parties. Made with moist chocolate cupcakes topped with colorful purple, green, and gray frosting, each cupcake is crowned with a chocolate-dipped sugar ice cream cone witch hat adorned with sprinkles, candy eyeballs, and a jellybean nose for a fun surprise delight.
Ingredients
Chocolate Cupcake Base
- Chocolate cake mix (enough for 24 cupcakes)
- Ingredients as per cake mix package (usually eggs, oil, water)
Witch Hat Decoration
- 24 Sugar ice cream cones (1 per cupcake)
- 24 Round flat cookies (1 per cupcake)
- 10-12 oz Chocolate (for melting)
- 1-2 tablespoons vegetable shortening (to thin chocolate)
Frosting and Decorations
- Purple frosting (for cupcake topping)
- Green frosting (for cupcake topping)
- Gray frosting (for piping hair)
- Sprinkles (for hatband)
- Candy eyeballs (for face)
- Jelly beans (for nose)
Instructions
- Bake Cupcakes: Prepare the chocolate cupcakes according to the cake mix recipe instructions. Once baked, allow them to cool completely before decorating.
- Melt Chocolate: In a microwave-safe bowl or double boiler, melt the chocolate together with the vegetable shortening until smooth and thin enough to dip.
- Dip Cones and Cookies: Dip each sugar ice cream cone and round flat cookie into the melted chocolate, coating them evenly. Set dipped cones and cookies aside or place them in the refrigerator to fully set and harden.
- Pipe Frosting on Cupcakes: Using a piping bag or spatula, frost the cooled cupcakes with alternating colors of purple and green frosting as desired.
- Assemble Witch Hat Base: Pipe a line of frosting around the opening of each cone, then place the cone in the center of a dipped cookie to create the witch hat base.
- Add Hatband: Pipe frosting all around where the cookie and cone meet, then sprinkle sprinkles over the frosting to form the decorative hatband.
- Pipe Hair: Use gray frosting to pipe hair on one side of each cupcake, adding character to the witches.
- Place Hat on Cupcake: Carefully place each assembled witch hat on top of the frosted cupcakes.
- Add Facial Features: Decorate each cupcake by adding candy eyeballs and a jellybean nose to bring the witch faces to life.
Notes
- These cupcakes make a wonderfully festive Halloween party treat that kids and adults will love.
- For a stronger chocolate coating, add a little more vegetable shortening when melting chocolate to keep it thin and smooth for dipping.
- While sprinkles add a colorful touch to the hatband, you can customize decorations to your liking.
- Make sure cupcakes are completely cooled before decorating to prevent frosting from melting.
- Store cupcakes in an airtight container at room temperature or refrigerate if your kitchen is warm.
Nutrition
- Serving Size: 1 cupcake
- Calories: 65 kcal
- Sugar: 6 g
- Sodium: 2 mg
- Fat: 5 g
- Saturated Fat: 3 g
- Unsaturated Fat: 3 g
- Trans Fat: 1 g
- Carbohydrates: 7 g
- Fiber: 1 g
- Protein: 1 g
- Cholesterol: 0 mg


