
If you’re gearing up for a Halloween party and want to impress your guests without breaking a sweat, this Halloween Charcuterie Board Recipe is your new best friend. I absolutely love how this board comes together — it’s packed with fun spooky vibes, a great balance of flavors, and all the textures that make munching downright addictive. Plus, it’s super easy to throw together even last minute, so stick around and I’ll show you how to create a show-stopper everyone will talk about.
Why You’ll Love This Recipe
- Effortless Party Prep: You can assemble this Halloween charcuterie board in no time, making it perfect for last-minute guests or busy hosts.
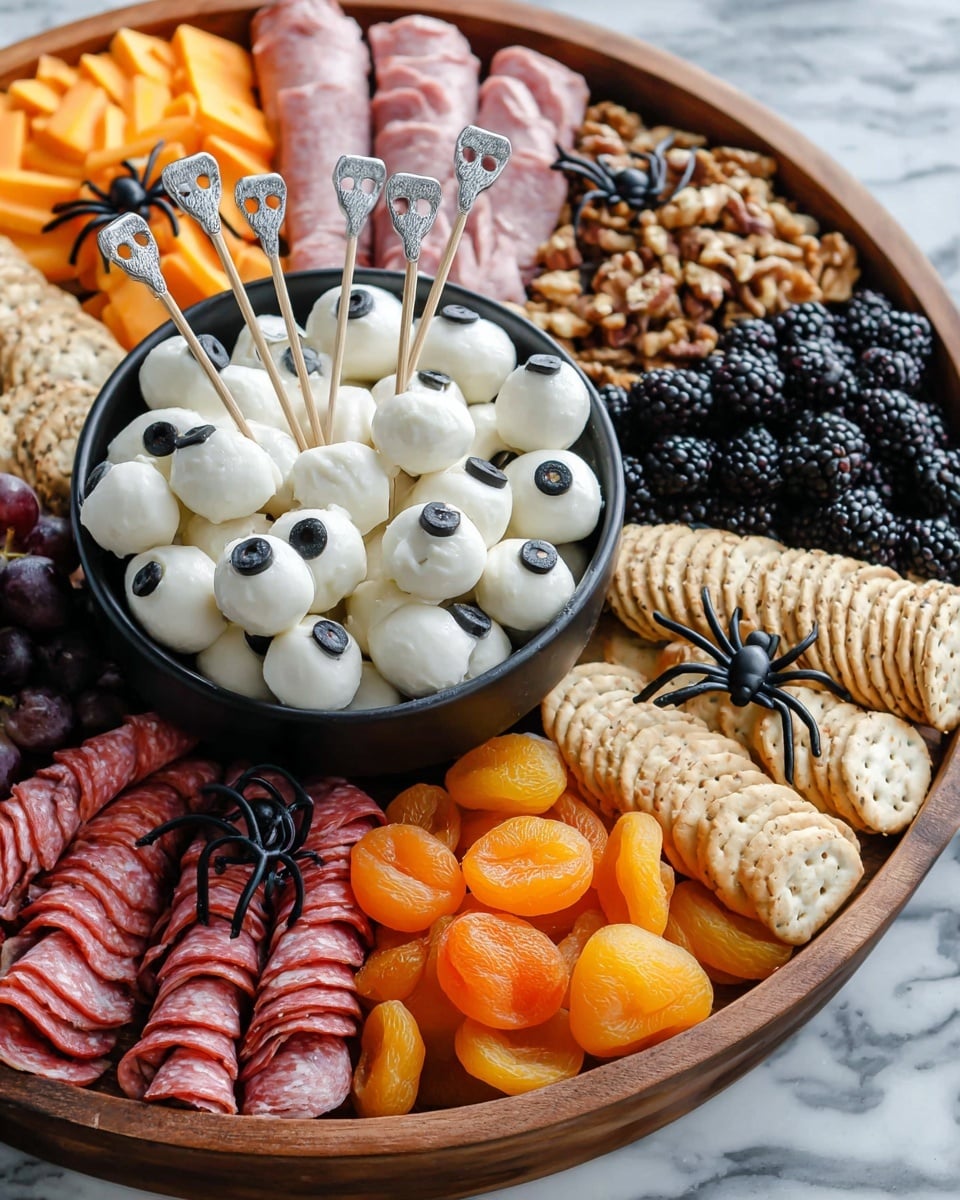
- Eye-Catching & Spooky: With creative touches like mozzarella “eyeballs” and plastic spiders, it brings the perfect Halloween vibe without being over the top.
- Balanced Flavors & Textures: Creamy cheeses, savory meats, fresh fruit, crunchy nuts, and sweet treats create a board that pleases every palate.
- Highly Customizable: Use this recipe as a template and swap in your favorite treats to make it uniquely yours.

Ingredients You’ll Need
This Halloween Charcuterie Board Recipe shines because of the fun mix of cheeses, meats, fruits, nuts, and little surprises that come together so well. When you shop, look for fresh, colorful produce and good-quality cheeses to elevate the whole spread.
- Sharp Cheddar Cheese: Adds a punchy, tangy flavor—perfect balance for the creamier cheeses on the board.
- Brie Cheese Round: Creamy and mild, the perfect gooey contrast to sharper flavors.
- Jalapeño Pepper Jack Cheese: Has a little kick, which I love for adding some unexpected warmth without overwhelming.
- Fresh Mozzarella Balls (Ciliegine): These are a fun mini cheese pop, especially when decorated as spooky eyeballs.
- Prosciutto: Thinly sliced, salty, and buttery, prosciutto is always a crowd-pleaser.
- Genoa Salami: Adds a savory, slightly spicy twist that pairs beautifully with the cheese.
- Blackberries: Deep, juicy bursts of sweetness that also contribute spooky dark hues.
- Green Grapes: Refreshing and crisp, they cleanse the palate.
- Green Apple Slices: Tart and crunchy, perfect for a fresh contrast.
- Dried Apricots: Chewy and sweet, they’re a great texture play.
- Everything Bagel Seasoned Crackers: Flavor-packed and crunchy, they make a perfect vessel.
- Fig and Olive Crisps: Fancy little crackers that elevate the board’s flavor profile.
- Walnuts: For that earthy crunch and a bit of natural bitterness.
- Pimento Stuffed Green Olives: Salty and tangy pops of flavor that feel so festive.
- Chocolate Covered Peanuts: Sweet, salty, and crunchy — a delightful surprise.
- Decorations like Plastic Spiders: Totally optional, but they bring the festive Halloween fun.
Variations
One of the reasons I keep coming back to this Halloween Charcuterie Board Recipe is how easy it is to personalize. Whether you have picky eaters or want to keep it vegan, these tweaks make it your own.
- Go Dairy-Free: I swapped out some cheeses for vegan alternatives once, and the board was still a hit—just add extra olives and nuts to fill the space!
- Kid-Friendly Option: Skip the spicy jalapeño pepper jack and opt for mild cheeses, and include fun Halloween-shaped cookie cutters to make apple slices more festive.
- Sweet Tooth Boost: Try adding mini pumpkin-spiced cookies or candy corn clusters for more Halloween flair and sweetness.
- Seasonal Twist: Swap green grapes for blood oranges or pomegranate seeds in winter for a colorful twist.
How to Make Halloween Charcuterie Board Recipe
Step 1: Lay the Foundation
I start by placing larger items like any bowls (if you’re using one for olives or nuts) and fun décor pieces such as a skeleton or creepy figurines. This anchors the board visually and gives structure to build around. Then, arrange your cheeses spaced out so each gets its own spotlight—this helps you see exactly what you have and make a balanced board.
Step 2: Add Meats and Fruits
Next, tuck in the prosciutto and Genoa salami around and between those cheeses. Fold the meats for volume—it makes the board look abundant without overfilling. Then add the fresh fruits like blackberries, grapes, and green apple slices. The colors and shapes create that festive vibe, and the contrast in flavor keeps everyone coming back for more.
Step 3: Fill the Gaps with Crackers, Nuts and Treats
Fill all the empty spaces with crunchy crackers, walnuts, dried apricots, pimento olives, and chocolate covered peanuts. I discovered that mixing different cracker shapes and flavors makes the board more interesting and approachable. Finally, sprinkle on your spooky plastic spiders or any other Halloween-themed decorations to amp up the fun. And now, you’re ready to enjoy — or impress your guests!
Pro Tips for Making Halloween Charcuterie Board Recipe
- Room Temperature Cheeses: Let your cheeses sit out 30 minutes before assembling—it really amps up their flavor and creamy texture.
- Scale the Board to Your Crowd: Adjust quantities based on the number of guests. I usually plan about 2-3 ounces of cheese and meat per person.
- Mix up the Textures: Combining soft, hard, crunchy, and chewy keeps everyone interested bite after bite.
- Avoid Overcrowding: Give each item some breathing room on the board; it looks prettier and makes it easier to grab.
How to Serve Halloween Charcuterie Board Recipe
Garnishes
I like to add the mozzarella balls decorated as spooky eyeballs—it’s such a simple trick that delights kids and adults alike. Fresh herbs like rosemary sprigs or sage leaves also add a subtle aroma and a pop of green that balances the spooky theme. And don’t skip those plastic spiders or themed picks; they’re a fun conversation starter.
Side Dishes
This board pairs beautifully with a fresh green salad to lighten things up, or some warm pumpkin soup to keep with the seasonal theme. I’ve also served it alongside a big batch of mulled cider and everyone loved the combo—warm drinks and cool bites complement each other perfectly.
Creative Ways to Present
For a memorable Halloween spread, I like to use a rustic wooden board or slate platter—it adds a bit of an earthy, creepy vibe. Embedding the board with battery-operated fairy lights or candle tea lights around the edges really elevates the spooky atmosphere during evening parties. You could even carve little pumpkin bowls to hold nuts or olives right on the board for an extra festive touch.
Make Ahead and Storage
Storing Leftovers
I wrap leftover cheeses tightly in parchment paper and store them in an airtight container in the fridge to keep flavors fresh. Meats should be tightly sealed as well. Fruits and nuts can be stored separately to avoid sogginess. If you do it right, leftovers last up to 3 days without losing much quality.
Freezing
I don’t recommend freezing this whole board since fresh fruits and crackers won’t freeze well. However, any leftover meats or cheeses can be individually wrapped and frozen for up to a month. Just thaw them slowly in the fridge to preserve texture and flavor.
Reheating
Since the board is mostly served cold or at room temperature, reheating doesn’t come into play much. But if you have warm dips or sides paired with it, gently reheat them in the microwave or on the stove to prevent drying out.
FAQs
-
Can I prepare the Halloween Charcuterie Board Recipe in advance?
Absolutely! You can cut and prep most ingredients a day ahead—slice cheeses, portion meats, and wash fruits—then assemble the board a couple of hours before your event. This keeps everything fresh and ready to enjoy.
-
What are some kid-friendly options for this Halloween charcuterie board?
For kids, swap spicy or strong-flavored cheeses for milder ones like mild cheddar or mozzarella. Add fun-shaped fruit like apple slices cut with cookie cutters, and include sweet treats like chocolate cover peanuts or mini cookies to keep it exciting.
-
How do I decorate the mozzarella balls to look like eyeballs?
I like to gently press a small slice of black olive onto the mozzarella ball to create the “pupil,” and sometimes add a thin ring of green or red bell pepper around it to look like the iris. It’s simple but totally spooky!
-
Can I make this board vegan?
Definitely. Use vegan cheese alternatives, plant-based deli slices, and pile on fruits, nuts, and veggies. You can also include vegan crackers and some favorite dips like hummus to keep it tasty and inclusive.
Final Thoughts
I’ve made this Halloween Charcuterie Board Recipe more times than I can count, and every time it’s a hit at gatherings. It’s the perfect mix of spooky fun and sophisticated snacking, and honestly, I love how it brings everyone together to nibble, chat, and celebrate the season. Give it a try for your next Halloween bash—you’ll find it’s just as enjoyable to make as it is to eat!
Print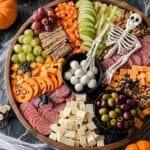
Halloween Charcuterie Board Recipe
- Prep Time: 15 minutes
- Cook Time: 0 minutes
- Total Time: 15 minutes
- Yield: Serves 6-8
- Category: Appetizer
- Method: No-Cook
- Cuisine: American
Description
Create a spooky and delicious Halloween Charcuterie Board perfect for parties, featuring a festive assortment of sharp cheddar, brie, jalapeño pepper jack, fresh mozzarella with decorative eyeballs, savory meats like prosciutto and genoa salami, fresh fruits, nuts, crackers, and sweet treats. This no-cook, easy-to-assemble board is both visually striking and a crowd-pleaser for all ages.
Ingredients
Cheeses
- 16 oz sharp cheddar cheese
- 8 oz creamy brie cheese round
- 8 oz jalapeño pepper jack cheese
- 8 oz fresh mozzarella balls (ciliegine) with decorative eyeballs
Meats
- 4 oz prosciutto
- 4 oz genoa salami
Fruits
- Blackberries (1 cup)
- Green grapes (1 cup)
- Green apple slices (1 medium apple, sliced)
- Dried apricots (1/2 cup)
Crackers and Crisps
- Everything bagel seasoned crackers (1 package, approx. 6 oz)
- Fig and olive crisps (1 package, approx. 4 oz)
Nuts and Extras
- Walnuts (1/2 cup)
- Pimento stuffed green olives (1/2 cup)
- Chocolate covered peanuts (1/2 cup)
Decorations
- Plastic spiders and spooky Halloween-themed decorations for garnish
Instructions
- Arrange Bowls and Large Items: Begin by placing any bowls or containers on your serving board or platter, such as for nuts or olives. If using Halloween props like skeletons, position these now to anchor the theme.
- Add Cheeses: Place all cheeses on the board, spacing them out for balance. Arrange the sharp cheddar, creamy brie round, jalapeño pepper jack, and mozzarella balls with decorative eyeballs so they stand out and are easy to access.
- Place Meats and Fruits: Layer the prosciutto and genoa salami slices around the cheeses. Then tuck in fresh fruits including blackberries, green grapes, green apple slices, and dried apricots in various spots to add color and texture.
- Fill Gaps with Crackers, Nuts, and Sweets: Fill all remaining spaces with everything bagel seasoned crackers, fig and olive crisps, walnuts, and chocolate covered peanuts to create a full, abundant look.
- Finish with Decorations: Top the board with plastic spiders and other spooky Halloween-themed decorations to complete the festive appearance.
- Serve and Enjoy: Your Halloween Charcuterie Board is now ready to impress guests and delight partygoers. Serve immediately and enjoy the delicious variety!
Notes
- Use a variety of textures and colors to make the board visually appealing and inviting.
- Freshen sliced apples by tossing in lemon juice to prevent browning if not serving immediately.
- Incorporate fun thematic touches like spooky plastic spiders to enhance the Halloween vibe.
- This recipe requires no cooking, making it quick and easy to prepare for any gathering.
- Feel free to customize the cheese, meat, and fruit selection based on personal preference or dietary needs.
Nutrition
- Serving Size: 1/8 of board
- Calories: 320
- Sugar: 7g
- Sodium: 520mg
- Fat: 22g
- Saturated Fat: 9g
- Unsaturated Fat: 11g
- Trans Fat: 0g
- Carbohydrates: 16g
- Fiber: 3g
- Protein: 12g
- Cholesterol: 40mg


