
If you’re looking for a festive treat that’s as fun to make as it is to eat, you’re going to adore this Mummy Oreo Balls Recipe. I absolutely love how these spooky little sweets come together — with just a few simple ingredients, you get a creamy, crunchy, and utterly addictive dessert that’s perfect for Halloween parties or anytime you want to impress your guests without fuss.
Why You’ll Love This Recipe
- Super Simple Ingredients: You won’t have to hunt down weird stuff — just Oreos, cream cheese, candy melts, and candy eyes.
- No-Bake Convenience: Perfect for when you want something quick but special — no oven required!
- A Crowd-Pleaser: My family goes crazy for these — they’re creamy inside and crisp outside, with a fun Halloween look.
- Kid-Friendly Fun: Little helpers will love shaping and decorating their own mummies with you.

Ingredients You’ll Need
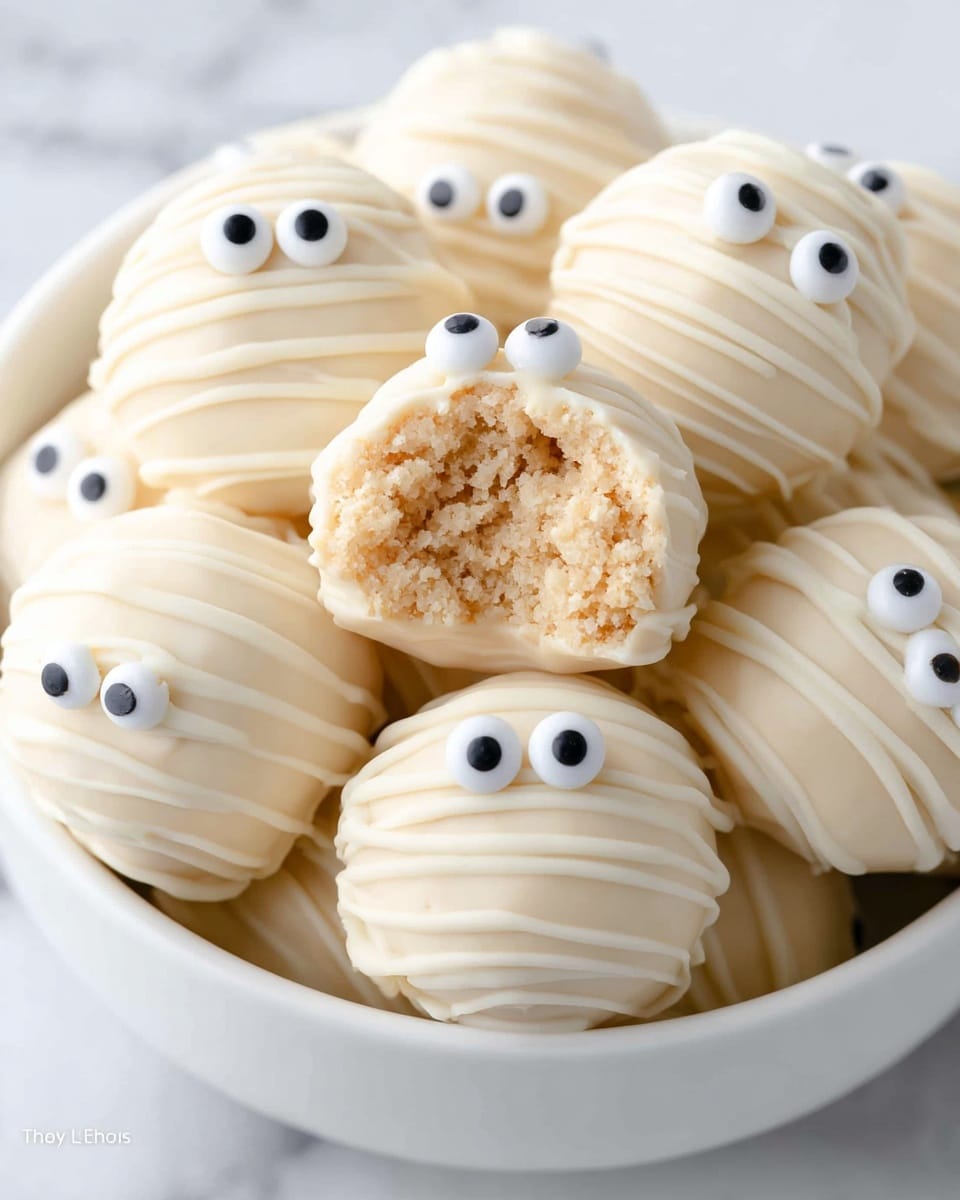
Every ingredient here plays a special role to create that perfect mummy look and taste. The cream cheese binds the crushed Oreos into a luscious filling, while the candy melts form that smooth, shiny, spooky outer coating that kids and adults both adore.
- Golden Oreos: These give a lighter color that makes the mummy “bandages” stand out better than classic chocolate Oreos.
- Cream Cheese: Softened room temperature cream cheese blends easily — this keeps the filling rich and creamy.
- Vanilla Candy Melts: Their smooth melt and sweet vanilla flavor create that beautiful, ghostly white shell for your mummies.
- Candy Eyes: The cutest finishing touch — these eyes bring the whole mummy to life! You can usually find these in the baking aisle or specialty stores.
Variations
I love to experiment with this Mummy Oreo Balls Recipe depending on the season or who I’m sharing with. Feel free to personalize it! The basic framework is so flexible, making it easy to get creative in your kitchen.
- Chocolate Oreos Instead: If you want a darker mummy look or just prefer the classic flavor, swap in classic Oreos — just know the white melted chocolate will contrast beautifully!
- Flavored Candy Melts: I once used orange candy melts for a pumpkin twist — it was a big hit at my Halloween party!
- Nut-Free Option: This recipe is naturally nut-free, making it a safe, crowd-friendly treat for school parties.
- Mini Candy Eyes or Sprinkles: For a fun twist, add tiny candy eyes or colorful sprinkles for extra personality and texture.
How to Make Mummy Oreo Balls Recipe
Step 1: Crush Your Golden Oreos to Perfection
Start by pulsing the Golden Oreos in your food processor until they’re a fine crumb. This part is crucial — if your crumbs are too big, your balls won’t hold together as well. If you don’t have a food processor, no worries! Pop the Oreos in a sealed bag and crush them with a rolling pin gently until fine.
Step 2: Mix Crumbs and Cream Cheese
Pour those cookie crumbs into a large mixing bowl and add your softened cream cheese. Stir it all until it becomes one smooth, creamy dough. When I first made this, I learned that letting the cream cheese get fully softened at room temp makes this step so much easier — no lumps to break up!
Step 3: Shape Your Mummies
Using a cookie scoop or tablespoon, form your mixture into 1-inch balls. Roll them gently between your palms for a smooth finish. Place each ball onto parchment paper on a baking sheet and pop them in the freezer for about 30 minutes — this chilling step is key to making sure they stay firm while you dip them later.
Step 4: Dip and Decorate Like a Pro
Melt your vanilla candy melts according to package directions until smooth. Then, using a fork (tines facing down so you don’t poke the oreo ball), dip each ball and swirl it to coat completely. Tap off the excess chocolate and return them to the parchment paper. I always pour leftover chocolate into a small plastic bag, snip a tiny hole, and drizzle thin “bandages” over the tops before adding candy eyes. If the chocolate hardens mid-process, warming it slightly brings it back to perfect drizzling consistency.
Step 5: Chill and Set
Finish by placing your decorated mummies in the fridge for about 15-20 minutes to let the chocolate fully harden. Once set, these cuties are ready to be served — but I warn you, they disappear fast!
Pro Tips for Making Mummy Oreo Balls Recipe
- Freeze for Firmness: If your mixture feels too soft, toss the bowl in the fridge for 15 minutes before shaping.
- Avoid Over-Dipping: Hold your Oreo balls on the fork very gently — tapping off excess chocolate quickly keeps your coating thin and neat.
- Candy Eyes Adhesion: If eyes don’t stick well, a tiny dab of melted chocolate on the back is the perfect edible glue.
- Storage Savvy: Keep leftover balls chilled tightly covered to preserve freshness and prevent sogginess.
How to Serve Mummy Oreo Balls Recipe
Garnishes
I like to keep it simple and let the mummies shine, but sometimes I sprinkle a little edible glitter or a dusting of cocoa powder around the platter for an extra spooky vibe. A few plastic spiders or Halloween-themed cupcake picks nearby always add a fun festive touch as well.
Side Dishes
These mummy Oreo balls are sweet little bites, so I usually pair them with light, refreshing drinks like sparkling apple cider or a simple fruit punch. They also go surprisingly well beside salty popcorn or cheese crisps if you want a sweet-and-savory combo on your dessert table.
Creative Ways to Present
One Halloween, I arranged these little guys standing upright on a decorated cake stand surrounded by faux cobwebs and mini pumpkins — it was a showstopper! You can also use clear treat bags tied with orange and black ribbons to give out as party favors. That little extra flair turns a simple snack into a memorable treat.
Make Ahead and Storage
Storing Leftovers
After making these, I store leftover mummy Oreo balls in an airtight container in the fridge. Because of the cream cheese, they keep best chilled and taste fresh for up to a week. Just pull them out about 15 minutes before serving so they soften slightly for perfect creamy bites.
Freezing
I’ve successfully frozen these treats by placing them on a tray first to harden, then transferring into a freezer-safe bag. When you’re ready for a sweet surprise, thaw them overnight in the fridge and dip into melted chocolate fresh if you want the best texture.
Reheating
No reheating needed here — these are meant to be enjoyed cold or at room temperature. Just let refrigerated mummy Oreo balls sit out for a little bit before serving if you want to soften that cream cheese center.
FAQs
-
Can I use regular Oreos instead of Golden Oreos for this recipe?
Absolutely! Using regular Oreos will give the mummy balls a darker, more traditional chocolatey look, which contrasts nicely with the white candy melts. However, Golden Oreos tend to highlight the “mummy bandage” effect better because of their lighter color.
-
Do I need a food processor to make mummy Oreo balls?
Nope! A food processor makes crushing Oreos faster and finer, but you can easily crush the cookies by placing them in a sealable bag and smashing gently with a rolling pin or heavy pan until they’re finely ground.
-
How do I keep candy eyes from falling off?
I recommend putting a tiny dot of melted candy melts on the back of each candy eye to act like glue when placing them onto the chocolate. This helps secure them as the chocolate sets.
-
Can I make these ahead for a party?
Yes! These are great make-ahead treats. Just store them in an airtight container in the fridge and take them out shortly before serving. They also freeze well if you want to prepare even earlier.
Final Thoughts
Making these mummy Oreo balls has become one of my favorite Halloween traditions. They’re a delicious mix of creamy, crunchy, and crunchy once again thanks to that chocolate shell, and the fun design always brings smiles to the kids’ faces. I’m so glad to share this recipe with you because it really delivers on both flavor and festive fun. Trust me, once you try the Mummy Oreo Balls Recipe, you’ll want to make them every Halloween — and maybe even sneak a batch now and then for a sweet treat anytime!
Print
Mummy Oreo Balls Recipe
- Prep Time: 20 minutes
- Cook Time: 0 minutes
- Total Time: 50 minutes
- Yield: 14 Oreo balls
- Category: Dessert
- Method: No-Cook
- Cuisine: American
Description
These Mummy Oreo Balls are a spooky and delicious Halloween treat made with just 4 simple ingredients. Featuring a creamy cream cheese and Oreo cookie center coated in a hard vanilla candy shell, these no-bake dessert balls are easy to make and perfect for festive celebrations. Fun to assemble and decorate, they’re great for including kids in the kitchen.
Ingredients
Main Ingredients
- 20 Golden Oreos
- 4 ounces cream cheese, softened to room temperature
- 10 ounces vanilla candy melts or dipping wafers
- 1 package candy eyes
Instructions
- Prepare the workspace: Line a large baking sheet with parchment paper and set it aside to use for placing the finished Oreo balls.
- Crush the Oreos: Pulse the Golden Oreos in a food processor until they become fine crumbs. This ensures a smooth texture for the Oreo ball mixture.
- Mix with cream cheese: Transfer the Oreo crumbs to a large mixing bowl and add the softened cream cheese. Stir until fully combined and smooth, forming a dough-like consistency.
- Form the balls: Using a cookie scoop, portion the mixture into approximately 1-inch balls. Roll each between your palms until smooth and place them onto the prepared baking sheet. Freeze for 30 minutes to firm up.
- Melt the candy coating: Melt the vanilla candy melts according to package instructions, usually by microwaving in short intervals and stirring.
- Dip the balls in chocolate: Pour the melted candy melts into a small bowl. Using a fork, dip each chilled Oreo ball into the melted chocolate, coating it completely. Tap off any excess coating gently on the bowl edge, ensuring the truffle rests on top of the fork tines without being pierced.
- Decorate with candy eyes: Return the coated balls to the baking sheet. Transfer remaining melted chocolate into a small zip-top bag, cut a small hole in one corner, and drizzle chocolate over the balls to create the ‘mummy wrap’ effect. Place two candy eyes on each ball immediately, using a small dab of melted chocolate if needed to adhere the eyes.
- Set the coating: Place the decorated balls in the refrigerator for 15-20 minutes to allow the chocolate coating to harden completely.
- Serve and enjoy: Remove from fridge and serve these adorable and tasty mummy Oreo balls as a fun Halloween treat.
Notes
- This recipe is a no-bake dessert, making it simple and perfect for kids to participate in assembling and decorating.
- You can substitute the Golden Oreos with regular Oreos if preferred for a darker look.
- Make sure the cream cheese is softened to room temperature to mix smoothly with the crushed cookies.
- If the candy melts harden too quickly during decorating, gently reheat in short bursts to keep them smooth.
- Store leftover Oreo balls in an airtight container in the refrigerator for up to 3-4 days.
Nutrition
- Serving Size: 1 Oreo ball
- Calories: 111 kcal
- Sugar: 7 g
- Sodium: 86 mg
- Fat: 6 g
- Saturated Fat: 2 g
- Unsaturated Fat: 3 g
- Trans Fat: 0 g
- Carbohydrates: 13 g
- Fiber: 1 g
- Protein: 1 g
- Cholesterol: 9 mg


