
If you’re on the hunt for a fun, festive dessert that really steals the Halloween show, you’ve got to try this Jack-O-Lantern Cake Recipe. I absolutely love how this cake not only tastes delicious but also sports that adorable pumpkin face that’ll wow your family and friends—especially the little ones. When I first tried this recipe, I was amazed at how the design held up perfectly, making it as much a conversation piece as a treat. Trust me, once you see how easy it is to pull off, you’ll want to make it every fall!
Why You’ll Love This Recipe
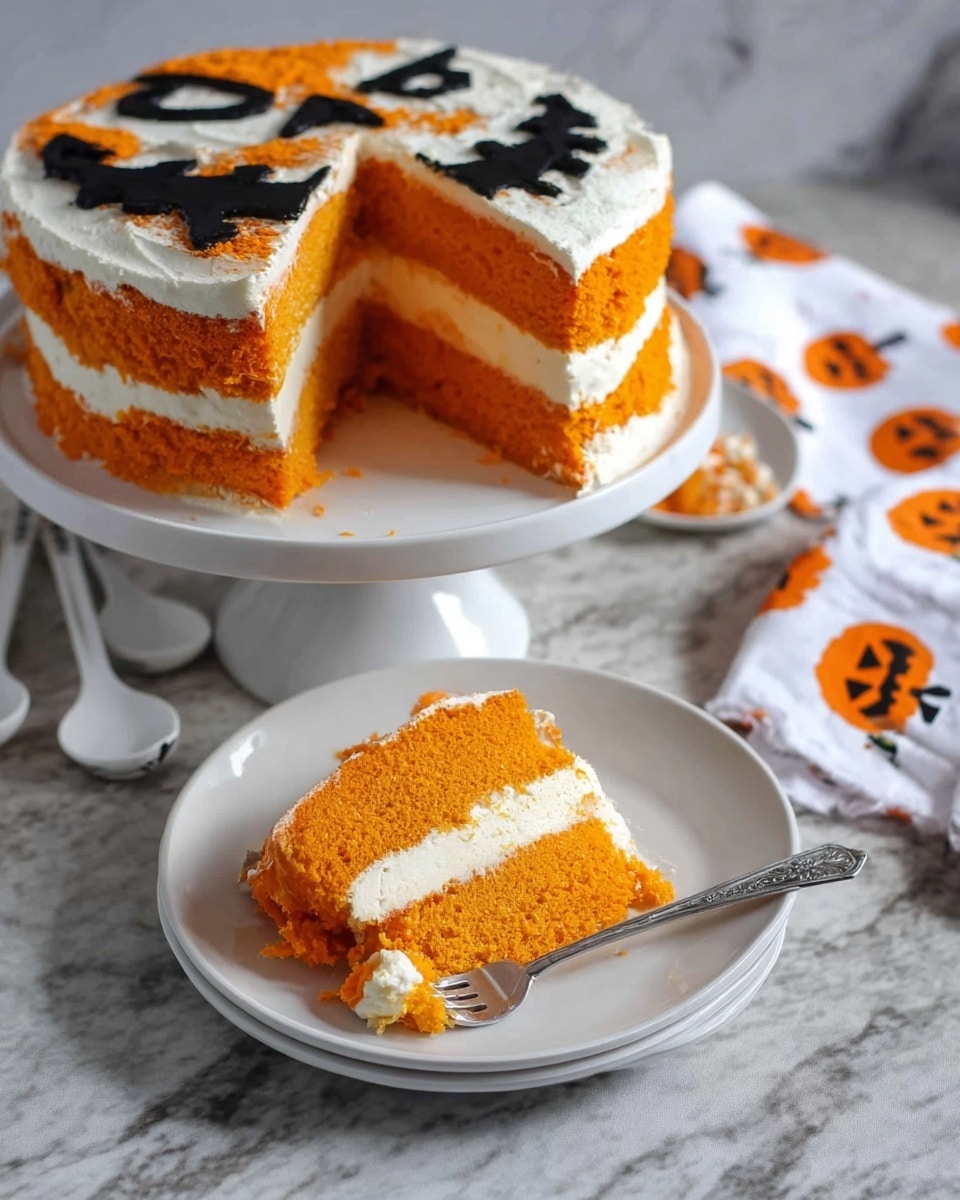
- Festive and Fun: It’s a beautifully designed Jack-O-Lantern that’s perfect for Halloween celebrations.
- Light and Fluffy Texture: This cake is tender and airy thanks to the whipped egg whites folded in.
- Make-Ahead Friendly: You can prep it in advance and it holds up well when chilled properly.
- Whipped Cream Filling: The creamy filling complements the pumpkin flavor perfectly without being too heavy.

Ingredients You’ll Need
The great thing about this Jack-O-Lantern Cake Recipe is that it uses simple pantry staples with a few kitchen staples that you probably already have. The combination of egg yolks and whipped egg whites creates a delicately fluffy cake that’s a joy to bake and eat. For the luscious whipped cream filling, opting for heavy cream makes all the difference in richness.
- Egg yolks: These give the cake richness and structure—don’t toss those whites, we’ll need them!
- Sugar: Used in both the batter and whipped cream; makes a perfect sweet balance.
- Vegetable oil: Keeps the cake moist without weighing it down.
- Whole milk: Adds tenderness to the batter.
- Vanilla extract: Enhances flavor—don’t skip it!
- All-purpose flour: The base for a tender crumb.
- Cornstarch: A trick I learned to lighten the flour’s density and make the cake soft.
- Egg whites: Whipped for volume—stiff peaks are essential here.
- Vinegar: Helps stabilize the egg whites, ensuring they whip to perfection.
- Heavy whipping cream: For that thick, creamy whipped topping.
- Confectioners sugar: Sweetens the whipped cream delicately.
- Dash of salt: Balances and boosts flavors.
Variations
I like to keep this Jack-O-Lantern Cake Recipe pretty classic, but one of the best things about baking is making it your own. Feel free to adjust the flavorings and the decoration to fit your style or dietary needs. I always encourage trying a version that makes this recipe uniquely yours!
- Chocolate variation: I once swapped out some of the flour for cocoa powder in both the batter and the black design; the pumpkin face really popped with a rich chocolate contrast.
- Dairy-free twist: Using coconut cream for the whipped topping works surprisingly well if you want to avoid dairy.
- Spiced-up pumpkin: Adding a teaspoon of pumpkin pie spice or cinnamon to the batter makes it feel even more autumnal and cozy.
- Gluten-free option: I’ve successfully replaced flour with a 1:1 gluten-free blend—just be gentle folding in the egg whites!
How to Make Jack-O-Lantern Cake Recipe
Step 1: Prepare Your Pan and Design
Start by preheating your oven to 375°F (190°C) and greasing an 8-inch round cake pan with cooking spray. Then line the pan with parchment paper cut to fit snugly. Here’s a fun part: draw or trace your Jack-O-Lantern face directly on the parchment paper, but on the side that will later face the cake. Don’t worry about being perfect—this adds charm! This design piping sets the stage for the whole cake, so take a little time here.
Step 2: Mix the Egg Yolks and Sugar
In a bowl, whisk together the egg yolks and sugar until smooth and slightly pale. This step creates the base that’s rich and sweet. I always take a moment here to feel the silky texture—it’s a good sign your cake is off to a great start! Reserve those egg whites; you’ll need them next.
Step 3: Add Liquids and Dry Ingredients
Next, whisk in the vegetable oil, milk, and vanilla extract to the yolk mixture until combined. Then sift in the flour and cornstarch and whisk again until the batter is smooth with no lumps. To get that classic pumpkin-orange color, add 2-3 drops of orange food gel. It’s not just for looks—this dash of color will make the Jack-O-Lantern face really pop once baked.
Step 4: Whip the Egg Whites to Stiff Peaks
Using a stand mixer fitted with a whisk attachment, beat the egg whites until frothy. Slowly add the vinegar and sugar while continuing to whip until you achieve stiff, glossy peaks. This step is crucial—without stiff peaks, the cake won’t have that light, airy texture I love. Check by lifting the whisk: the peaks should hold firmly without drooping.
Step 5: Fold in the Egg Whites Gently
Carefully fold the egg whites into the batter just until combined. Be gentle here—you want to keep as much air in the mixture as possible. Overfolding can deflate the egg whites, resulting in a thinner batter and a denser cake. I like to use a large spatula and cut through the middle, then gently scoop and turn from the sides.
Step 6: Prepare the Jack-O-Lantern Design
Remove about 1/4 cup of batter and tint it black using black food coloring. Spoon this black batter into a piping bag. Pipe the Jack-O-Lantern face onto the prepared pan following your traced design. To help the design hold, pop the pan into the freezer for 5-8 minutes before you pour the remaining orange batter over the top to cover the design. This little chill trick keeps your pumpkin’s face crisp and clear after baking.
Step 7: Bake Your Jack-O-Lantern Cake
Bake the cake for 8-9 minutes or until the edges start to turn a gentle golden brown. The cake will be soft but set. When done, flip it out of the pan and carefully peel off the parchment to reveal the sharp Jack-O-Lantern design. Use the rest of your batter to bake two more plain layers without a design. Let all the cakes cool completely before assembling.
Step 8: Whip the Cream Filling
In a chilled bowl, whisk the heavy cream with the confectioners sugar, vanilla, and a pinch of salt until stiff peaks form. This whipped cream is dreamy—not too sweet and perfectly fluffy, which balances the slightly denser sponge layers beautifully.
Step 9: Assemble Your Jack-O-Lantern Cake
Place one layer of plain cake on your serving plate, then pipe or spread a generous layer of whipped cream on top. Add the next plain cake layer, more cream, and finally top everything with your Jack-O-Lantern designed cake. Chill until ready to serve so the whipped cream sets a bit—your Jack-O-Lantern is now ready to impress!
Pro Tips for Making Jack-O-Lantern Cake Recipe
- Freezing the Design: I’ve found chilling the piped design in the freezer really keeps the black batter from bleeding into the orange layer.
- Egg White Peaks: Always check that your egg whites form stiff, shiny peaks for the lightest texture.
- Folding Technique: Be slow and smooth folding in the whites—you want to retain all that airiness.
- Timing Is Everything: Flip the cake out while still warm so the parchment comes off easily without tearing your Jack-O-Lantern face.
How to Serve Jack-O-Lantern Cake Recipe
Garnishes
I usually keep garnishes simple so the Jack-O-Lantern design stays the star. A sprinkle of cinnamon on top of the whipped cream or a few edible gold stars make a subtle festive touch. Sometimes, a handful of fresh cranberries or small mint leaves on the plate add a nice color pop without stealing the focus.
Side Dishes
This cake pairs beautifully with a warm cup of spiced apple cider or fresh pumpkin spice latte. For a Halloween party, I like to serve it alongside homemade caramel popcorn or a light pumpkin soup to keep the pumpkin theme going strong.
Creative Ways to Present
For extra fun, I’ve served this cake on a rustic wooden board surrounded by little plastic spiders or candy corn for an easy spooky vibe. Another time, I dusted cocoa powder through a Halloween stencil on the whipped cream layer for an added spooky pattern that matched the pumpkin face. Presentation really brings out the festive spirit, especially for kids.
Make Ahead and Storage
Storing Leftovers
I’ve found the best way to keep this cake fresh is to cover it tightly with plastic wrap or use a cake dome and store it in the fridge. It stays moist and the whipped cream doesn’t dry out. Ideally, consume within 2-3 days for best flavor and texture.
Freezing
You can freeze the individual cake layers before assembly by wrapping them tightly in plastic wrap and foil. Just thaw in the fridge overnight when you’re ready to assemble. I don’t recommend freezing the fully assembled cake because the whipped cream can get watery when thawed.
Reheating
This cake is best enjoyed chilled, so reheating isn’t necessary. If you prefer the cake a bit softer, let it sit at room temperature for 15-20 minutes before serving. Avoid microwaving as it melts the whipped cream and ruins the design.
FAQs
-
Can I make the Jack-O-Lantern face without food coloring?
You could, but the visual impact is best with food coloring. The orange and black contrast makes the pumpkin face clear and festive. Without it, the design might blend into the cake and lose its charm. If you’re avoiding artificial colors, look for natural food gels or powders labeled orange and black.
-
What if I don’t have a piping bag?
No worries! You can use a zip-top plastic bag with a tiny corner snipped off to pipe the Jack-O-Lantern design. It needs just a small nozzle to create the sharp edges of the face.
-
Can I use a different frosting instead of whipped cream?
Yes, though whipped cream provides a light, creamy balance. Buttercream or cream cheese frosting are options but will add more density and sweetness. If you try a substitution, adjust sugar amounts to keep the cake from getting too sweet.
-
How do I know when to stop folding the egg whites into the batter?
Fold until the egg whites are just evenly mixed into the batter. There should still be a light, airy texture. Once you see no more streaks of egg white, stop. Overmixing will deflate the batter and make the cake dense.
Final Thoughts
This Jack-O-Lantern Cake Recipe has become a seasonal favorite in my home because it combines fun, flavor, and a little bit of baking magic. It’s the perfect way to share a festive moment with family and friends, making those spooky October days a little sweeter and more memorable. If you decide to try it out, remember I’m rooting for you—you’ll love seeing that pumpkin face come to life and tasting every light, creamy bite. Happy baking!
Print
Jack-O-Lantern Cake Recipe
- Prep Time: 25 minutes
- Cook Time: 8 minutes per cake layer (approx. 24 minutes total)
- Total Time: 50 minutes
- Yield: 8-12 servings
- Category: Dessert
- Method: Baking
- Cuisine: American
Description
This Jack-O-Lantern Cake is a festive and fun Halloween dessert featuring a beautifully piped pumpkin face design on a light and fluffy sponge cake, layered with sweet whipped cream. Perfect for parties and celebrations, it combines a delicate orange-tinted cake with creamy vanilla frosting to create a visually impressive and delicious treat.
Ingredients
Cake Batter
- 6 egg yolks
- 4 Tbsp sugar
- 4 Tbsp vegetable oil
- 4 Tbsp whole milk
- 2 tsp vanilla extract
- 1 cup all purpose flour
- 2 Tbsp cornstarch
- 6 egg whites
- 1/2 tsp vinegar
- 4 Tbsp sugar
- 2-3 drops orange food gel
Whipped Cream Frosting
- 2 cups heavy whipping cream
- 5-6 Tbsp confectioners sugar
- dash salt
- 2 tsp vanilla extract
Instructions
- Prepare Pan and Draw Design: Preheat the oven to 375°F (190°C) and grease an 8″ circular pan with cooking spray. Line it with parchment paper and draw or trace a Jack-O-Lantern face onto the parchment paper, cutting it to fit the pan perfectly.
- Make Egg Yolk Mixture: Whisk together the egg yolks and 4 tablespoons of sugar until smooth. Set aside the egg whites for later use.
- Add Wet Ingredients: Incorporate the vegetable oil, whole milk, and vanilla extract into the egg yolk mixture, whisking until fully combined.
- Combine Dry Ingredients: Sift in the all-purpose flour and cornstarch into the wet ingredients, whisking until the batter is smooth. Add 2-3 drops of orange food gel to tint the batter.
- Whip Egg Whites: In a stand mixer bowl fitted with a whisk attachment, whisk the 6 egg whites until frothy. Slowly add vinegar and 4 tablespoons sugar while continuing to whip.
- Whip to Stiff Peaks: Continue whisking the egg whites until stiff peaks form, which is crucial to maintain lightness in the cake.
- Fold Egg Whites into Batter: Gently fold the whipped egg whites into the batter, mixing just until evenly combined to avoid deflating the mixture.
- Create Black Batter Design: Remove about 1/4 cup of the batter into a small bowl and dye it black. Transfer the black batter to a piping bag.
- Pipe Design and Freeze: Pipe the Jack-O-Lantern face onto the prepared pan lined with parchment paper. Place the pan in the freezer for 5-8 minutes to set the design.
- Cover and Bake Cake Layer: Pipe the orange batter over the frozen design, covering the entire pan. Bake for 8-9 minutes or until the edges are golden brown.
- Cool and Repeat Layers: Remove cake from the pan and carefully peel off the parchment paper. Use the remaining batter to bake two additional plain cake layers. Allow all layers to cool completely.
- Prepare Whipped Cream: Whisk the heavy whipping cream, confectioners sugar, salt, and vanilla extract in a stand mixer until stiff peaks form and the consistency resembles whipped cream.
- Assemble Cake: Place one plain cake layer on a serving plate, spread or pipe a layer of whipped cream on top, and add another plain cake layer. Repeat with whipped cream and place the Jack-O-Lantern designed cake on top.
- Chill and Serve: Keep the assembled cake refrigerated until serving for best texture and freshness. Enjoy your festive Jack-O-Lantern cake!
Notes
- The egg whites must reach stiff peaks to ensure the cake is light and airy; do not overmix when folding.
- Freezing the piped design before adding the orange batter prevents colors from blending and maintains the sharp face outline.
- Using parchment paper with your Jack-O-Lantern design helps achieve a perfect transfer without smudging.
- Make ahead tips: The cake can be made a day before, but wrap tightly in plastic wrap and refrigerate to maintain freshness.
- For vibrant color, use gel food coloring rather than liquid to avoid thinning the batter.
Nutrition
- Serving Size: 1 slice (1/12 of cake)
- Calories: 320
- Sugar: 25g
- Sodium: 85mg
- Fat: 18g
- Saturated Fat: 10g
- Unsaturated Fat: 7g
- Trans Fat: 0g
- Carbohydrates: 32g
- Fiber: 0.5g
- Protein: 5g
- Cholesterol: 110mg


