
If you’re looking to impress your guests with something fresh, fun, and downright addictive, then you’ve got to try How to Make a Butter Board Recipe. I absolutely love this because it’s simple to put together yet feels so fancy — perfect for those nights when you want great flavor without fussing in the kitchen. Once you discover my favorite toppings and tips, you’ll find that this butter board becomes your new go-to snack or party centerpiece.
Why You’ll Love This Recipe
- Effortless Elegance: It looks like you spent hours prepping, but it comes together in less than 15 minutes.
- Perfect Flavor Balance: Sweet, salty, spicy, and herbal all in one bite — every topping adds a little magic.
- Versatile for Any Occasion: Great for dinner parties, casual gatherings, or even just a special treat for yourself.
- Customizable to Your Taste: You can easily swap out toppings or add extra herbs to make it your own.

Ingredients You’ll Need
Choosing the right ingredients really takes this butter board from good to unforgettable. Softened butter is your creamy base, and each topping brings textures and flavours that play off each other perfectly. I like to shop for flaky sea salt and fresh herbs whenever possible — they make a noticeable difference.
- Unsalted butter: Make sure it’s softened to room temperature; this helps it spread beautifully without tearing your board or bread.
- Flaky sea salt: Adds crunch and bursts of saltiness — avoid regular table salt for this one.
- Garlic (whole head or raw cloves): Roasting the whole head mellows its flavor, but raw crushed garlic amps up the punch if you’re short on time.
- Olive oil: A drizzle keeps the garlic luscious and enhances the richness of the butter.
- Fig chutney (or chutney of your choice): Adds a sweet, slightly tangy element that balances the salt and spice.
- Prosciutto: I finely chop it to scatter evenly — the salty cured flavor really makes the board sing.
- Dukkah: This Middle Eastern nut and spice blend adds crunch and warmth; try to get a fresh jar or make your own if you can.
- Chilli oil: For a gentle kick of heat — drizzle sparingly unless you love it fiery!
- Fresh thyme leaves: Their subtle earthiness pairs perfectly with the butter’s richness.
- Fresh rosemary: Remove leaves from the stem and sprinkle generously for aromatic depth.
- Wooden board or serving platter: Big enough to spread and display your butter and toppings — it’s part of the charm!
Variations
The best part about learning how to make a butter board recipe is how flexible it is. I’ve tried so many swaps depending on the season and what’s in my pantry — don’t be afraid to make it yours.
- Herb Variations: I love swapping thyme and rosemary for fresh basil or oregano in the summer for a bright, fresh twist.
- Spice Level: If you want less heat, skip the chili oil and add a sprinkle of smoked paprika instead — smoky and mild.
- Dairy-Free Version: Try using a high-quality vegan butter substitute; just keep the toppings the same for flavor impact.
- Savory vs. Sweet: Feel free to experiment with jams or chutneys like apricot or pear instead of fig — each changes the vibe completely.
How to Make How to Make a Butter Board Recipe
Step 1: Roast or Prepare Your Garlic
When I first tried this, roasting the garlic was a game-changer. Preheat your oven to 220°C/430°F and cut your whole head of garlic in half horizontally — exposing those lovely cloves. Drizzle with olive oil, wrap it tightly in foil, and roast for about 40 minutes until it’s fragrant and soft enough to squeeze out. If you’re in a hurry, use two raw, crushed garlic cloves instead — the flavor is sharper but still delicious. Just be sure not to overwhelm the butter.
Step 2: Spread the Butter on Your Board
This is where your butter board really comes alive. Take your softened butter and, with a butter knife or the back of a spoon, spread it evenly over your board in a thick layer. Use the back of the spoon to create swirls and grooves — they help keep the toppings in place and make everything look extra inviting. Don’t skimp here; a generous layer is what makes each bite so rich and satisfying.
Step 3: Layer on Your Toppings
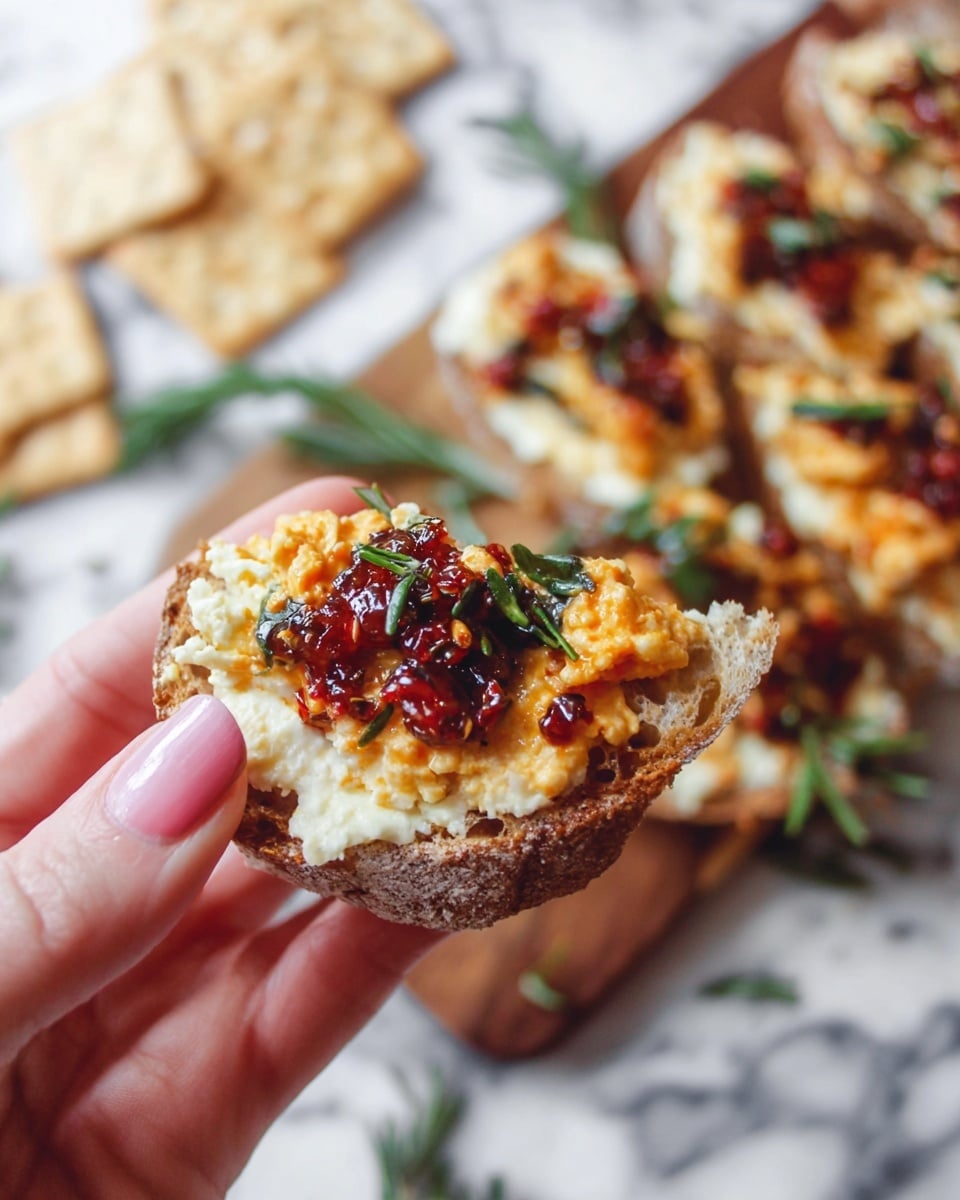
Sprinkle the flaky sea salt evenly all over the butter — this adds just the right pop of seasoning. Then, dollop the roasted garlic or crushed raw garlic across the surface. Next, add spoonfuls of fig chutney to bring a touch of sweetness and depth. Scatter the chopped prosciutto and dukkah for that irresistible crunch and umami punch. Drizzle the chili oil over to add a subtle heat, and finish by sprinkling the fresh thyme leaves and rosemary for herbaceous brightness. Try to distribute everything evenly so every bite hits all the right notes.
Step 4: Serve with Your Favorite Dippers
My family goes crazy for serving this butter board with thick slices of warm no-knead focaccia — its airy crumb soaks up all that buttery goodness. Crackers, sourdough crisps, pita chips, or fresh crudités all work beautifully too. Place the board in the center and watch everyone dig in. Trust me, this is a communal experience that makes entertaining easy and memorable.
Pro Tips for Making How to Make a Butter Board Recipe
- Butter Temperature Matters: Let your butter sit out until it’s soft enough to spread effortlessly — this really helps with creating those pretty swirls.
- Balance Your Toppings: I learned the hard way that too much chili oil can overpower the board; drizzle sparingly and taste as you go.
- Use Rustic Bread: Fresh, crusty bread is key for scooping up the butter and toppings without falling apart in your hand.
- Don’t Overcrowd the Board: Leave some space between toppings so people can enjoy individual flavors — it also looks more inviting!
How to Serve How to Make a Butter Board Recipe
Garnishes
I always stick with fresh thyme and rosemary because their fragrance cuts through the richness of the butter so nicely. Sometimes, I throw on a few edible flowers or microgreens for a pop of color when I’m entertaining — it adds a lovely visual touch that guests always comment on.
Side Dishes
This butter board pairs wonderfully with a crisp green salad or a simple platter of crisp veggies like cucumber and bell pepper. For a heartier spread, I like to add some olives and cured meats on the side — it turns the whole thing into a relaxed grazing feast.
Creative Ways to Present
For a dinner party, I’ve laid out mini butter boards on individual wooden paddles as place settings — it’s such a fun way to start the meal and makes every guest feel special. You can also serve it in shallow bowls for a rustic look, or even on slate slabs for a modern twist. Play around with textures and colors on your board to make it truly Instagram-worthy!
Make Ahead and Storage
Storing Leftovers
Butter boards are best enjoyed fresh, but if you have leftovers, cover any unused portion tightly with plastic wrap or transfer into an airtight container and store in the fridge for up to 2 days. I’ve noticed the toppings like prosciutto do best if you add them fresh right before serving to keep them crisp.
Freezing
I haven’t had great luck freezing a fully assembled butter board because the textures don’t hold up well. However, you can freeze plain softened butter and prepare your toppings fresh when you’re ready — just thaw the butter in the fridge overnight.
Reheating
This is best served at room temperature, so just take leftovers out of the fridge about 30 minutes before serving to soften naturally. Avoid microwave reheating as it can separate the butter and dull flavors.
FAQs
-
Can I use salted butter for this butter board recipe?
You can, but I recommend unsalted butter so you can control the saltiness yourself. Since the recipe includes flaky sea salt and salty toppings like prosciutto, using unsalted butter helps keep the flavors balanced and prevents the board from getting too salty.
-
What breads work best for serving with a butter board?
I love crusty, airy breads like a no-knead focaccia or sourdough boule. Their texture holds up well to the richness of the butter and toppings, making each bite perfect. Crackers or pita chips are also great if you prefer a crunchier option.
-
Can I prepare parts of the butter board ahead of time?
Absolutely! You can roast your garlic and soften the butter in advance. It’s best to assemble the board right before serving to keep the toppings fresh and visually appealing, especially delicate herbs and prosciutto.
-
What if I don’t like spicy food? Can I skip the chili oil?
Definitely! The chili oil adds a lovely kick, but it’s optional. You can simply omit it or substitute with a drizzle of honey or balsamic glaze if you want a little something extra without the heat.
Final Thoughts
Learning how to make a butter board recipe has truly changed the way I entertain — it’s quick, impressive, and endlessly customizable. Whether you’re whipping this up for a casual night or a full-on party, the combination of creamy butter and layered toppings never fails to wow. I hope you enjoy making this as much as I do because once you get the hang of it, you’ll find yourself reaching for it time and again. Trust me, your friends and family will thank you!
Print
How to Make a Butter Board Recipe
- Prep Time: 10 minutes
- Cook Time: 40 minutes (if roasting garlic), 0 minutes (if using raw garlic)
- Total Time: 50 minutes (with roasted garlic), 10 minutes (with raw garlic)
- Yield: 10 servings
- Category: Appetizer
- Method: Roasting
- Cuisine: American
Description
Discover how to make a delightful Butter Board, a creative and flavorful alternative to traditional cheese or charcuterie boards. This easy-to-assemble appetizer features softened unsalted butter spread with savory and sweet toppings including roasted or raw garlic, flaky sea salt, fig chutney, prosciutto, dukkah, chilli oil, and fresh herbs, served alongside fresh bread, crackers, or crudités for an irresistible party snack.
Ingredients
Butter Board Base
- 250g/2 sticks unsalted butter, softened to room temperature
- 3 teaspoons flaky sea salt
Garlic
- 1 whole head of garlic OR 2 raw garlic cloves, crushed
- 1 tablespoon olive oil
Toppings and Garnishes
- 1 tablespoon fig chutney (or chutney of your choice)
- 2 slices prosciutto, finely chopped
- 1 tablespoon dukkah
- 1 tablespoon chilli oil
- 2 tablespoons fresh thyme leaves
- 1 sprig of fresh rosemary, leaves removed from the stem
Serving
- Wooden board or serving platter
- Fresh bread (such as no knead focaccia), crackers (pita chips or sourdough crackers), or crudités
Instructions
- Roast the garlic (optional): Preheat the oven to 220C/430F. Cut the whole head of garlic in half and drizzle with 1 tablespoon of olive oil. Wrap it securely in aluminium foil and roast for 40 minutes until the cloves are soft. Allow to cool, then squeeze out the roasted cloves. Alternatively, use 2 raw garlic cloves crushed for a quicker method.
- Prepare the butter base: Spread the softened unsalted butter evenly onto your wooden board or serving platter. Use a spatula or knife to create grooves and swirls in the butter surface, giving texture and spaces for the toppings to sit nicely.
- Add seasoning and garlic: Sprinkle 3 teaspoons of flaky sea salt evenly over the butter. Dollop the roasted or raw crushed garlic over the butter, distributing it to cover the spread beautifully.
- Layer the toppings: Spoon the fig chutney onto the butter in small dollops. Scatter the finely chopped prosciutto evenly across the board. Follow with a generous sprinkle of dukkah, then drizzle the chilli oil over the entire arrangement for a spicy kick.
- Finish with fresh herbs: Sprinkle 2 tablespoons of fresh thyme leaves and the rosemary leaves evenly over the top to add fragrance, flavor, and visual appeal.
- Serve: Present your butter board alongside fresh bread such as no knead focaccia, assorted crackers like pita chips or sourdough crackers, or crisp crudités. Encourage guests to scoop and enjoy this sumptuous, savory treat.
Notes
- The butter board is a creative, budget-friendly alternative to cheese or charcuterie boards, perfect for entertaining and grazing.
- Roasted garlic offers a mellow, sweet flavor, while raw crushed garlic adds a sharper punch—choose based on your preference and time.
- Use any chutney of your choice to customize the sweetness and flavor profile.
- Serving suggestions include crusty fresh bread, pita chips, sourdough crackers, or crunchy fresh vegetables for dipping.
- Ensure the butter is softened to room temperature for easy spreading and a beautiful textured surface.
Nutrition
- Serving Size: 25g
- Calories: 90
- Sugar: 0.8g
- Sodium: 140mg
- Fat: 9g
- Saturated Fat: 5.5g
- Unsaturated Fat: 3g
- Trans Fat: 0g
- Carbohydrates: 1g
- Fiber: 0.2g
- Protein: 0.5g
- Cholesterol: 25mg


