
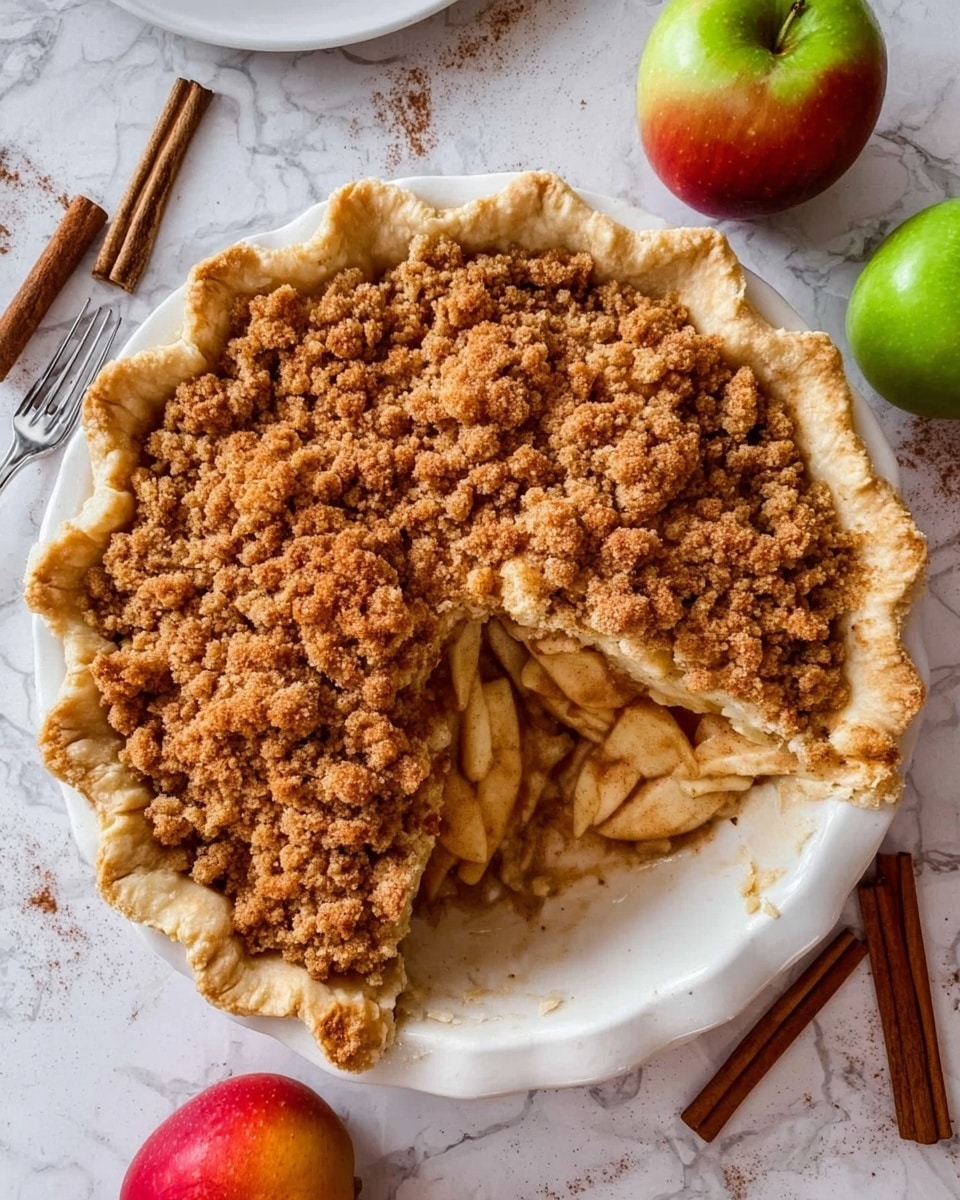
If you’ve ever dreamed of that perfect balance between tart apples and a golden, buttery crumble topping, this Dutch Apple Crumble Pie Recipe is honestly everything you want in a homemade pie. It’s got this luscious apple filling that’s tender but not mushy, wrapped in a flaky crust and topped with the most irresistible crumble. When I first made it, my whole family went crazy—I’m pretty sure it disappeared faster than I could slice it! Stick around, because I’ll walk you through every step so you get that flawless pie all your guests will rave about.
Why You’ll Love This Recipe
- Perfect Apple Texture: The apples get tender but still hold their shape, thanks to the careful simmering step.
- Buttery Crumble Topping: The streusel topping is crunchy and golden, adding that perfect contrast to the soft filling.
- Flaky Homemade Crust: Chilling the crust before baking ensures a buttery, crisp base every time.
- Balanced Sweet and Spicy Flavor: A blend of spices like cinnamon, nutmeg, and just a hint of cardamom brings depth without overpowering the apples.

Ingredients You’ll Need
This recipe shines because it uses fresh apples blended with aromatic spices and a crumble topping that’s seriously next-level. Pick a variety of apples for balanced flavor and texture—you’ll find the mix makes a huge difference.
- Pie crust: I use my homemade pie dough recipe for the best flaky crust, but store-bought can work if you’re short on time.
- Lemon zest and juice: Just a little brightness to keep the apples from browning and to add fresh flavor.
- Apples: A mix is best, like Granny Smith’s tartness balanced by Honeycrisp’s sweetness.
- Brown sugar and granulated sugar: Brown sugar adds richness and moisture, granulated sugar adds sweetness.
- All-purpose flour: Helps thicken the filling and the crumble topping.
- Spices (cinnamon, nutmeg, cardamom): These warm spices create that classic comforting apple pie taste.
- Kosher salt: Just a pinch to tie all the flavors together.
- Vanilla extract: Adds a lovely, homey aroma to the filling.
- Butter: Melted and mixed into the crumble for that irresistible crumbly texture.
Variations
I like to keep this pie pretty classic since it’s my family’s favorite, but you can totally play around to suit your taste buds or dietary needs. The crumble topping especially invites some creativity!
- Spice twists: Swap cardamom for ground ginger or cloves for a different cozy vibe—I once tried allspice and it gave it a festive holiday feel.
- Gluten-free crust: I’ve successfully made this with gluten-free pie dough and it still works beautifully.
- Nutty crumble: Add chopped pecans or walnuts into the crumble for an extra crunch and flavor.
- Lower sugar option: Reduce the sugar slightly if you like your pie less sweet; I tweak this when using sweeter apple varieties.
How to Make Dutch Apple Crumble Pie Recipe
Step 1: Choose and Prepare Your Apples
I always use about 5 pounds of apples—that’s roughly 11 large apples—and opt for a mix like Granny Smith, Honeycrisp, and Golden Delicious. Mixing varieties balances tartness and sweetness perfectly. Peel and thinly slice each apple right before adding it to the lemon juice in the skillet. This stops them from browning and keeps everything fresh. Trust me, peeling and slicing one apple at a time makes all the difference—your filling will look so much prettier!
Step 2: Cook the Filling to Perfection
Once all your apples are sliced and tossed with lemon juice and zest, add the sugars, flour, salt, and spices to the pan. Gently stir everything on medium heat with the lid on, but here’s my secret: don’t walk away! Stir every couple of minutes to prevent sticking and ensure even cooking. After about 20 minutes, your apples should be fork-tender but still hold their shape. Taste for your perfect “al dente” apple—everyone has their level of softness, so adjust as you go.
Step 3: Chill the Filling and Crust
Transfer the filling to a sheet pan and cool it completely—either pop it in the fridge or freezer for 30 minutes. Meanwhile, roll out your pie dough in a 9-inch pie dish and put it in the fridge or freezer too. This chilling step is key to that flaky, tender crust you and your family will love.
Step 4: Make the Divine Crumble Topping
Whisk the dry ingredients together, then stir in melted butter until the mix looks sandy with some chunks. The chunks are good—they become those wonderful crumbs after baking! Chill the crumble while you get ready to assemble everything.
Step 5: Assemble and Bake Your Dutch Apple Crumble Pie
Once the filling and crust are cold, scrape all the filling, including any caramel-y juices, into the crust. Top with about a cup or two of the crumble — just enough to cover the apples. Bake at 425°F for 15 minutes on a baking sheet preheated in the oven, then lower the heat to 350°F without removing your pie. After another 10 minutes, sprinkle the rest of the crumble over the top, shield the edges with foil to prevent burning, and bake for a final 25-35 minutes. Your pie will be bubbling and smelling like pure heaven!
Step 6: Patience is a Virtue—Cool Before Serving
I know waiting 4 hours feels like forever (I’m right there with you), but letting the pie cool completely is absolutely necessary. It stops the filling from being lava-hot and liquid-y, and keeps the crumble crisp instead of soggy. Trust me, slicing hot pie will wreck your pie’s texture and your patience will be rewarded with a perfect slice every time.
Pro Tips for Making Dutch Apple Crumble Pie Recipe
- Apple Prep Order: Peel and slice one apple fully before moving to the next to prevent browning and ensure even coating with lemon juice.
- Don’t Skip the Chilling: Cooling both the filling and crust before baking locks in that flaky crust and keeps the filling firm.
- Use a Hot Baking Surface: Placing the pie on a preheated baking sheet or stone helps the crust bake evenly and gets that perfect golden bottom.
- Protect the Crust Edges: Use a foil shield or make your own to guard the pie edges from burning during the longer bake time.
How to Serve Dutch Apple Crumble Pie Recipe
Garnishes
I’m a sucker for a generous scoop of vanilla ice cream melting on top—my husband even thinks serving it without ice cream is borderline criminal! Drizzle some warm caramel sauce if you want to kick it up a notch. A sprinkle of cinnamon or a dollop of whipped cream also pairs beautifully.
Side Dishes
Serve this pie with a simple cup of strong coffee or chai for an afternoon treat. For a cozy dinner, it pairs wonderfully with roast pork or turkey—it makes the meal feel extra special without any extra fuss.
Creative Ways to Present
For holiday gatherings, I’ve served this Dutch Apple Crumble Pie in mini ramekins topped with crumble for individual portions. It looks charming and makes plating easy. Also, try dusting with powdered sugar just before serving for a snowy, festive look.
Make Ahead and Storage
Storing Leftovers
I usually cover the pie loosely with plastic wrap and keep it on the countertop for up to 2 days. After that, I transfer it to the fridge to keep it fresh longer. The flavor actually improves a little as it rests overnight!
Freezing
Freeze the unbaked assembled pie wrapped tightly in plastic wrap and foil for up to 3 months. When ready, thaw overnight and bake as usual. I’ve also frozen leftover slices, wrapped individually, and reheated them with good results.
Reheating
Reheat leftover slices in a 350°F oven for 10-15 minutes to bring back the crisp topping and warm filling without making the crust soggy. The microwave works in a pinch, but you’ll lose that lovely crumble texture.
FAQs
-
What types of apples are best for this Dutch Apple Crumble Pie Recipe?
Using a mix of apples is ideal for both flavor and texture. Granny Smith apples give tartness and hold up well during cooking, while sweeter apples like Honeycrisp and Golden Delicious add natural sweetness and softness. This blend ensures your filling isn’t too mushy or too tart.
-
Can I use store-bought pie crust for this recipe?
Absolutely! While I recommend homemade pie crust for that extra flaky texture, store-bought dough works well too. Just make sure it’s thawed properly and chilled before assembling the pie to help with flakiness.
-
How do I prevent the crust edges from burning?
Use a pie crust shield or make a foil collar with a cut-out center to protect the edges during the longer bake time. Place it over the crust edges once the pie’s been partially baked and the temperature reduced. This keeps the edges golden but not burnt.
-
Can I make the Dutch Apple Crumble Pie Recipe ahead of time?
Yes! You can prepare the filling and crumble topping a day ahead and refrigerate separately. Assemble the pie right before baking for the freshest crust. You can also freeze the assembled unbaked pie for future baking.
-
Why do I need to let the pie cool for hours before slicing?
Cooling allows the apple juices to thicken and set, preventing the filling from running out and making the crumble soggy. It ensures each slice holds its shape and tastes just right.
Final Thoughts
I absolutely love how this Dutch Apple Crumble Pie Recipe comes together—it feels like the ultimate cozy dessert that everyone can enjoy. I remember the first time I made it for my family’s holiday, and how each bite just kept getting better with that buttery crumble and perfectly cooked apples. Whether you’re an experienced baker or giving pie a try for the first time, this recipe is super forgiving and results in a true crowd-pleaser. I promise, once you try it, you’ll be making this again and again—so go ahead, treat yourself and enjoy every crumb!
Print
Dutch Apple Crumble Pie Recipe
- Prep Time: 45 minutes
- Cook Time: 80 minutes
- Total Time: 340 minutes
- Yield: 10 servings
- Category: Dessert
- Method: Baking
- Cuisine: American
Description
This Dutch Apple Crumble Pie features a wonderfully flaky homemade pie crust filled with a rich and spiced apple filling, topped with a buttery golden crumble. Made with a blend of tart and sweet apples, lemon juice to brighten the flavors, and warm spices like cinnamon, nutmeg, and cardamom, this pie strikes a perfect balance of textures and flavors. The crumble topping adds a delightful contrast to the tender baked apples, making it an irresistible dessert perfect for any season.
Ingredients
Pie Crust
- 1 homemade single pie crust (1 sheet of pie dough)
Apple Filling
- 1/4 teaspoon lemon zest
- 2 tablespoons juice from half a lemon
- 5 pounds apples (Granny Smith, Honeycrisp, Golden Delicious mix)
- 1/2 cup packed brown sugar
- 1/2 cup granulated sugar
- 1/3 cup all-purpose flour
- 1/2 teaspoon kosher salt
- 1 1/2 teaspoons ground cinnamon
- 3/4 teaspoon ground nutmeg
- 1/2 teaspoon ground cardamom (optional)
- 1 teaspoon vanilla extract
Crumble Topping
- 1 1/2 cups all-purpose flour
- 1/3 cup granulated sugar
- 3/4 cup packed brown sugar
- 1/2 teaspoon kosher salt (use less if using table salt)
- 3/4 cup butter, melted (1 1/2 sticks)
Instructions
- Choose Apples: Select 5 pounds of apples, roughly 11 large, using a mix such as Granny Smith, Honeycrisp, and Golden Delicious for a balanced flavor.
- Prepare Filling Base: Zest 1/4 teaspoon lemon peel into a 12-inch high-sided skillet (heat off). Add juice from half a lemon (about 2 tablespoons) to prevent browning and brighten flavor.
- Peel and Slice Apples: Peel and slice apples into 1/8-inch pieces one at a time, adding each to the skillet with lemon juice and stirring occasionally to coat.
- Cook Apple Mixture: Place skillet over medium heat. Add brown sugar, granulated sugar, flour, kosher salt, cinnamon, nutmeg, and optional cardamom. Stir gently to moisten ingredients without breaking the apples. Cover and cook for 20 minutes, stirring every 3 minutes, until apples are fork tender but hold shape. Add tablespoon of water if sticking.
- Finish Filling: Remove from heat and stir in vanilla extract. Transfer filling, including juices, to a pan and cool completely in fridge or freezer (approx. 30 minutes in freezer).
- Prepare Pie Crust: Roll out pie dough and place in 9-inch pie dish. Fold edges under and crimp. Chill crust in fridge or freezer for about 30 minutes for flakiness.
- Preheat Oven: Place a baking sheet or pizza stone on center rack and preheat oven to 425°F (220°C) for 20-30 minutes until very hot.
- Make Crumble Topping: In a medium bowl, whisk together flour, granulated sugar, brown sugar, and kosher salt. Pour melted butter over dry ingredients and stir until a wet sandy mixture with clumps forms. Chill in fridge.
- Assemble Pie: Remove chilled apple filling and pie crust from freezer. Scrape apple filling into pie shell, spreading evenly to edges. Break crumble topping into pieces and sprinkle about 1-2 cups over apples. Keep remaining crumble chilled.
- Bake Initial Phase: Place pie on hot baking sheet in oven and bake at 425°F for 15 minutes to brown crust edges.
- Reduce Temperature and Continue Baking: Lower oven temperature to 350°F (175°C) without removing pie. Bake an additional 10 minutes at this temperature.
- Add Remaining Crumble and Shield Edges: Remove pie, sprinkle remaining crumble evenly over top, breaking up large clumps. Place foil shield or pie crust protector around edges, exposing center.
- Final Bake: Return pie to oven on baking sheet and bake at 350°F for 25-35 minutes until crust edges are brown and crumble topping is light golden. Remove foil shield and bake 5-10 more minutes if additional browning is desired.
- Cool Pie: Cool pie on wire rack for about 4 hours to allow filling to set and prevent soggy topping.
- Serve: Slice and serve at room temperature, optionally with vanilla ice cream or caramel sauce.
- Storage: Store covered at room temperature up to 2 days, then refrigerate. See notes for freezing instructions.
Notes
- This recipe yields a pie with the best apple flavor, combining a flaky crust, tender spiced apples, and crispy buttery crumble topping.
- Use a mixture of tart and sweet apples for depth of flavor and ideal texture.
- The filling is cooked on stovetop first so apples are perfectly tender and won’t soften further while baking.
- Cooling the filling and crust before baking ensures a crispy crust and prevents soggy bottom.
- Adjust crumble amount on top to your liking, but don’t overly pile it to maintain balance.
- Patience is key: letting the pie cool thoroughly is essential for best texture and flavor.
- Pie crust shield or foil prevents crust edges from burning during the long bake.
- For freezing: wrap cooled pie tightly with plastic wrap and foil; freeze up to 2 months. Thaw overnight in fridge before serving and optionally reheat.
Nutrition
- Serving Size: 1 slice
- Calories: 574 kcal
- Sugar: 67 g
- Sodium: 434 mg
- Fat: 19 g
- Saturated Fat: 10 g
- Unsaturated Fat: 7 g
- Trans Fat: 1 g
- Carbohydrates: 101 g
- Fiber: 7 g
- Protein: 4 g
- Cholesterol: 37 mg


