
I’m so excited to share this cozy, heartwarming Pumpkin Hazelnut White Chocolate Biscotti Recipe with you! It’s one of those treats that instantly feel like autumn in every bite—crispy, subtly sweet, and with that perfect balance of nutty, creamy, and pumpkin-spiced goodness. Whenever I make these biscotti, I’m reminded of chilly afternoons spent sipping coffee by the window, and honestly, they never fail to brighten up my day.
This Pumpkin Hazelnut White Chocolate Biscotti Recipe is fantastic because it’s versatile and stores beautifully, making it perfect for gifting, holiday mornings, or whenever you want a little something special alongside your favorite cup of tea or coffee. You’ll find that the pumpkin adds just the right hint of seasonal flavor without overpowering the smooth white chocolate chunks and crunchy hazelnuts, creating a biscotti you’ll crave all year long.
Why You’ll Love This Recipe
- Perfect Fall Flavor Mix: Pumpkin, hazelnuts, and white chocolate come together for a unique, autumn-inspired treat.
- Great for Gifting: These biscotti keep well and package beautifully for friends and family.
- Crisp Yet Tender Texture: Twice-baked biscotti ensure the ideal crunch without being too hard on your teeth.
- Simple Yet Impressive: You’ll impress guests with a bakery-quality treat made right in your kitchen.

Ingredients You’ll Need
These ingredients are easy to find and work harmoniously to create the perfect Pumpkin Hazelnut White Chocolate Biscotti Recipe. Keep an eye out for good quality canned pumpkin and fresh hazelnuts for the best flavor.
- All-purpose flour: The base for your biscotti, providing structure and crunch.
- Baking powder: Helps your biscotti rise slightly for a perfect texture.
- Salt: Balances sweetness and enhances flavors.
- Ground cinnamon: Adds warm spice that pairs beautifully with pumpkin.
- Ground nutmeg: Gives that classic pumpkin spice nuance.
- Unsalted butter: For richness and tender crumb; make sure it’s softened to room temperature.
- Sugar: Sweetens the dough and helps create a light, crispy texture.
- Eggs: Bind the dough and add moisture.
- Pure pumpkin puree: Not pumpkin pie filling! Adds moisture and that signature pumpkin flavor.
- Vanilla extract: Deepens flavor and complements the white chocolate.
- Chopped hazelnuts: Toast them for more crunch and flavor.
- White chocolate chips or chunks: Melts slightly when baking, creating creamy pockets of sweetness.
Variations
I love to tweak this Pumpkin Hazelnut White Chocolate Biscotti Recipe depending on the occasion or what I have on hand—you can easily personalize it and still get delicious results. Don’t hesitate to experiment a bit with nuts or add some extra spices to make it your own!
- Nut swap: I’ve swapped hazelnuts for pecans or walnuts, which gives a slightly different crunch and flavor, but still delicious.
- Spice it up: Adding a pinch of ground ginger or allspice really boosts warmth and complexity if you want a more pronounced seasonal vibe.
- Chocolate mix: Try mixing white and dark chocolate chips for a touch of bittersweet contrast.
- Gluten-free version: I experimented with a gluten-free flour blend and the texture came out slightly more crumbly but still tasty and enjoyable.
How to Make Pumpkin Hazelnut White Chocolate Biscotti Recipe
Step 1: Prepare Your Dry Ingredients and Toast Hazelnuts
Start by whisking together the flour, baking powder, salt, cinnamon, and nutmeg in a large bowl—this ensures even distribution of spices and leavening. Toast your chopped hazelnuts in a dry skillet over medium heat for about 5 minutes, stirring frequently until fragrant and slightly golden. Toasting really amps up their nuttiness, trust me, it makes a difference!
Step 2: Cream Butter and Sugar, Then Mix in Wet Ingredients
In a separate bowl, beat your softened butter and sugar until light and fluffy. This step gives your biscotti that tender texture. Then, beat in the eggs, one at a time, followed by the pumpkin puree and vanilla extract. You’ll want a smooth, combined mixture before adding the dry ingredients.
Step 3: Combine Wet and Dry Ingredients
Slowly add the dry mixture to the wet, stirring gently until just combined—don’t overmix or the biscotti might get tough. Fold in the toasted hazelnuts and white chocolate chips last; I like to save these for the end so they keep their shape and texture.
Step 4: Shape Dough into Logs and First Bake
Divide the dough in half and shape each portion into a rough log about 12 inches long and 2-3 inches wide on a lined baking sheet. Wetting your hands lightly helps prevent sticking. Bake at 350°F (175°C) for about 30-35 minutes until the logs are firm to the touch and lightly golden—this initial baking sets the shape.
Step 5: Slice and Bake Again for Perfect Crunch
Once cool enough to handle, slice each log diagonally into ½-inch thick pieces. Lay the slices cut side down back on the baking sheet, and bake for an additional 10-15 minutes per side, flipping halfway through. You’ll want them golden and crisp but not so hard you can’t bite through—this twice-baking is key to that classic biscotti crunch.
Pro Tips for Making Pumpkin Hazelnut White Chocolate Biscotti Recipe
- Toast Your Nuts: I always toast hazelnuts before adding them—it brings out a richer nuttiness that’s delicious.
- Don’t Overmix Dough: Overworking the dough can make biscotti tough, so mix just until combined.
- Slice While Warm: Slicing the logs when slightly warm but not hot prevents crumbling and makes cleaner cuts.
- Watch Baking Times Closely: Biscotti can go from perfectly crisp to rock hard quickly, so keep an eye during the second bake.
How to Serve Pumpkin Hazelnut White Chocolate Biscotti Recipe
Garnishes
I often like to sprinkle a little powdered sugar or a drizzle of melted white chocolate over the biscotti for a festive touch when serving. Sometimes a light dusting of cinnamon mixed with sugar adds an extra cozy appeal that guests love.
Side Dishes
This Pumpkin Hazelnut White Chocolate Biscotti pairs wonderfully with a warm latte, chai tea, or rich hot cocoa. It’s also great alongside a simple bowl of fresh fruit or a cheese platter when you want to mix sweet and savory.
Creative Ways to Present
For special occasions, I like bundling biscotti in pretty cellophane bags tied with twine or fall-themed ribbons—perfect for giving as gifts or party favors. Arranging them on a platter alongside some seasonal elements like mini pumpkins or cinnamon sticks always impresses my guests.
Make Ahead and Storage
Storing Leftovers
Once fully cooled, store your biscotti in an airtight container at room temperature—they’ll stay fresh and crunchy for up to two weeks. I usually keep mine in decorative tins, which also makes them easy to bring out for unexpected guests.
Freezing
I’ve found that biscotti freeze beautifully! Wrap them tightly in plastic wrap and place in a freezer bag or container. When you want some, just thaw at room temperature for a couple of hours, and they’ll taste just as fresh.
Reheating
If you want to revive any day-old biscotti’s crispness, pop them in a 300°F oven for about 5-7 minutes. This little trick breathes new life into them without drying them out.
FAQs
-
Can I use pumpkin pie filling instead of pumpkin puree in this Pumpkin Hazelnut White Chocolate Biscotti Recipe?
I recommend sticking with pure pumpkin puree rather than pumpkin pie filling because pie filling contains added sugars and spices, which could throw off the flavor and texture of the biscotti. Using pumpkin puree lets you control exactly how much sweetness and spice goes in.
-
How do I make sure my biscotti are crunchy but not too hard?
The key is the twice-baking technique. Bake the logs first until set, then slice and bake again until golden and crisp. Keep an eye during the second bake—the biscotti should be firm but still a bit tender in the center. Don’t overbake or they’ll become too hard.
-
Can I prepare the dough ahead of time?
Absolutely! You can prepare the dough and refrigerate it overnight before shaping and baking. Just bring it back to room temperature before shaping for easier handling. This is great for spreading out your baking process.
-
Is there a way to make these biscotti gluten-free?
Yes, try using a high-quality gluten-free all-purpose baking flour blend. The texture may be a bit more crumbly, but the flavors will still shine through beautifully.
Final Thoughts
This Pumpkin Hazelnut White Chocolate Biscotti Recipe is truly one of my favorites to bake when I want to feel a little festive and cozy in the kitchen. I hope you enjoy the process as much as the delicious results—it’s such a warm, satisfying treat that’s perfect for sharing or savoring solo with your morning coffee. Trust me, once you try this recipe, it’ll become your go-to biscotti for every autumn (and beyond)!
Print
Pumpkin Hazelnut White Chocolate Biscotti Recipe
- Prep Time: 15 minutes
- Cook Time: 45 minutes
- Total Time: 60 minutes
- Yield: 10 servings (about 3-1/2 quarts)
- Category: Soup
- Method: Stovetop
- Cuisine: American
Description
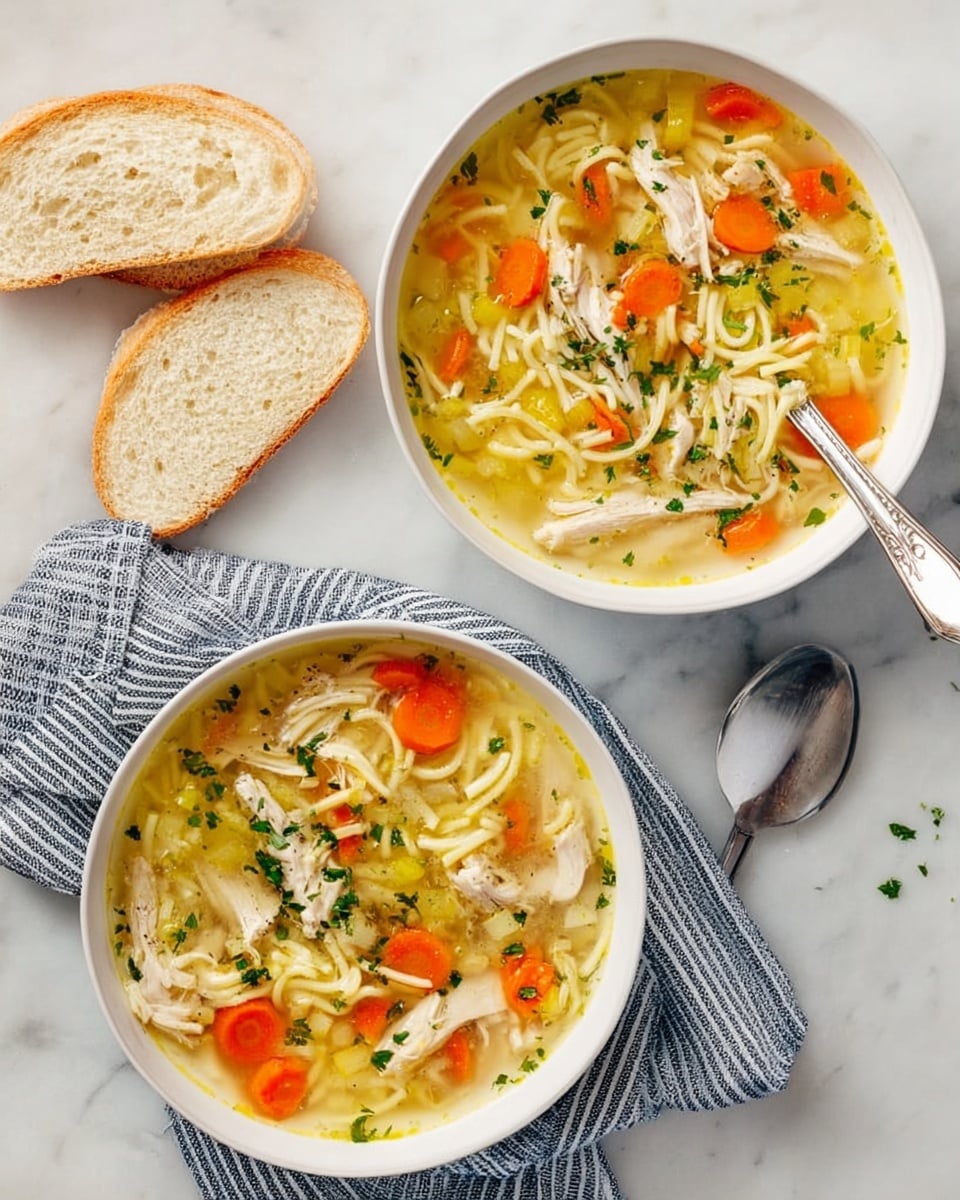
A classic homemade chicken noodle soup featuring tender bone-in chicken thighs, savory broth infused with fresh aromatics, and chewy egg noodles. Perfectly comforting and nutritious, this soup is ideal for cozy dinners or meal prepping.
Ingredients
Chicken and Seasoning
- 2-1/2 pounds bone-in chicken thighs
- 1/2 teaspoon salt
- 1/2 teaspoon pepper
- 1 tablespoon canola oil
Vegetables and Aromatics
- 1 large onion, chopped
- 1 garlic clove, minced
- 4 celery ribs, chopped
- 4 medium carrots, chopped
- 2 bay leaves
- 1 teaspoon minced fresh thyme or 1/4 teaspoon dried thyme
Broth and Noodles
- 10 cups chicken broth
- 3 cups uncooked kluski or other egg noodles (about 8 ounces)
Final Touches
- 1 tablespoon chopped fresh parsley
- 1 tablespoon lemon juice
- Optional: Additional salt and pepper to taste
Instructions
- Prepare and Brown Chicken: Pat the chicken dry with paper towels and season with salt and pepper. Heat canola oil in a 6-quart stockpot over medium-high heat. Add chicken in batches and cook until dark golden brown, about 3-4 minutes per batch. Remove chicken and set aside, discarding all but 2 tablespoons of drippings.
- Sauté Onion and Garlic: Add chopped onion to the reserved drippings and cook over medium-high heat until tender, about 4-5 minutes. Add minced garlic and cook for an additional minute, stirring.
- Add Broth and Deglaze: Pour in chicken broth and bring to a boil, scraping the bottom of the pot to loosen browned bits for extra flavor.
- Simmer Chicken with Vegetables: Return the browned chicken to the pot along with chopped celery, carrots, bay leaves, and thyme. Reduce heat to low, cover, and simmer until chicken is tender, approximately 25-30 minutes.
- Remove Chicken and Add Noodles: Transfer the chicken to a plate and remove the pot from heat. Add uncooked egg noodles to the soup and cover, letting them stand until tender, about 20-22 minutes. For best texture when storing leftovers, cook noodles separately and add before serving.
- Shred Chicken Meat: Once chicken is cool enough to handle, remove meat from bones and shred into bite-sized pieces. Discard bones.
- Finish Soup: Return shredded chicken to the pot, discard bay leaves, and stir in fresh parsley and lemon juice. Adjust seasoning with additional salt and pepper if desired. Serve warm.
Notes
- You don’t need a whole chicken to make homemade chicken noodle soup; bone-in thighs provide excellent flavor.
- For leftovers, cook noodles separately to prevent them from becoming mushy as they absorb broth.
- Save the chicken bones to make homemade chicken stock for future recipes.
Nutrition
- Serving Size: 1 cup
- Calories: 239
- Sugar: 3g
- Sodium: 1176mg
- Fat: 12g
- Saturated Fat: 3g
- Unsaturated Fat: 8g
- Trans Fat: 0g
- Carbohydrates: 14g
- Fiber: 2g
- Protein: 18g
- Cholesterol: 68mg


